How to Delete Table Row with Ajax, Sweetalert2 and PHP/MySQLi
Getting Started
First, we need the jQuery library, Bootstrap for a better design to our app and Sweet Alert. I've included these files in the downloadable of this tutorial but if you want, you can download them yourself using the links below:
Creating our Database
Next, we create the database that we are going to filter in this tutorial.
I've included a SQL file in the downloadable of this tutorial. All you have to do is import the said file. If you have no idea on how to import, please visit my tutorial How import .sql file to restore MySQL database.
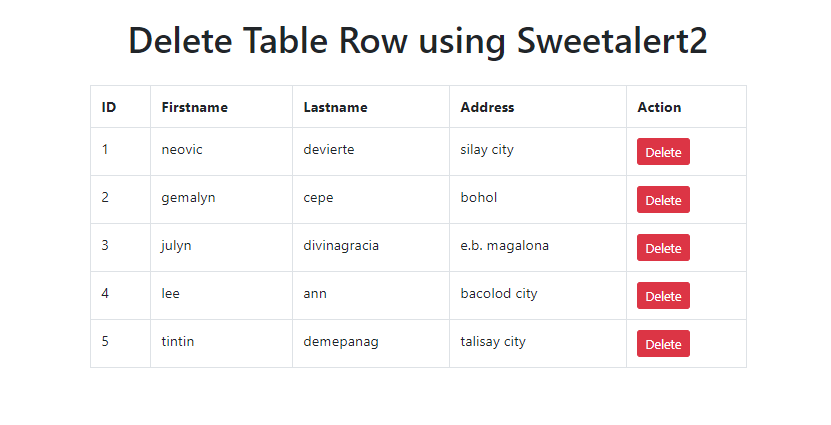
You should be able to create a database named mydatabase.
you can also run the code below in the SQL page in phpmyadmin
- (1, 'neovic', 'devierte', 'silay city'),
- (2, 'gemalyn', 'cepe', 'bohol'),
- (3, 'julyn', 'divinagracia', 'e.b. magalona'),
- (4, 'lee', 'ann', 'bacolod city'),
- (5, 'tintin', 'demepanag', 'talisay city');
Creating our Table
Next, we create our table where we show the data from our database. Create a new file, name it as index.html and paste the codes below.
- <!DOCTYPE html>
- <html>
- <head>
- <meta charset="utf-8">
- <link rel="stylesheet" type="text/css" href="asset/bootstrap/css/bootstrap.min.css">
- <link rel="stylesheet" type="text/css" href="asset/sweet_alert/sweetalert2.min.css">
- <style type="text/css">
- .mt20{
- margin-top:20px;
- }
- </style>
- </head>
- <body>
- <div class="container">
- <div class="row justify-content-center">
- <div class="col-sm-8">
- <table class="table table-bordered mt20">
- <thead>
- </thead>
- <tbody id="tbody">
- </tbody>
- </table>
- </div>
- </div>
- </div>
- </body>
- </html>
Creating our Ajax Scripts
Next, we the help of jQuery, we are going to create our ajax scripts. Create a new file inside our assets folder, name it as app.js and paste the codes below.
- $(document).ready(function(){
- fetch();
- $(document).on('click', '.delete_product', function(){
- var id = $(this).data('id');
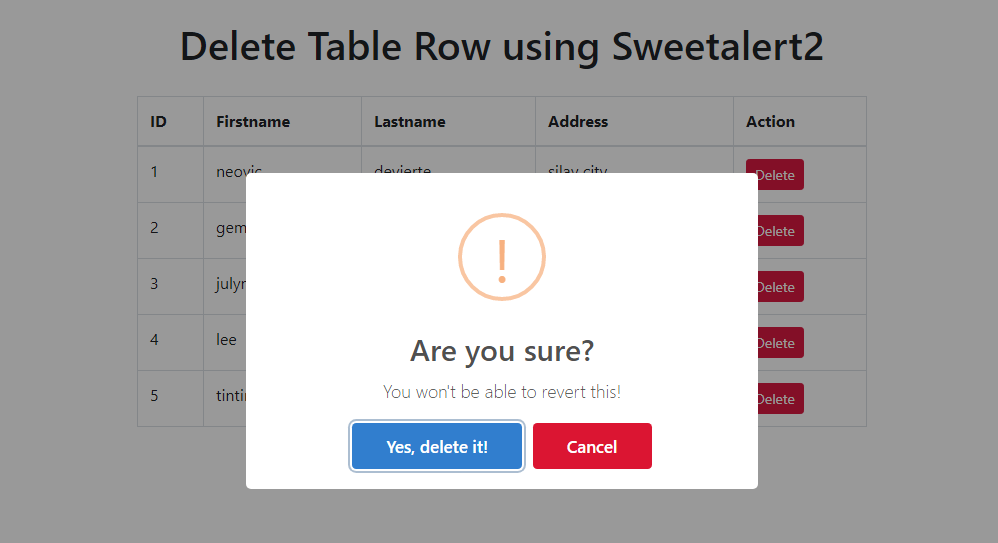
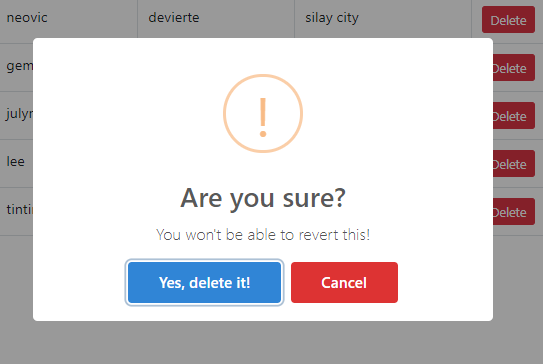
- swal.fire({
- title: 'Are you sure?',
- text: "You won't be able to revert this!",
- icon: 'warning',
- showCancelButton: true,
- confirmButtonColor: '#3085d6',
- cancelButtonColor: '#d33',
- confirmButtonText: 'Yes, delete it!',
- }).then((result) => {
- if (result.value){
- $.ajax({
- url: 'api.php?action=delete',
- type: 'POST',
- data: 'id='+id,
- dataType: 'json'
- })
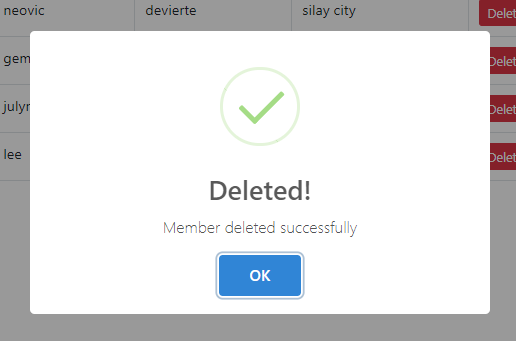
- .done(function(response){
- swal.fire('Deleted!', response.message, response.status);
- fetch();
- })
- .fail(function(){
- swal.fire('Oops...', 'Something went wrong with ajax !', 'error');
- });
- }
- })
- });
- });
- function fetch(){
- $.ajax({
- method: 'POST',
- url: 'api.php',
- dataType: 'json',
- success: function(response){
- $('#tbody').html(response);
- }
- });
- }
Creating our PHP API
Lastly, we create our PHP API where we put all our PHP functions. Create a new file, name it as api.php and paste the codes below.
- <?php
- //connection
- $conn = new mysqli('localhost', 'root', '', 'mydatabase');
- $action = 'fetch';
- $action = $_GET['action'];
- }
- if($action == 'fetch'){
- $output = '';
- $sql = "SELECT * FROM members";
- $query = $conn->query($sql);
- while($row = $query->fetch_assoc()){
- $output .= "
- <tr>
- <td>".$row['id']."</td>
- <td>".$row['firstname']."</td>
- <td>".$row['lastname']."</td>
- <td>".$row['address']."</td>
- <td><button class='btn btn-sm btn-danger delete_product' data-id='".$row['id']."'>Delete</button></td>
- </tr>
- ";
- }
- }
- if($action == 'delete'){
- $id = $_POST['id'];
- $sql = "DELETE FROM members WHERE id = '$id'";
- if($conn->query($sql)){
- $output['status'] = 'success';
- $output['message'] = 'Member deleted successfully';
- }
- else{
- $output['status'] = 'error';
- $output['message'] = 'Something went wrong in deleting the member';
- }
- }
- ?>
That's it you have now a simple delete function with sweet alert. By this you can make your end users experience a friendly and a better front-end experience.
Output Images:
That ends this tutorial. Happy Coding :)