How to Store Visitor Log in the Database using PHP and MySQL?
Within this tutorial, we will explore the development of a straightforward web application featuring a central focus on Site Visitor Logs. This article's primary objective is to serve as a valuable resource for PHP programming newcomers and students, offering insights into the implementation of common features to enrich their proficiency and understanding of the PHP programming language. Here, you will find the complete source code for a basic web application that includes a functionality for tracking site visitor activity.
Reasons for Storing Visitor Logs in a Database
Database Storage of Visitor Logs is a commonly featured aspect in various web applications, including Content Management Systems. This feature serves a crucial purpose, enabling website administrators to monitor page views and more. It fulfills several significant roles, such as:
- Analytics and Statistics - Enabling website owners and managers to track and analyze visitor behavior effectively.
- Security Monitoring - Assisting in identifying suspicious or malicious activities, such as hacking attempts, spam, or unauthorized access.
- Performance Monitoring - Providing insights into performance issues, slow-loading pages, or high traffic periods.
- Historical Data - Serving as a historical record of website and user activities.
How to Store Visitor Log in the Database using PHP and MySQL?
In this tutorial, I'll supply you with a straightforward website source code that includes a `Visitor Log Storage` feature to help you grasp the process better. Before diving into the coding aspect, make sure you have the following components installed on your local machine if they aren't already:
- Web Server Software (e.g., XAMPP or WAMP)
- Code Editor (e.g., Sublime Text, Microsoft Visual Studio Code, or Notepad++)
Once you have installed the Web Server Software, be sure to start or run the `Apache` and `MySQL` services.
Furthermore, the web application's user interface, which I will be presenting, relies on Content Delivery Networks (CDN) for loading the Bootstrap Framework and jQuery. These libraries are essential for enhancing the UI design. Please ensure you have an internet connection when accessing the web application to benefit from these resources. If offline, you may need to download the libraries and update the CSS and Script links accordingly.
Creating the Database
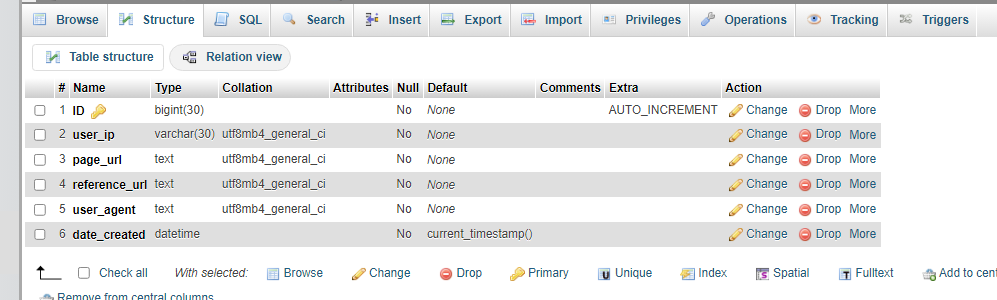
Begin by creating a new MySQL database, which you can name as `dummy_db`. Afterward, add a new table within this database named `visit_logs`. The table should include the following columns as outlined in the MySQL script below:
Creating the Database Connection Script
Now, it's time to create a new PHP script file and save it as `db-connect.php`. This script file contains the PHP code responsible for establishing the database connection.
- <?php
- // Hostname
- $host = "localhost";
- // Username
- $uname = "root";
- // Password
- $pw = "";
- // DB name
- $db_name = "dummy_db";
- try{
- // Opening Database Connection
- $conn = new mysqli($host, $uname, $pw, $db_name);
- }catch(Exception $e){
- }
- ?>
Creating the Visit Log Class
Now, proceed to create another PHP file, which you should name as `visitors-log.class.php`. Within this PHP script file, you will find the class responsible for retrieving the site visitor data and storing visitor data in the database.
- <?php
- class VisitorLog{
- private $db_conn;
- private $http_protocol;
- private $page_url;
- private $reference_url;
- private $user_ip;
- private $user_agent;
- function __construct(){
- require_once('db-connect.php');
- $this->db_conn = $conn;
- $server_data = $_SERVER ?? "";
- // Setting HTTP Protocol (http:// or http://)
- $this->http_protocol = ((!empty($server_data['HTTPS']) && $server_data['HTTPS'] != 'off') || $server_data['SERVER_PORT'] == 443) ? "https://" : "http://";
- // Get Current URL
- $this->page_url = $this->http_protocol . $server_data['HTTP_HOST'] . $server_data['REQUEST_URI'] . $server_data['QUERY_STRING'];
- // Get Reference URL
- // User Agant
- $this->user_agent = $server_data['HTTP_USER_AGENT'];
- // Get User IP Address
- $this->user_ip = $server_data['REMOTE_ADDR'];
- }
- }
- public function log_site_visit(){
- // Query Statement
- $stmt = $this->db_conn->prepare("INSERT INTO `visit_logs` (user_ip, page_url, reference_url, user_agent) VALUES (?, ?, ?, ?)");
- // Binding Insert Values
- $stmt->bind_param('ssss', $this->user_ip, $this->page_url, $this->reference_url, $this->user_agent);
- // Insert Site Visit Log Data into the database
- $save = $stmt->execute();
- if($save){
- // Do something when page visit data has been saved successfully
- // return true;
- }else{
- // Do something when page visit data has failed to save
- // return false;
- }
- }
- function __destruct(){
- // Closing Database Connection
- $this->db_conn->close();
- }
- }
- ?>
Creating the Website Interface
Next, let's develop the user interface for the website.
Index File
Start by creating a new PHP file named `index.php`. This file encompasses a fusion of PHP and HTML5 scripts, including the requirement of the class file and the navigation bar.
- <?php
- require_once("visitors-log.class.php");
- /**
- * Log Site Visit Data
- */
- $vlClass = new VisitorLog();
- $vlClass->log_site_visit();
- //page
- $page = str_replace(["-", "_"], " ",$_GET['page'] ?? "home");
- ?>
- <!DOCTYPE html>
- <html lang="en">
- <head>
- <meta charset="UTF-8">
- <meta name="viewport" content="width=device-width, initial-scale=1.0">
- <!-- Bootstrap 5.3 CSS-->
- <link rel="stylesheet" href="https://cdn.jsdelivr.net/npm/[email protected]/dist/css/bootstrap.min.css">
- <!-- jQuery -->
- <!-- Bootstrap 5.3 JS-->
- <script src=" https://cdn.jsdelivr.net/npm/[email protected]/dist/js/bootstrap.bundle.min.js"></script>
- </head>
- <body>
- <nav class="navbar navbar-expand-lg bg-body-tertiary">
- <div class="container-fluid">
- <button class="navbar-toggler" type="button" data-bs-toggle="collapse" data-bs-target="#navbarNav" aria-controls="navbarNav" aria-expanded="false" aria-label="Toggle navigation">
- </button>
- <div class="collapse navbar-collapse" id="navbarNav">
- <ul class="navbar-nav">
- <li class="nav-item">
- </li>
- <li class="nav-item">
- </li>
- <li class="nav-item">
- </li>
- <li class="nav-item">
- </li>
- </ul>
- </div>
- </div>
- </nav>
- <div class="container-md py-4">
- <?php
- if($page == "site visits")
- include('site-visits.php');
- ?>
- </div>
- </body>
- </html>
Visit Log Display Page
Finally, let's develop the page that showcases the stored visit logs from the database. This file consists of a combination of both `PHP` and HTML5 scripts. Save this script as `site-visits.php`.
- <?php
- include("db-connect.php");
- ?>
- <div class="col-12">
- <div class="card rounded-0">
- <div class="card-body">
- <div class="container-fluid">
- <div class="table-responsive">
- <table class="table table-striped table-bordered">
- <colgroup>
- <col width="15%">
- <col width="15%">
- <col width="20%">
- <col width="20%">
- <col width="30%">
- </colgroup>
- <thead>
- <tr class="bg-dark text-light">
- <th class="text-center">Date/Time</th>
- <th class="text-center">IP</th>
- <th class="text-center">URL</th>
- <th class="text-center">Referer</th>
- <th class="text-center">User Agent</th>
- </tr>
- </thead>
- <tbody>
- <?php
- $visits = $conn->query("SELECT * FROM `visit_logs` order by abs(unix_timestamp(`date_created`)) desc");
- if($visits->num_rows > 0):
- ?>
- <?php while($row = $visits->fetch_assoc()): ?>
- <tr>
- <td><?= $row['user_ip'] ?></td>
- <td><?= $row['page_url'] ?></td>
- <td><?= $row['reference_url'] ?></td>
- <td><?= $row['user_agent'] ?></td>
- </tr>
- <?php endwhile; ?>
- <?php else: ?>
- <tr>
- <th class="text-center" colspan="5">No Data</th>
- </tr>
- <?php endif; ?>
- </tbody>
- </table>
- </div>
- </div>
- </div>
- </div>
- </div>
- <?php
- $conn->close();
- ?>
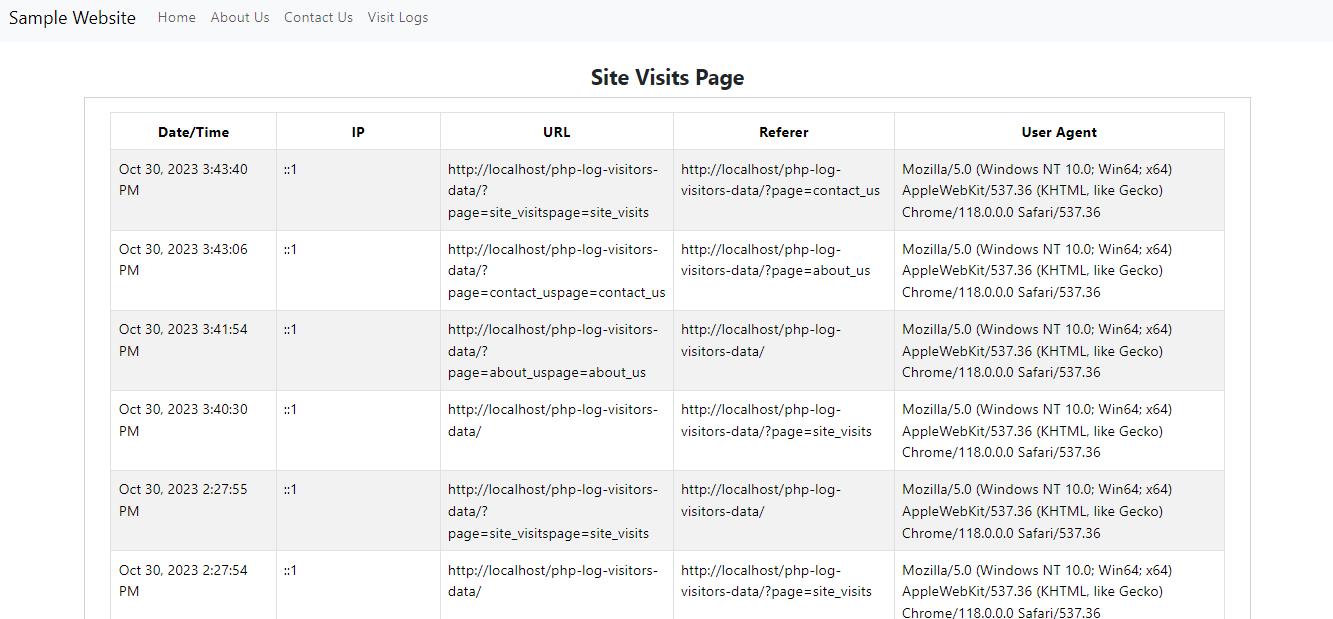
The provided source code will generate the results as shown in the following images:


And there you have it! I hope this Storing Visitors Log in the Database using PHP and MySQL Tutorial will help you with your current project or you'll find this useful for your future PHP projects. Explore more on this website for more Free Source Codes, Tutorials, and Articles covering various programming languages.