Laravel 10: Paginate DB Table Data with Bootstrap Tutorial
In this tutorial, you will learn to create a simple web application with Pagination using Laravel 10 (PHP Framework) and Bootstrap Framework. The tutorial aims to provide students and beginners with a reference for learning some useful web application components using Laravel. Here, I will be providing the steps and scripts for creating a simple web application that demonstrates pagination using Laravel.
What is Pagination?
Pagination is one of the useful and often used components in web applications. This component limits the number of data to display and provides links such as next, previous, and specific pages to load the limited number of data on the specific page.
Laravel (PHP Framework) comes with a Pagination approach that allows the developers to implement this kind of feature or component easily. The said framework paginator is integrated with the query builder and eloquent ORM.
In this tutorial, I will be using Laravel version 10.8 and Bootstrap 5 Framework.
Getting Started
In this tutorial, we will need the following software to create and run a Laravel Project on our local machine or devices. Kindly download and install the following.
- Code Editor[ i.e. VS Code Editor, Sublime, Notepad++, etc ]
- XAMPP or any equivalent
- Composer
After the successful download and installation, make sure to run your MySQL server for the database. If you are using XAMPP, you can also start the Apache server so you can also access the PHPMyAdmin front end.
Creating the Laravel Project
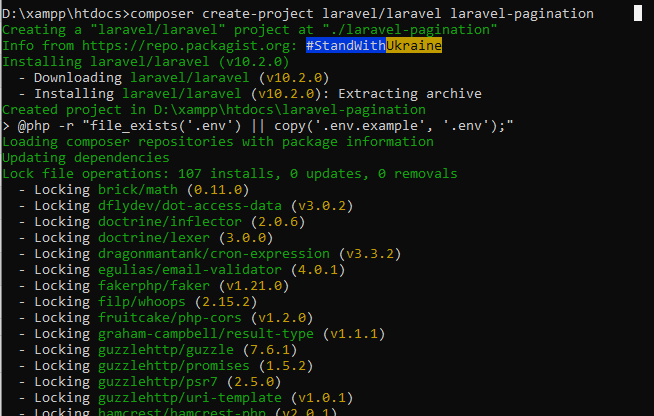
Open your terminal or command prompt and change the current directory to your XAMPP htdocs directory. If you are using other software change it into the equivalent directory. After that, run the following composer script to create a Laravel project, download the dependencies, and install it.
composer create-project laravel/laravel laravel-pagination
A new directory will be created named laravel-pagination. Change your terminal or command prompt directory to this folder.
cd laravel-pagination
Creating the Database
Open your preferred browser and browse the PHPMyAdmin (i.e. http://localhost/phpmyadmin). Next, create a new database named dummy_db.
After that, open the .env file from the root folder with your preferred code editor and update database credentials such as the database host, name, password, and username.
Next, run the following script in your terminal or command prompt.
php artisan make:model Members --resource -m
The script will create a new Model, Controller, and Migration files.
Paths:
- app/models/Members.php
- app/Http/Controllers/MembersController.php
- database/migration/<date_time>_create_members_table.php
Next, open the <date_time>_create_members_table.php file in your code editor and update the content like the following.
- <?php
- use Illuminate\Database\Migrations\Migration;
- use Illuminate\Database\Schema\Blueprint;
- use Illuminate\Support\Facades\Schema;
- return new class extends Migration
- {
- /**
- * Run the migrations.
- */
- public function up(): void
- {
- Schema::create('members', function (Blueprint $table) {
- $table->id();
- $table->string('name');
- $table->string('email');
- $table->string('phone');
- $table->timestamps();
- });
- }
- /**
- * Reverse the migrations.
- */
- public function down(): void
- {
- Schema::dropIfExists('members');
- }
- };
The script above will create a database table named members which will be used for storing and retrieving the sample data of the application.
Next, execute migrate command in your terminal or command prompt. To run the database tables creation.
php artisan migrate
Inserting Sample Random Data
The next step is we'll be populating the members table with some sample random data using the Database Seeder and Factory. To do that, run the following command.
php artisan make:seeder MembersSeeder
And
php artisan make:factory MembersFactory
Next, update the created factory file content located in database/factories directory like the following:
- <?php
- namespace Database\Factories;
- use Illuminate\Database\Eloquent\Factories\Factory;
- /**
- * @extends \Illuminate\Database\Eloquent\Factories\Factory<\App\Models\Members>
- */
- class MembersFactory extends Factory
- {
- /**
- * Define the model's default state.
- *
- * @return array<string, mixed>
- */
- {
- return [
- 'name' => fake()->name(),
- 'email' => fake()->unique()->safeEmail(),
- 'phone' => fake()->phoneNumber()
- ];
- }
- }
The file above defines the random data to create each column of the database members table.
Next, update the created seeder file content located in database/seeders directory like the following:
- <?php
- namespace Database\Seeders;
- use App\Models\Members;
- use Illuminate\Database\Console\Seeds\WithoutModelEvents;
- use Illuminate\Database\Seeder;
- class MembersSeeder extends Seeder
- {
- /**
- * Run the database seeds.
- */
- public function run(): void
- {
- Members::factory()
- ->create();
- }
- }
The file will execute the insertion of random data on the database upon running the following command:
run php artisan db:seed MembersSeeder
After that, you can check if the data are successfully inserted into the database through PHPMyAdmin.
Creating the Controller
Next, we will update the controller file for retrieving the data from the database and paginate it limited to 10 data rows per page. Open the apps/Http/Controllers/MembersController.php file on your code editor and update the content like the following.
- <?php
- namespace App\Http\Controllers;
- use App\Models\Members;
- use Illuminate\Http\Request;
- class MembersController extends Controller
- {
- /**
- * Display a listing of the resource.
- */
- public function index()
- {
- //
- $members = Members::paginate(10);
- return view('members', ['members'=>$members]);
- }
- /**
- * Show the form for creating a new resource.
- */
- public function create()
- {
- //
- }
- /**
- * Store a newly created resource in storage.
- */
- public function store(Request $request)
- {
- //
- }
- /**
- * Display the specified resource.
- */
- public function show(Members $members)
- {
- //
- }
- /**
- * Show the form for editing the specified resource.
- */
- public function edit(Members $members)
- {
- //
- }
- /**
- * Update the specified resource in storage.
- */
- public function update(Request $request, Members $members)
- {
- //
- }
- /**
- * Remove the specified resource from storage.
- */
- public function destroy(Members $members)
- {
- //
- }
- }
Creating the Page Interface
Next, will create the web application sample page. To do that create a new blade file named members.blade.php inside the resources/views directory. Then paste the following script.
- <!DOCTYPE html>
- <html lang="en">
- <head>
- <meta charset="UTF-8">
- <meta http-equiv="X-UA-Compatible" content="IE=edge">
- <meta name="viewport" content="width=device-width, initial-scale=1.0">
- <link rel="stylesheet" href="https://cdn.jsdelivr.net/npm/[email protected]/dist/css/bootstrap.min.css">
- <script src="https://cdn.jsdelivr.net/npm/[email protected]/dist/js/bootstrap.bundle.min.js"></script>
- </head>
- <body>
- <div class="container-md py-5">
- <div class="table-responsive">
- <table class="table table-sm table-bordered table-striped">
- <thead>
- <tr>
- </tr>
- </thead>
- <tbody>
- @foreach($members as $member)
- <tr>
- </tr>
- @endforeach
- </tbody>
- </table>
- {{$members->onEachSide(2)->links()}}
- </div>
- </div>
- </body>
- </html>
The file script above contains the HTML elements of the page layout, data table, and pagination links. The Bootstrap v5 Framework is loaded on the page using CDNs which means that an internet connection is a must when browsing the page later on.
Using Bootstrap for the Paginator Links
To use the Bootstrap 5 pagination links design, we must enable the use of the Paginator Bootstrap 5 service provider. To do that, open the app/Providers/AppServiceprovider.php file on your code editor and update the content like the following:
- <?php
- namespace App\Providers;
- use Illuminate\Support\ServiceProvider;
- use Illuminate\Pagination\Paginator;
- class AppServiceProvider extends ServiceProvider
- {
- /**
- * Register any application services.
- */
- public function register(): void
- {
- //
- }
- /**
- * Bootstrap any application services.
- */
- public function boot(): void
- {
- //
- Paginator::useBootstrapFive();
- }
- }
Update the Routing File
Finally, update the web application routing configuration. To do that, open the routes/web.php and comment on the default route script and add the controller route script like the following:
- <?php
- use Illuminate\Support\Facades\Route;
- use App\Http\Controllers\MembersController;
- /*
- |--------------------------------------------------------------------------
- | Web Routes
- |--------------------------------------------------------------------------
- |
- | Here is where you can register web routes for your application. These
- | routes are loaded by the RouteServiceProvider and all of them will
- | be assigned to the "web" middleware group. Make something great!
- |
- */
- // Route::get('/', function () {
- // return view('welcome');
- // });
- Route::controller(MembersController::class)->group(function(){
- Route::get('/', 'index');
- });
Then, we can now run the Laravel Project and browse it to the browser and see if it works and meets our objective in this tutorial. Run the following command:
php artisan serve
Browse http://127.0.0.1:8000 on your browser.
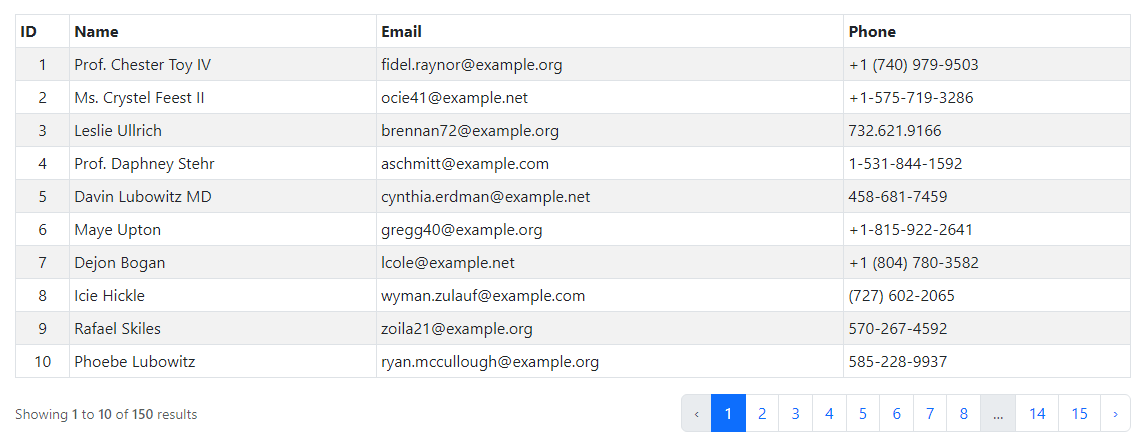
The web page must result in something like the following snapshot:
There you go! I have also provided the complete source code zip file that I created for this tutorial on this website and it is free to download. The download button is located below this tutorial's content. Feel free to download and modify the source code the way you wanted to enhance your programming capabilities using Laravel 10.
How to Run the source code?
- Please start the Apache and MySQL servers of your XAMPP or equivalent software.
- Extract the source code folder into the XAMPP's htdocs directory or equivalent directory.
- Create a new database named dummy_db
- Open the terminal or command prompt and redirect the directory to the source code folder
- Run the php artisan migrate command
- Run the php artisan make:seeder MembersSeeder command
- Run the php artisan serve command
- Browse the application. http://127.0.0.1:8000
That's it! I hope this Laravel 10: Paginate DB Table Data with Bootstrap Tutorial will help you with what you are looking for and that you'll find this useful for your current and future PHP Projects using Laravel 10 Framework.
Explore more on this website for more Tutorials and Free Source Codes.


