Dynamically Add and Remove Form Item using jQuery clone() Method Tutorial
In this article, I will be discussing about how to create an Add and Remove Form Item Feature in web-application using jQuery's clone() method. This kind of feature is commonly applied to a project which has a process of saving multiple data at once in the database. There are lots of ideas and techniques you can create to achieve this feature with the help of jQuery, but I found this solution more simple and easiest in my experience.
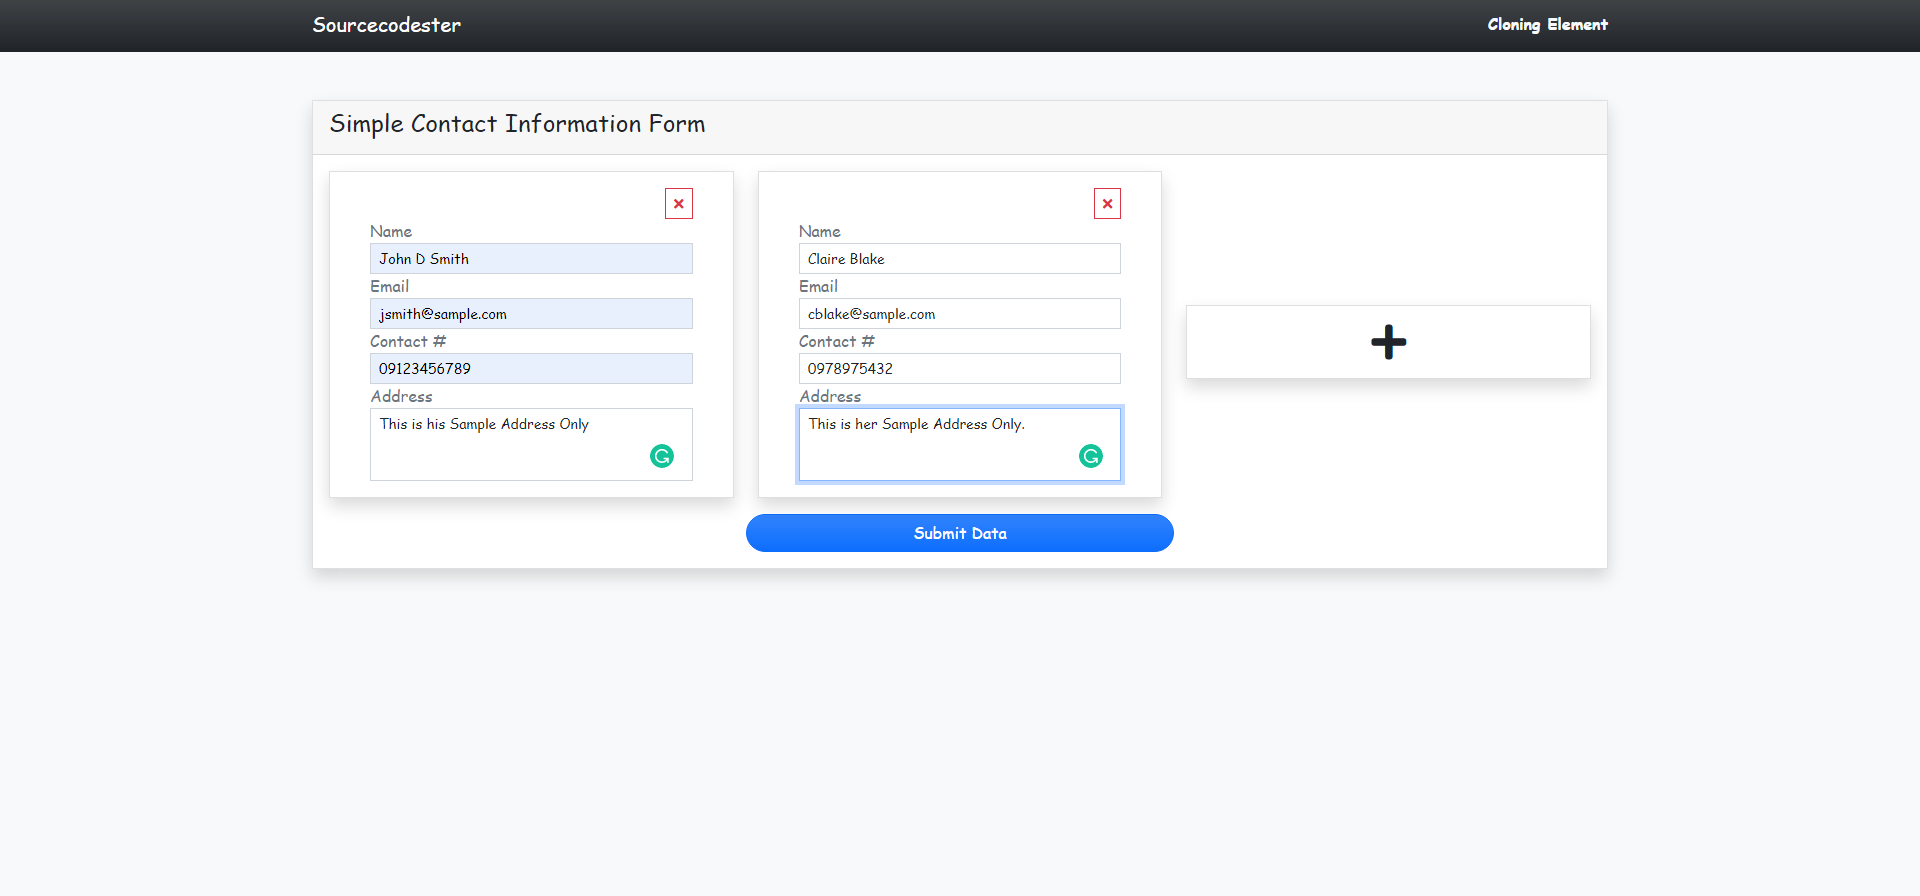
Below, I have provided a simple PHP Web Application which contains a form for Contact Directories which allows the users to add multiple set of input dynamically. The form items/sets contain the fields that are needed and each of these items has a 'remove button' using an 'x' icon button at the upper-right. The remove button allows the user to remove the item. It has also contained some features that are commonly included in submitting a form such as preventing submitting the form when no item is listed and if required fields are empty. The application only displays the submitted data and there is no database included.
Getting Started
To run the application you must have a local server such as XAMPP in order to run PHP Scripts in your device.
Using XAMPP:Download and Install XAMPP. After that, open the XAMPP's Control Panel and start the Apache. Then create a new directory in your xampp/htdocs directory.
Libraries/Plugin used: (Download and compile the ff in your source code directory)Creating Default Page Interface
The script below is the code of our default page which is the index.php. This file contains the contact form.
- <!DOCTYPE html>
- <html lang="en">
- <head>
- <meta charset="UTF-8">
- <meta http-equiv="X-UA-Compatible" content="IE=edge">
- <meta name="viewport" content="width=device-width, initial-scale=1.0">
- <link rel="stylesheet" href="./Font-Awesome-master/css/all.min.css">
- <link rel="stylesheet" href="./css/bootstrap.min.css">
- <style>
- :root {
- --bs-success-rgb: 71, 222, 152 !important;
- }
- html,
- body {
- height: 100%;
- width: 100%;
- font-family: Apple Chancery, cursive;
- }
- .btn-info.text-light:hover,
- .btn-info.text-light:focus {
- background: #000;
- }
- </style>
- </head>
- <body class="bg-light">
- <nav class="navbar navbar-expand-lg navbar-dark bg-dark bg-gradient" id="topNavBar">
- <div class="container">
- <a class="navbar-brand" href="https://sourcecodester.com">
- Sourcecodester
- </a>
- <div>
- </div>
- </div>
- </nav>
- <div class="container py-5" id="page-container">
- <div class="card rounded-0 shadow">
- <div class="card-header">
- </div>
- <div class="card-body">
- <form action="submitted_data.php" method="POST" id="contact-form">
- <div class="row align-items-center" id="item-card">
- <div class="col-lg-4 col-md-6 col-sm-12 item mb-3 h-100">
- <div class="card rounded-0 shadow h-100">
- <div class="card-body h-100">
- <div class="container-fluid">
- <div class="w-100 text-end">
- </div>
- <div class="form-group">
- <input type="text" name="name[]" class="form-control form-control-sm rounded-0" required>
- </div>
- <div class="form-group">
- <input type="email" name="email[]" class="form-control form-control-sm rounded-0" required>
- </div>
- <div class="form-group">
- <input type="text" name="contact[]" class="form-control form-control-sm rounded-0" required>
- </div>
- <div class="form-group">
- </div>
- </div>
- </div>
- </div>
- </div>
- <div class="col-lg-4 col-md-6 col-sm-12 h-100" id="new_item">
- <div class="card rounded-0 shadow h-100">
- <div class="card-body h-100">
- <div class="container-fluid h-100">
- <a href="javascript:void(0)" id="new-item-btn" class="text-dark fw-bolder fs-1 h-100 w-100 text-decoration-none">
- <div class="d-flex w-100 h-100 align-items-center justify-content-center">
- </div>
- </a>
- </div>
- </div>
- </div>
- </div>
- </div>
- <div class="row justify-content-center">
- </div>
- </form>
- </div>
- </div>
- </div>
- </body>
- <!--The ELement to be Cloned -->
- <noscript id="el-clone">
- <div class="col-lg-4 col-md-6 col-sm-12 item mb-3 h-100">
- <div class="card rounded-0 shadow h-100">
- <div class="card-body h-100">
- <div class="container-fluid">
- <div class="w-100 text-end">
- </div>
- <div class="form-group">
- <input type="text" name="name[]" class="form-control form-control-sm rounded-0" required>
- </div>
- <div class="form-group">
- <input type="email" name="email[]" class="form-control form-control-sm rounded-0" required>
- </div>
- <div class="form-group">
- <input type="text" name="contact[]" class="form-control form-control-sm rounded-0" required>
- </div>
- <div class="form-group">
- </div>
- </div>
- </div>
- </div>
- </div>
- </noscript>
- <!--The ELement to be Cloned -->
- </html>
Creating Submitted Data Display Page
This is the page where the page will be redirected when the form is submitted. It contains a table that list all the contact information submitted. This page can be only browse when the form is submitted. Save the scrip below as submitted_data.php.
- <?php
- // Checks if There is a POST Data
- if($_SERVER['REQUEST_METHOD'] != 'POST'){
- echo '<script> alert("No data has been submitted."); location.replace("./")</script>';
- }else{
- extract($_POST);
- }
- ?>
- <!DOCTYPE html>
- <html lang="en">
- <head>
- <meta charset="UTF-8">
- <meta http-equiv="X-UA-Compatible" content="IE=edge">
- <meta name="viewport" content="width=device-width, initial-scale=1.0">
- <link rel="stylesheet" href="./Font-Awesome-master/css/all.min.css">
- <link rel="stylesheet" href="./css/bootstrap.min.css">
- <style>
- :root {
- --bs-success-rgb: 71, 222, 152 !important;
- }
- html,
- body {
- height: 100%;
- width: 100%;
- font-family: Apple Chancery, cursive;
- }
- .btn-info.text-light:hover,
- .btn-info.text-light:focus {
- background: #000;
- }
- </style>
- </head>
- <body class="bg-light">
- <nav class="navbar navbar-expand-lg navbar-dark bg-dark bg-gradient" id="topNavBar">
- <div class="container">
- <a class="navbar-brand" href="https://sourcecodester.com">
- Sourcecodester
- </a>
- <div>
- </div>
- </div>
- </nav>
- <div class="container py-5" id="page-container">
- <div class="card rounded-0 shadow">
- <div class="card-header">
- <div class="d-flex w-100">
- <div class="col-4 text-end">
- </div>
- </div>
- </div>
- <div class="card-body">
- <div class="container-fluid">
- <table class="table table-stripped table-bordered">
- <colgroup>
- <col width="5%">
- <col width="25%">
- <col width="15%">
- <col width="15%">
- <col width="40%">
- </colgroup>
- <thead>
- <tr class="bg-primary bg-gradient text-light">
- </tr>
- </thead>
- <tbody>
- <?php
- $i = 1;
- // Looping all the submitted data
- foreach($name as $k => $v):
- ?>
- <tr>
- </tr>
- <?php endforeach; ?>
- </tbody>
- </table>
- </div>
- </div>
- </div>
- </div>
- </body>
- </html>
Creating Main Function
The script below is a JavaScript file that contains our jQuery custom functions and event codes. The script includes the codes of cloning an item/set to be added at the form, removing the item/set from the form, and the form check process before submitting the data. Save the file as script.js and in my case, my CSS and JS files are organized by directory which makes this file located inside the JS directory.
- // removing the contact Item
- function remove_item(_this) {
- _this.closest('.item').remove()
- }
- $(function() {
- // Focuses the first Input of Form
- $('input[name="name[]"]').first().focus()
- // Event Lister of Form Item Remove Button when Click
- $('.remove-item').click(function() {
- remove_item($(this))
- })
- // Adds New Form Item when Add Item has been Clicked
- $('#new-item-btn').click(function() {
- // cloning the item card from noscript element
- var item = $($('noscript#el-clone').html()).clone()
- // Inserting the new item befor 'Add Item' Card
- $('#new_item').before(item)
- // Focuses the first input in the added item card
- item.find('input[name="name[]"]').focus()
- // Event Lister of added item card Remove Button when Click
- item.find('.remove-item').click(function() {
- remove_item($(this))
- })
- })
- // Event when clicking the Submit Button
- $('#submit-form').click(function() {
- var form = $('#contact-form')
- $(this).attr('disabled', true)
- .text("Submitting Data ...")
- if ($('#item-card .item').length <= 0) {
- // Checks if there is atleast 1 Item Card
- alert("No Contact Item Added.")
- $(this).attr('disabled', false)
- .text("Submit Data")
- return false;
- } else if (form[0].checkValidity() == false) {
- // Checks if All input fields are filled
- form[0].reportValidity()
- $(this).attr('disabled', false)
- .text("Submit Data")
- return false;
- } else {
- // Form Submission
- form.submit()
- }
- })
- })
There you go. You can now test the application on your end and check if it working properly and achieves the goal I stated above. If there's an error occurred on your end, review your codes with the codes I provided above. You can also download the source code I created for this tutorial. The download link/button is located after this article.
That ends this tutorial. I hope this will help you with what you are looking for and you'll find it useful with your current or future projects.
Explore more on this website for more Tutorials and Free Source Codes.
Related Links: