Creating a Report in Student Registration Using Crystal Reports part 2.
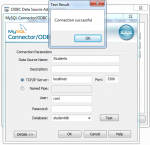
In my previous tutorial which is Creating a Report in a Student Registration Using Crystal Reports part 1, I set up the ODBC data source for the Student Registration database.
- Read more about Creating a Report in Student Registration Using Crystal Reports part 2.
- 1 comment
- Log in or register to post comments
- 396 views