This tutorial will guide you through the systematic procedure of Exporting MySQL Database Table Records to a XML File using the PHP language. Geared towards students and PHP beginners, this guide serves as a valuable reference, offering insights to bolster their understanding and programming skills. I will present a straightforward web application that illustrates the primary objective outlined in this article.
What is XML?
eXtensible Markup Language, commonly referred to as XML, stands as a versatile markup language designed for the storage and transportation of data. Employing a set of rules that ensure both human and machine readability when encoding documents, XML's adaptability and self-descriptive characteristics have led to its widespread utilization in diverse applications. These applications include handling configuration files, facilitating data interchange between web services, and representing hierarchical data structures.
Here are some other tutorials or articles that are related in XML:
Explore the XML-related topics listed above by clicking on them to be redirected to their dedicated articles for a more in-depth understanding.
How to Export MySQL Database Table Records into XML File?
Before getting started, please download and install the following software on your local machine if they are not already installed:
- XAMPP/WAMP or any equivalent local web and MySQL server software
- Code Editor such as Notepad++, Sublime Text, and MS VS Code
After successfully installing the aforementioned requirements, ensure that you have started the Apache and MySQL servers. In XAMPP/WAMP, open their control panel and click the start buttons for the mentioned servers. The status of each server will be displayed in the control panel logs.
Let's Get Started
Step 1: Let's Create the Database and the Table
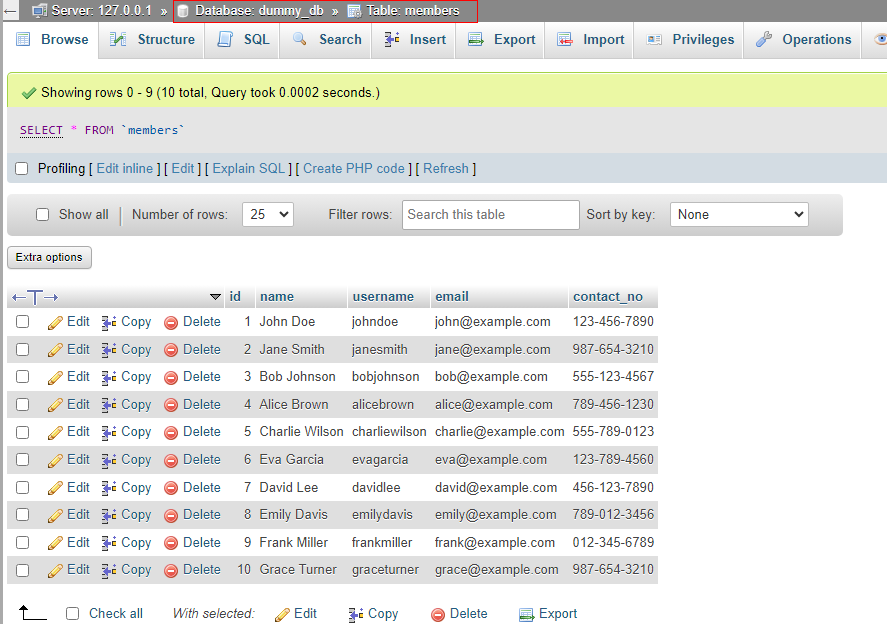
Initial steps involve creating the Database for our sample web application. Open PHPMyAdmin and navigate to the SQL page. Confirm that the dummy_db database name is still accessible in your MySQL. Utilize or refer to the MySQL script below for the creation of the database, table, and columns:
--
-- Database: `dummy_db`
--
-- --------------------------------------------------------
--
-- Table structure for table `members`
--
--
-- Dumping data for table `members`
--
Executing the provided MySQL script will yield a result similar to the image below:
Step 2: Creating the Database Connection
Moving forward, let's generate the PHP file containing the scripts that establish a connection between our PHP web application and the MySQL Database. To accomplish this, create a new PHP file within your web application's source code directory and open it with your preferred code editor. Save the file as `db-connect.php`. Consult the following PHP script for composing the database connection script in PHP:
<?php
// DB Hostname
$host = "localhost";
// DB username
$uname = "root";
// DB password
$pw = "";
// DB Name
$dbName = "dummy_db";
try{
// Opening Database Connection
$conn = new MySQLi($host, $uname, $pw, $dbName);
}catch(Exception $e){
// Opening Database Connection Failed
echo "Database connection Error:\n<br>\n";
}
Ensure to replace the variable values with the correct database credentials in the script above on your end.
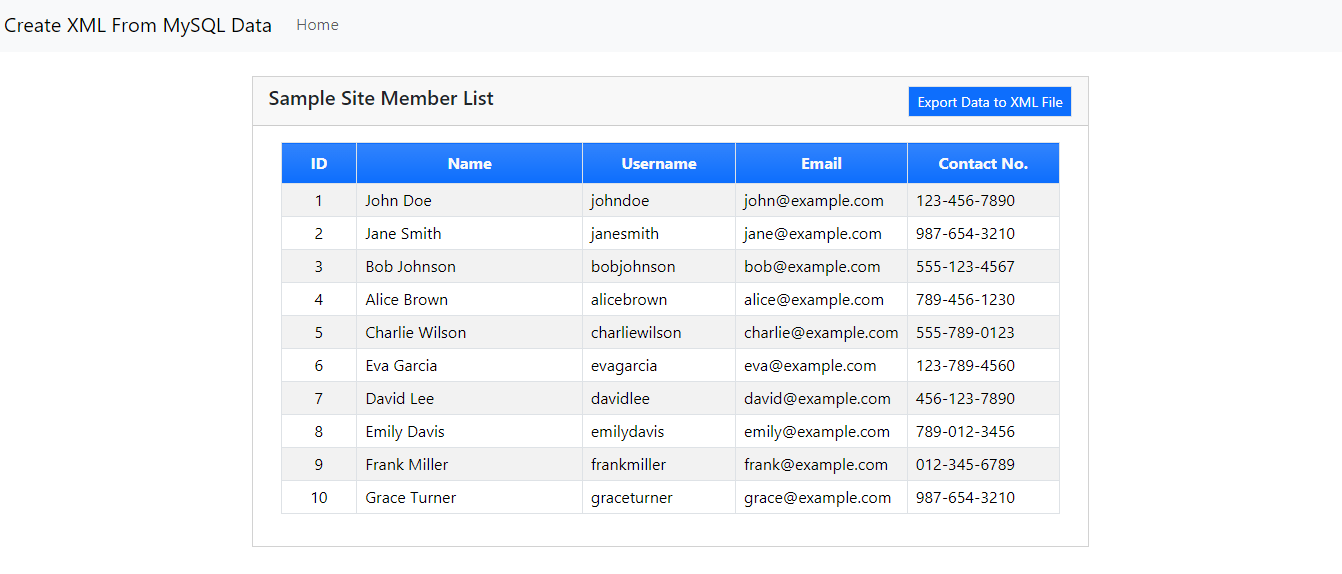
Step 3: Creating Web Application Page Interface
Now, let's establish the page interface for our sample web application. Create a new PHP file named `index.php`. This file contains a combined PHP and HTML scripts, relevant for the page interface that displays the retrieved database records. It also incorporates the PHP script responsible for retrieving records from the database and includes the PHP file for data export or transformation.
Note that the script includes CDN links for loading the Bootstrap Framework and jQuery Library. Therefore, an internet connection is necessary for the expected page design to load when browsing the page.
<?php
// Start Session
// Require Database Connection File
require_once("db-connect.php");
/**
* Retrieve Members Data from MySQL Database
*/
// SQL Statement
$members_sql = "SELECT * FROM `members` order by id asc";
// SQL Query
$members_qry = $conn->query($members_sql);
// SQL Execution and storing retrive data in a variable
$members = $members_qry->fetch_all(MYSQLI_ASSOC);
/**
* Including the PHP file that contains the Script that Exports MySQL Data into XML File
*/
if(isset($_GET['action']) && $_GET['action'] == 'export_as_xml'){ include_once("export_as_xml.php");
}
?>
<!DOCTYPE html>
<html lang="en">
<head>
<meta charset="UTF-8">
<meta name="viewport" content="width=device-width, initial-scale=1.0">
<title>Create XML from MySQL Data</title>
<!-- Bootstrap 5.3 CSS-->
<link rel="stylesheet" href="https://cdn.jsdelivr.net/npm/
[email protected]/dist/css/bootstrap.min.css">
<!-- jQuery -->
<script src="https://cdnjs.cloudflare.com/ajax/libs/jquery/3.7.1/jquery.min.js"></script>
<!-- Bootstrap 5.3 JS-->
<script src=" https://cdn.jsdelivr.net/npm/
[email protected]/dist/js/bootstrap.bundle.min.js"></script>
</head>
<body>
<nav class="navbar navbar-expand-lg bg-body-tertiary">
<div class="container-fluid">
<a class="navbar-brand" href="#">Create XML From MySQL Data</a>
<button class="navbar-toggler" type="button" data-bs-toggle="collapse" data-bs-target="#navbarNav" aria-controls="navbarNav" aria-expanded="false" aria-label="Toggle navigation">
<span class="navbar-toggler-icon"></span>
</button>
<div class="collapse navbar-collapse" id="navbarNav">
<ul class="navbar-nav">
<li class="nav-item">
<a class="nav-link <?= $page == 'home' ? "active" : '' ?>" href="./">Home</a>
</li>
</ul>
</div>
</div>
</nav>
<div class="container-md py-4">
<!-- Flashdata -->
<?php if(isset($_SESSION['flashdata']) && !empty($_SESSION['flashdata'])): ?> <div class="alert alert-<?= $_SESSION['flashdata']['type'] ?> px-2 py-1 rounded-0">
<?= $_SESSION['flashdata']['msg'] ?>
</div>
<?php unset($_SESSION['flashdata']); ?> <?php endif; ?>
<!-- End of Flashdata -->
<div class="card rounded-0 mx-auto col-lg-9 col-md-10 col-sm-12 col-12">
<div class="card-header rounded-0">
<div class="d-flex w-100 justify-content-between align-items-center">
<h5 class="card-title col-auto flex-grow-1">Sample Site Member List</h5>
<div class="col-auto flex-shrink-1">
<a href="./?action=export_as_xml" class="btn btn-sm btn-primary border rounded-0">Export Data to XML File</a>
</div>
</div>
</div>
<div class="card-body rounded-0">
<div class="container-fluid">
<!-- Displaying MySQL Data into Table Element -->
<div class="table-responsive">
<table class="table table-bordered table-hover table-striped">
<colgrep>
<col width="10%">
<col width="30%">
<col width="20%">
<col width="20%">
<col width="20%">
</colgrep>
<thead>
<tr class="bg-gradient bg-primary">
<th class="text-center bg-transparent text-light">ID</th>
<th class="text-center bg-transparent text-light">Name</th>
<th class="text-center bg-transparent text-light">Username</th>
<th class="text-center bg-transparent text-light">Email</th>
<th class="text-center bg-transparent text-light">Contact No.</th>
</tr>
</thead>
<tbody>
<?php if(!empty($members)): ?> <?php foreach($members as $member): ?>
<tr>
<td class="text-center px-2 py-1"><?= $member['id'] ?></td>
<td class="px-2 py-1"><?= $member['name'] ?></td>
<td class="px-2 py-1"><?= $member['username'] ?></td>
<td class="px-2 py-1"><?= $member['email'] ?></td>
<td class="px-2 py-1"><?= $member['contact_no'] ?></td>
</tr>
<?php endforeach; ?>
<?php endif; ?>
</tbody>
</table>
</div>
<!-- End of Displaying MySQL Data into Table Element -->
</div>
</div>
</div>
</div>
<?php
// Closing Database Connection
if($conn)
$conn->close();
?>
</body>
</html>
Step 3: Creating Main PHP Script
Finally, let's craft the PHP file housing the script responsible for generating XML content from the MySQL Database Table Records. Create a new PHP file named `export_as_xml.php`. This file contains the script utilizing the DOMDocument built-in class in PHP.
The DOMDocument class is a component of the Document Object Model (DOM) extension in PHP. It offers a method to represent an entire document, be it HTML or XML, as an Object-Oriented tree structure. In this structure, each node corresponds to a component of the document, such as elements, attributes, or text.
<?php
// Creating a new DOMDocument
$xml = new DOMDocument();
// Creating the Root Element
$membersEl = $xml->createElement('members');
// Looping Members Row
foreach($members as $member){
// Creating Member Row Element and adding it into the root Element
$newMemberRow = $membersEl->appendChild($xml->createElement('member'));
foreach($member as $field => $value){
// Creating the Memeber's Info Field Name and Value Element and adding it to the current memeber row's element
$newMemberRow->appendChild($xml->createElement($field, $value));
}
}
// adding the root Members Element with the child member elements into the created document
$xml->appendChild($membersEl);
// Nicely printing the format of the output with indentions
$xml->formatOutput = true;
// Save in new or overwrite existing XML file with the current XML File Content
$xml->save("members.xml");
// Storing a Success Flash Message to display in the UI
$_SESSION['flashdata'] = [
"type" => "success",
"msg" => "Members Data has been successfully exported in XML File"
];
}else{
// members data is empty
// Storing Error Flash Message to display in the UI
$_SESSION['flashdata'] = [
"type" => "danger",
"msg" => "Members Data is Empty"
];
}
// reloading the page using location.replace JS script to remove the provided GET request data
echo "<script>location.replace('./');</script>";
?>
Upon executing the provided scripts, clicking the `Export Data to XML File` button above the table in the page interface will initiate the export of MySQL database table records into an XML file. Upon successful completion of the process, a confirmation message will be displayed, as shown in the image below:

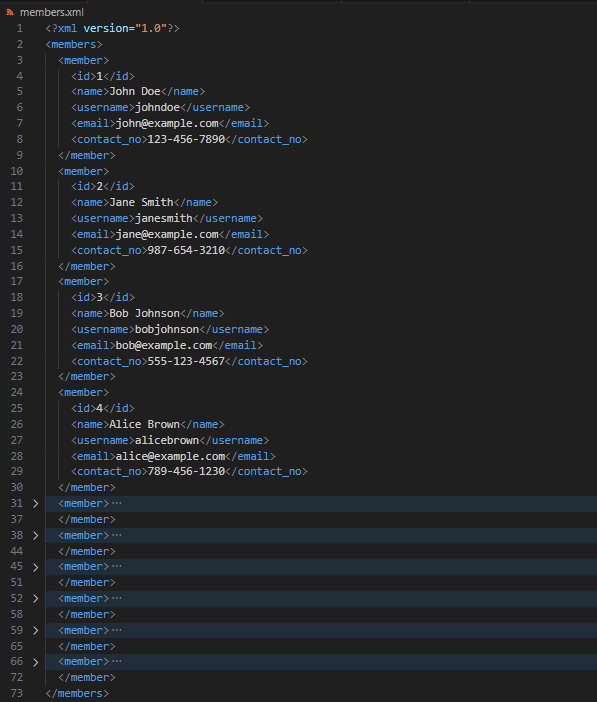
The resulting exported XML file will be named `members.xml`, containing content similar to the following:
I've also included the complete compressed source code file of the provided scripts on this website. You can download it by clicking the Download button located below this tutorial article.
And that's it! I hope this PHP Tutorial on Exporting MySQL Database Records into XML Files proves beneficial, aiding you in your PHP projects. Explore further on this website for additional Free Source Codes, Tutorials, and Articles spanning various programming languages.
Happy Coding =)