Bulk Deletion using Checkbox in PHP and JavaScript Tutorial

Introduction
In this tutorial, you will learn how to Create a Bulk Deletion Feature for web applications using HTML Checkbox, PHP, MYSQL Database, JavaScript, and jQuery/Ajax. This tutorial aims to provide a reference or guide to students or new programmers for the integration of PHP, MySQL Database, and JavaScript to develop an effective and interactive web application. Here, snippets and sample program web application source code are provided.
What is Bulk Deletion?
In a web application, Bulk Deletion is the process of deleting multiple data from the list, table, or database at once. This process or feature is commonly developed using HTML Checkboxes. The said feature can lessen the time to be consumed by the end-user in order to delete multiple data from the web application.
Technologies
Here are the following Technologies used to achieve a Bulk Deletion Feature for this tutorial.
- XAMPP
- Code Editor (VS Code, Sublime Text, or Notepad++)
- PHP
- MySQL Database
- HTML
- CSS
- JavaScript
- jQuery Library (not a slim copy)
- Bootstrap Framework (for the Page Design)
How to Create a Bulk Deletion Feature using Checkbox, PHP, and JS?
Creating the Bulk Deletion Feature using Checkboxes is not that complicated and there are a lot of ways to create one. Here's one of the effective ways to do it.
MySQL Schema and Sample Data
Let us assume that we have the following MySQL Database and Table Schema. The Database name is dummy_db and the sample table is called posts.
- (1, 'Quos voluptatem delectus sed et.', 'Ullam voluptas nostrum dolore velit odio iusto. Enim est dolorem sint nihil rem. Aut et est similique inventore. Hic ullam perspiciatis ad veritatis.', 'Quaerat quidem molestias autem placeat autem qui.', 'Colby Wilderman', '2012-12-04 21:49:28', NULL),
- (2, 'Est et molestiae sunt inventore occaecati.', 'Ut aliquid ipsa quo vitae odit ipsam. Odio labore temporibus fugiat neque doloribus quos incidunt omnis. Perferendis aperiam non vel voluptatem. Molestias nemo odit sit esse quo.', 'Tempore reprehenderit cupiditate consequuntur doloremque quis voluptatem ex ut.', 'Lisa Runolfsdottir', '1972-11-14 04:16:35', NULL),
- (3, 'Non aliquid ut et ipsam ut cupiditate et.', 'Quo fugiat nihil aut tenetur aut in. Ut dolores minima cum cumque nobis. Enim cumque omnis repellat tempora. Laudantium in velit omnis nam. Aperiam veritatis aut numquam perspiciatis similique rerum.', 'Fugit tempore modi delectus et.', 'Cleora Legros', '2007-08-15 07:23:17', NULL),
- (4, 'Cum omnis assumenda ut quia fugit et saepe vel.', 'Non aliquid voluptas dignissimos est beatae consequuntur mollitia. Quam voluptates eligendi occaecati sapiente sed sint aperiam.', 'Voluptatum et maiores quae cupiditate.', 'Dr. Jerrold Rice', '1989-05-06 00:19:12', NULL),
- (5, 'Aut aut magnam tempora.', 'Quibusdam voluptatem hic aut quis neque. Quibusdam recusandae quas vel ipsam hic magnam. Quam quibusdam repudiandae quia dolore expedita nobis.', 'Repellendus itaque asperiores non quisquam alias temporibus doloribus.', 'Juwan Ullrich V', '2001-07-24 23:27:38', NULL);
Database Connection
Next, we need to create a database connection file. This is a PHP File that contains a script for connecting to the MySQL Database. This file will be included in other PHP file scripts that fetch and delete data on the database.
db-connect.php
- <?php
- $host = "localhost";
- $username = "root";
- $pw = "";
- $db_name = "dummy_db";
- $conn = new mysqli($host, $username, $pw, $db_name);
- if(!$conn){
- }
- ?>
Fetching Data
Next, create a PHP file that contains a function that fetches all the data to display from the database.
get_posts.php
- <?php
- require_once('db-connect.php');
- function get_posts(){
- global $conn;
- $sql = "SELECT * FROM `posts` order by abs(unix_timestamp(`created_at`)) desc";
- $query = $conn->query($sql);
- return $query->fetch_all(MYSQLI_ASSOC);
- }
- $conn->close();
Creating the Interface
Next, create the Page Interface. It is a PHP file that consists of HTML and PHP. The following snippets used Bootstrap and jQuery CDNs which means that an internet connection is a must when running the application in order to load the external Library properly.
index.php
- <?php
- require_once('get_posts.php');
- $posts = get_posts();
- ?>
- <!DOCTYPE html>
- <html lang="en">
- <head>
- <meta charset="UTF-8">
- <meta http-equiv="X-UA-Compatible" content="IE=edge">
- <meta name="viewport" content="width=device-width, initial-scale=1.0">
- <link rel="stylesheet" href="https://cdnjs.cloudflare.com/ajax/libs/font-awesome/6.2.0/css/all.min.css" integrity="sha512-xh6O/CkQoPOWDdYTDqeRdPCVd1SpvCA9XXcUnZS2FmJNp1coAFzvtCN9BmamE+4aHK8yyUHUSCcJHgXloTyT2A==" crossorigin="anonymous" referrerpolicy="no-referrer" />
- <link rel="stylesheet" href="https://cdn.jsdelivr.net/npm/[email protected]/dist/css/bootstrap.min.css" integrity="sha384-Zenh87qX5JnK2Jl0vWa8Ck2rdkQ2Bzep5IDxbcnCeuOxjzrPF/et3URy9Bv1WTRi" crossorigin="anonymous">
- <script src="https://cdn.jsdelivr.net/npm/[email protected]/dist/js/bootstrap.bundle.min.js" integrity="sha384-OERcA2EqjJCMA+/3y+gxIOqMEjwtxJY7qPCqsdltbNJuaOe923+mo//f6V8Qbsw3" crossorigin="anonymous"></script>
- <style>
- html, body{
- min-height:100%;
- width:100%;
- }
- </style>
- </head>
- <body>
- <nav class="navbar navbar-expand-lg navbar-dark bg-primary bg-gradient">
- <div class="container">
- <div>
- </div>
- </div>
- </nav>
- <div class="container px-5 my-3">
- <div class="row">
- <!-- Page Content Container -->
- <div class="col-lg-12 col-md-12 col-sm-12 mt-4 pt-4 mx-auto">
- <div class="container-fluid">
- <div class="card rounded-0 shadow">
- <div class="card-header">
- <div class="d-flex justify-content-between">
- <div class="col-atuo">
- </div>
- </div>
- </div>
- <div class="card-body">
- <div class="container-fluid">
- <table class="table table-stripped table-bordered">
- <colgroup>
- <col width="5%">
- <col width="20%">
- <col width="20%">
- <col width="55%">
- </colgroup>
- <thead>
- <tr>
- <th class="text-center">
- <input class="form-check-input" type="checkbox" id="selectAll">
- </th>
- </tr>
- </thead>
- <tbody>
- <?php foreach($posts as $post): ?>
- <tr>
- <td class="text-center">
- <input class="form-check-input" type="checkbox" name="post_id[]" value="<?= $post['id'] ?>">
- </td>
- </tr>
- <?php endforeach; ?>
- </tbody>
- </table>
- </div>
- </div>
- </div>
- </div>
- </div>
- <!-- End of Page Content Container -->
- </div>
- </div>
- <!-- Confirmation Modal -->
- <div class="modal fade" id="confrimModal" data-bs-backdrop="static" aria-labelledby="confrimModal" aria-hidden="true" tabindex="-1">
- <div class="modal-dialog modal-dialog-centered modal-dialog-scrollable rounded-0">
- <div class="modal-content rounded-0">
- <div class="modal-header rounded-0">
- </div>
- <div class="modal-body rounded-0">
- <div class="container-fluid">
- </div>
- </div>
- <div class="modal-footer">
- </div>
- </div>
- </div>
- </div>
- <!-- End of Confirmation Modal -->
- </body>
- </html>
Creating the JavaScript
The below snippet is the JavaScript File that contains event listeners functions, modal functionalities, and Ajax scripts. It also contains the script that allows the user to check/uncheck all the row items checkboxes.
app.js
- var confirmModal = $('#confrimModal')
- var checked_ids = []
- var total_checks = $('input[name="post_id[]"]').length;
- var total_checks_checked = checked_ids.length
- var post_to_delete_list = $('#post_to_delete_list')
- $(document).ready(function(){
- /**
- * Store Checked Post ID
- */
- $('input[name="post_id[]"]').change(function(){
- var id = $(this).val()
- if($(this).is(':checked') === true){
- if(($.inArray(id, checked_ids)) < 0)
- checked_ids.push(id)
- }else{
- checked_ids = checked_ids.filter(e => e != id)
- }
- total_checks_checked = checked_ids.length
- if(total_checks_checked == total_checks){
- $('#selectAll').prop('checked',true)
- }else{
- $('#selectAll').prop('checked',false)
- }
- if(total_checks_checked > 0){
- $("#delete_btn").removeClass('d-none')
- }else{
- $("#delete_btn").addClass('d-none')
- }
- })
- /**
- * Select All Function
- */
- $('#selectAll').change(function(e){
- e.preventDefault()
- var _this = $(this)
- if(_this.is(':checked') === true){
- $('input[name="post_id[]"]').prop('checked', true).trigger('change')
- }else{
- $('input[name="post_id[]"]').prop('checked', false).trigger('change')
- }
- })
- /**
- * Delete Confirmation Function
- */
- $('#delete_btn').click(function(){
- var to_delete = '';
- checked_ids.map(id => {
- var parent = $(`input[name="post_id[]"][value="${id}"]`).closest('tr')
- console.log(`input[name="post_id[]"][value="${id}"]`)
- var post_title = parent.find('td:nth-child(2)').text()
- to_delete += `<li>${post_title}</li>`;
- })
- post_to_delete_list.html(to_delete)
- confirmModal.modal('show')
- })
- /**
- * Reset Selected List in Confirm Modal
- */
- confirmModal.on('hide.bs.modal', function(e){
- post_to_delete_list.html('')
- })
- /**
- * Delete Confirmed Action
- */
- $('#confirm-deletion').click(function(e){
- e.preventDefault()
- var _this = $(this)
- _this.attr('disabled', true)
- $.ajax({
- url:'delete_posts.php',
- method:'POST',
- data:{ids: checked_ids},
- dataType:'json',
- error:(err)=>{
- console.error(err)
- alert("An error occurred while deleting the post(s) data.")
- },
- success:function(resp){
- if(!!resp.status){
- if(resp.status == 'success'){
- alert("Selected Post(s) Data has been deleted successfully.")
- location.reload()
- }else if(!!resp.error){
- alert(resp.error)
- }else{
- alert("An error occurred while deleting the post(s) data.")
- }
- }else{
- alert("An error occurred while deleting the post(s) data.")
- }
- }
- })
- })
- })
Creating the Delete API
The following snippet is a PHP Script that processes the deletion of the selected data from the database. The selected data IDs will be sent to this file by the Ajax script using the POST method.
delete_posts.js
- <?php
- require_once('db-connect.php');
- if($_SERVER['REQUEST_METHOD'] == 'POST'){
- $delete = $conn->query($sql);
- if($delete){
- $resp['status'] = 'success';
- }else{
- $resp['status'] = 'failed';
- $resp['error'] = $conn->error;
- }
- }else{
- $resp['status'] = 'failed';
- $resp['error'] = 'No Post ID(s) Data sent to delete.';
- }
- }else{
- $resp['status'] = 'failed';
- $resp['error'] = 'No Post Data sent to this current request.';
- }
- $conn->close();
That's it! You can now test the sample web application that contains a Bulk Deletion Feature on your end.
How does the Application work?
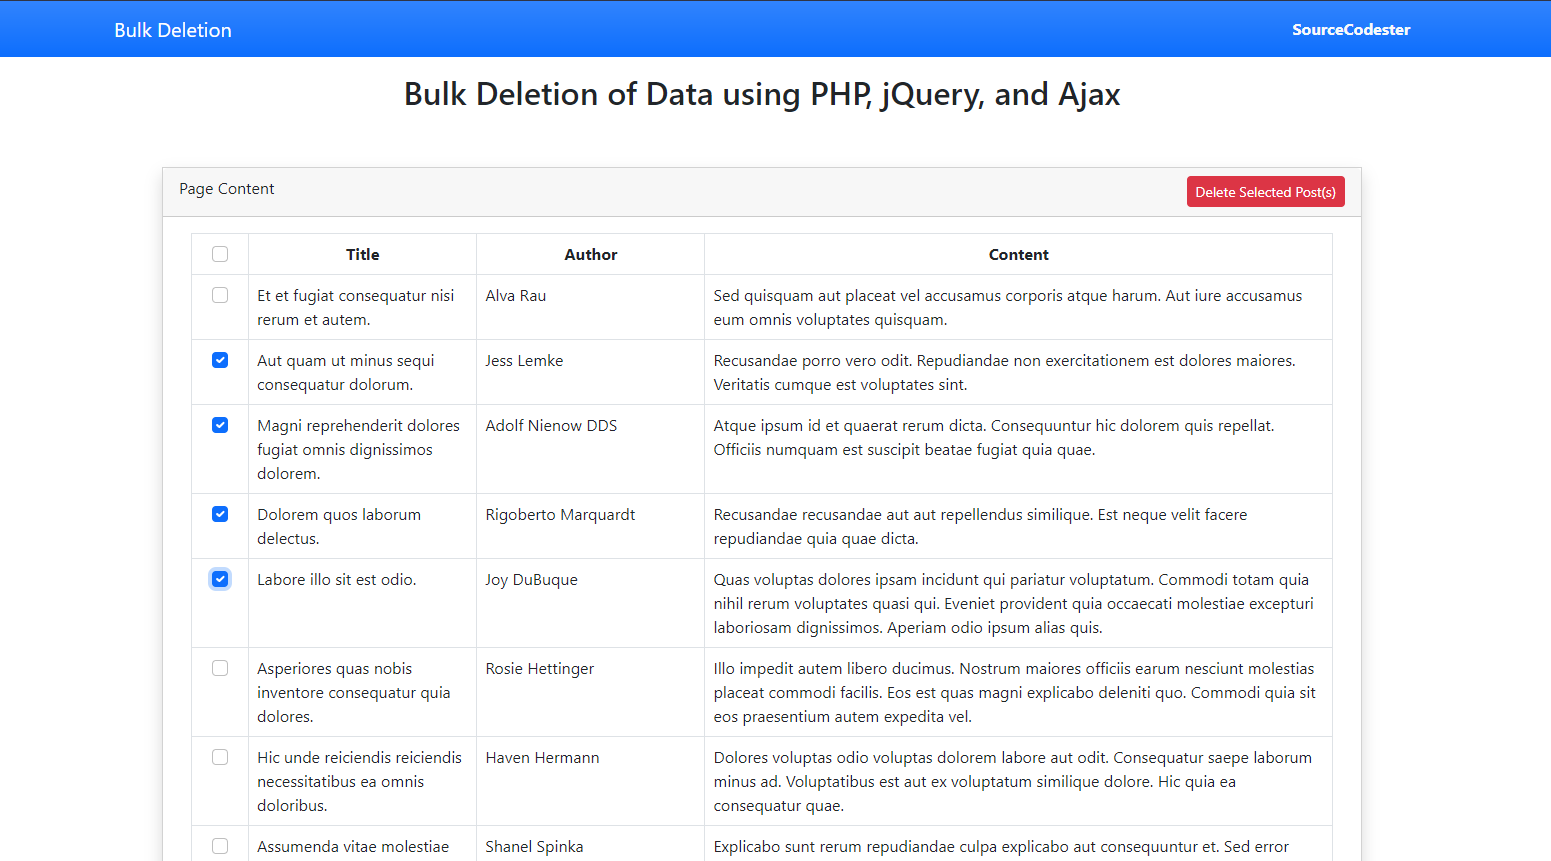
- Check the data you desire to delete or check the checkbox located at the upper left of the table trigger check all the checkboxes.
- After you check at least 1-row checkbox, the Delete Selected Post(s) Button will appear on the right side of the panel or card title container.
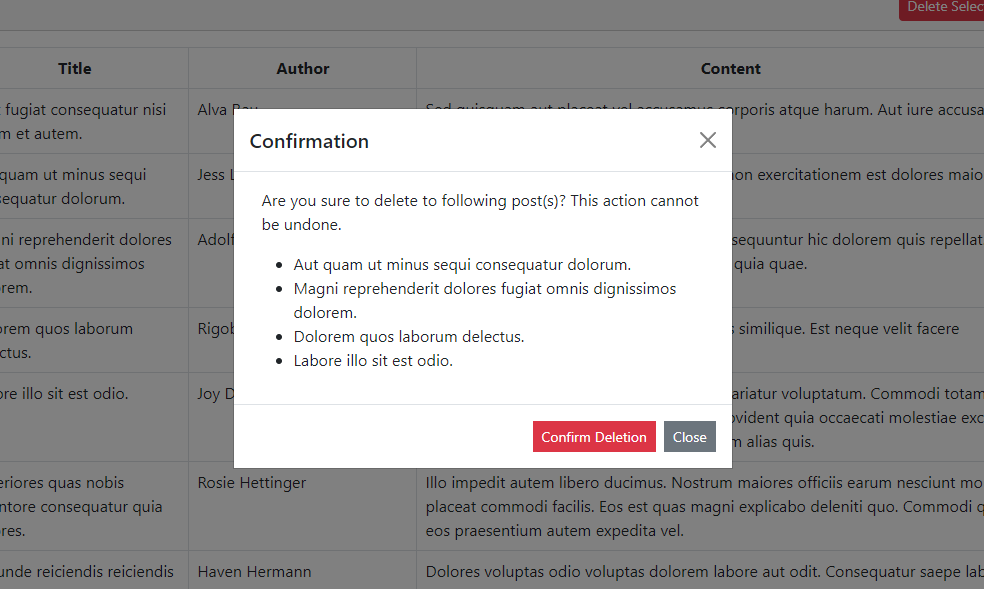
- A Confirmation Modal will appear after clicking the Delete Selected Post(s) Button. The modal contains a message confirming that you are about to delete selected Post(s) Data. Selected posts' titles are listed also on the confirmation modal.
- Click the Confirm Deletion Button to confirm the deletion of data.
Application Snapshots
Main Page
Confirmation Modal
DEMO VIDEO
That's the end of this tutorial. I hope this Bulk Deletion using Checkboxes, PHP, MySQL, and JS tutorial will help you with what you are looking for and that you'll find this useful for your current or future PHP Projects.
Explore more on this website for more Tutorials and Free Source Codes.