Creating a Simple Image Update in PHP Tutorial
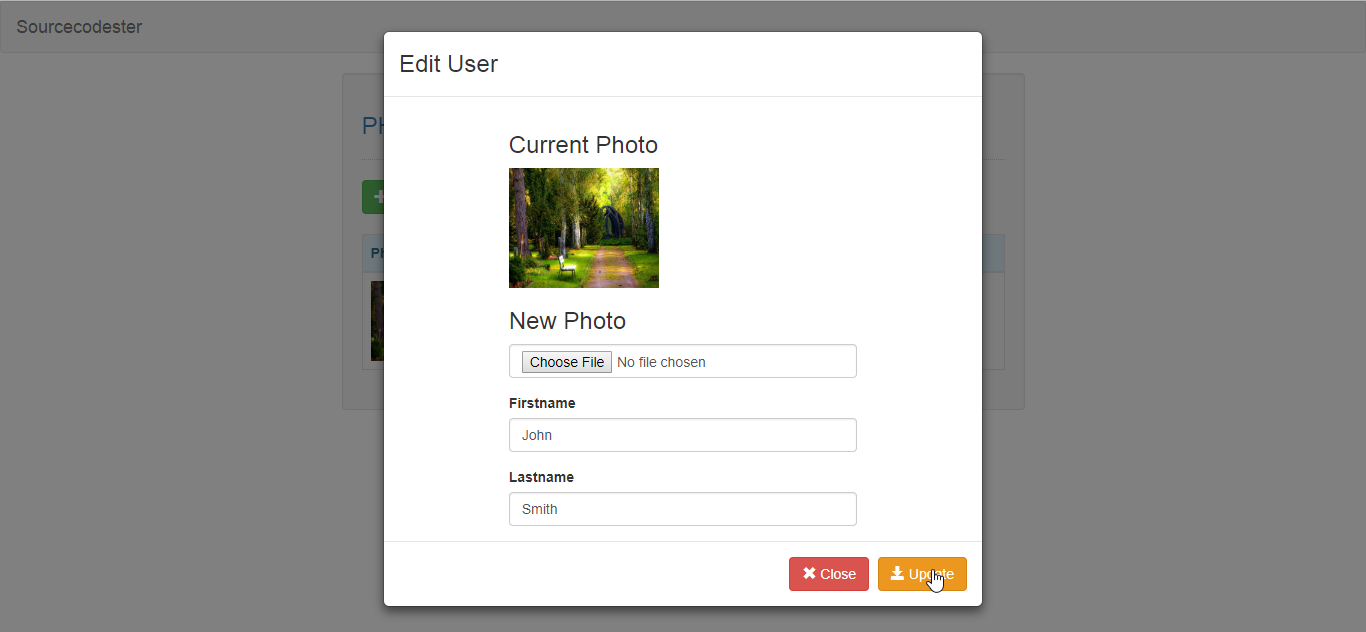
In this tutorial we will create a Simple Image Update using PHP. This code will launch a modal to update the user image when the user clicks the update button. The code use MySQLi UPDATE query to update the new user information base on the given user id. This is a user-friendly program feel free to modify and use it in your system.
We will be using PHP as a scripting language that interprets in the webserver such as XAMPP, wamp, etc. It is widely used by modern website applications to handle and protect user confidential information.
Getting Started:
First you have to download & install XAMPP or any local server that run PHP scripts. Here's the link for XAMPP server https://www.apachefriends.org/index.html.
And this is the link for the jquery that i used in this tutorial https://jquery.com/.
Lastly, this is the link for the bootstrap that i used for the layout design https://getbootstrap.com/.
Creating Database
First, make sure that you have already started your XAMPP's Apache and MySQL. Then browse the PHPMyAdmin in a browser i.e. http://localhost/phpmyadmin. Then create a new database naming db_img_update and go to the SQL tab and copy/paste the script below and click "Go" button to execute the code.
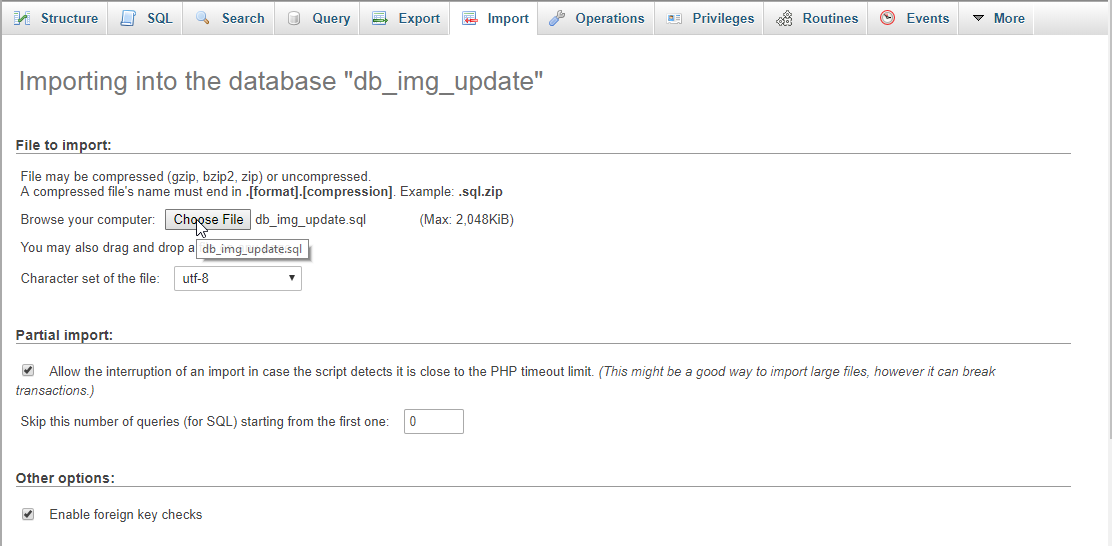
You can also import the provided SQL File provided along with the source code zip file insde the db folder. Click the Import tab at PHPMyadmin then locate the database file inside the folder of the application then click ok.

Creating the database connection
Open your any kind of text editor(notepad++, etc..). Then just copy/paste the code below then name it conn.php.
- <?php
- if(!$conn){
- }
- ?>
Creating The Interface
This is where we will create a simple form for our application. To create the forms simply copy and write it into your text editor, then save it as index.php.
- <!DOCTYPE html>
- <html lang="en">
- <head>
- <meta charset="UTF-8" name="viewport" content="width=device-width, initial-scale=1" />
- <link rel="stylesheet" type="text/css" href="css/bootstrap.css" />
- </head>
- <body>
- <nav class="navbar navbar-default">
- <div class="container-fluid">
- <a class="navbar-brand" href="https://sourcecodester.com">Sourcecodester</a>
- </div>
- </nav>
- <div class="col-md-3"></div>
- <div class="col-md-6 well">
- <h3 class="text-primary">PHP - Simple Image Update</h3>
- <hr style="border-top:1px dotted #ccc;"/>
- <button class="btn btn-success" type="button" data-toggle="modal" data-target="#form_modal"><span class="glyphicon glyphicon-plus"></span> Add user</button>
- <br /><br />
- <table class="table table-bordered">
- <thead class="alert-info">
- <tr>
- <th>Photo</th>
- <th>Firstname</th>
- <th>Lastname</th>
- <th>Action</th>
- </tr>
- </thead>
- <tbody>
- <?php
- require 'conn.php';
- ?>
- <tr>
- <td><img src="<?php echo $fetch['photo']?>" height="80" width="100"/></td>
- <td><?php echo $fetch['firstname']?></td>
- <td><?php echo $fetch['lastname']?></td>
- <td><button type="button" class="btn btn-warning" data-toggle="modal" data-target="#edit<?php echo $fetch['user_id']?>"><span class="glyphicon glyphicon-edit"></span> Update</button></td>
- <div class="modal fade" id="edit<?php echo $fetch['user_id']?>" aria-hidden="true">
- <div class="modal-dialog">
- <div class="modal-content">
- <form method="POST" enctype="multipart/form-data" action="edit.php">
- <div class="modal-header">
- <h3 class="modal-title">Edit User</h3>
- </div>
- <div class="modal-body">
- <div class="col-md-2"></div>
- <div class="col-md-8">
- <div class="form-group">
- <h3>Current Photo</h3>
- <img src="<?php echo $fetch['photo']?>" height="120" width="150" />
- <input type="hidden" name="previous" value="<?php echo $fetch['photo']?>"/>
- <h3>New Photo</h3>
- <input type="file" class="form-control" name="photo" value="<?php echo $fetch['photo']?>" required="required"/>
- </div>
- <div class="form-group">
- <label>Firstname</label>
- <input type="hidden" value="<?php echo $fetch['user_id']?>" name="user_id"/>
- <input type="text" class="form-control" value="<?php echo $fetch['firstname']?>" name="firstname" required="required"/>
- </div>
- <div class="form-group">
- <label>Lastname</label>
- <input type="text" class="form-control" value="<?php echo $fetch['lastname']?>" name="lastname" required="required"/>
- </div>
- </div>
- </div>
- <br style="clear:both;"/>
- <div class="modal-footer">
- <button class="btn btn-danger" data-dismiss="modal"><span class="glyphicon glyphicon-remove"></span> Close</button>
- <button class="btn btn-warning" name="edit"><span class="glyphicon glyphicon-save"></span> Update</button>
- </div>
- </form>
- </div>
- </div>
- </div>
- </tr>
- <?php
- }
- ?>
- </tbody>
- </table>
- </div>
- <div class="modal fade" id="form_modal" aria-hidden="true">
- <div class="modal-dialog">
- <div class="modal-content">
- <form method="POST" action="save.php" enctype="multipart/form-data">
- <div class="modal-header">
- <h3 class="modal-title">Add User</h3>
- </div>
- <div class="modal-body">
- <div class="col-md-2"></div>
- <div class="col-md-8">
- <div class="form-group">
- <label>Photo</label>
- <input type="file" class="form-control" name="photo" required="required"/>
- </div>
- <div class="form-group">
- <label>Firstname</label>
- <input type="text" class="form-control" name="firstname" required="required"/>
- </div>
- <div class="form-group">
- <label>Lastname</label>
- <input type="text" class="form-control" name="lastname" required="required"/>
- </div>
- </div>
- </div>
- <br style="clear:both;"/>
- <div class="modal-footer">
- <button class="btn btn-danger" type="button" data-dismiss="modal"><span class="glyphicon glyphicon-remove"></span> Close</button>
- <button class="btn btn-primary" name="save"><span class="glyphicon glyphicon-save"></span> Save</button>
- </div>
- </form>
- </div>
- </div>
- </div>
- <script src="js/jquery-3.2.1.min.js"></script>
- <script src="js/bootstrap.js"></script>
- </body>
- </html>
Creating PHP Query
This code contains the php query of the application. This code will store the user information to the MySQLi database server. To do that just copy and write this block of codes inside the text editor, then save it as save.php.
- <?php
- require_once 'conn.php';
- $image_name = $_FILES['photo']['name'];
- $image_temp = $_FILES['photo']['tmp_name'];
- $firstname = $_POST['firstname'];
- $lastname = $_POST['lastname'];
- $path = "upload/".$name;
- mysqli_query($conn, "INSERT INTO `user` VALUES('', '$firstname', '$lastname', '$path')") or die(mysqli_error());
- echo "<script>alert('User account saved!')</script>";
- }
- }else{
- echo "<script>alert('Image only')</script>";
- }
- }
- ?>
Creating the Main Function
This code contains the main function of the application. This code will update the user image when the button is clicked. To make this just copy and write these block of codes below inside the text editor, then save it as edit.php
- <?php
- require_once 'conn.php';
- $user_id = $_POST['user_id'];
- $image_name = $_FILES['photo']['name'];
- $image_temp = $_FILES['photo']['tmp_name'];
- $firstname = $_POST['firstname'];
- $lastname = $_POST['lastname'];
- $previous = $_POST['previous'];
- $path = "upload/".$name;
- mysqli_query($conn, "UPDATE `user` set `firstname` = '$firstname', `lastname` = '$lastname', `photo` = '$path' WHERE `user_id` = '$user_id'") or die(mysqli_error());
- echo "<script>alert('User account updated!')</script>";
- }
- }
- }else{
- echo "<script>alert('Image only')</script>";
- }
- }
- ?>
DEMO
There you have it we successfully created Simple Image Update using PHP. I hope that this simple tutorial helps you to what you are looking for. For more updates and tutorials just kindly visit this site.
Enjoy Coding!
