How to Print the Text in a Textbox
Submitted by janobe on Saturday, April 26, 2014 - 11:42.
This time, I’m going to teach you how to print the text in a Textbox in Visual Basic 2008. This will allow you to preview and print any message that you type in a TextBox. It depends on you, on how long your message will because it will automatically set on the next page.
So, lets get started :
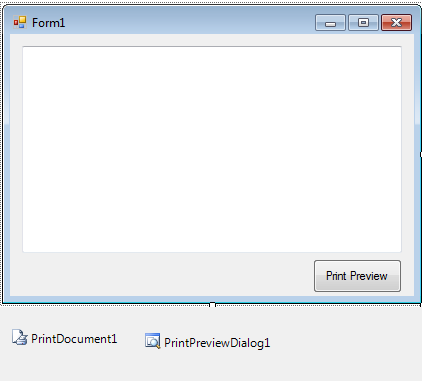
Open Visual Basic 2008, create a new Window Application and do the Form just like this. Add the PrintDocument and PrintPreviewDialog.
 Now, double click the PrintDocument and do this following code for setting up the font,margin and the process where in the message in the Textbox will appear in the PrintDocument.
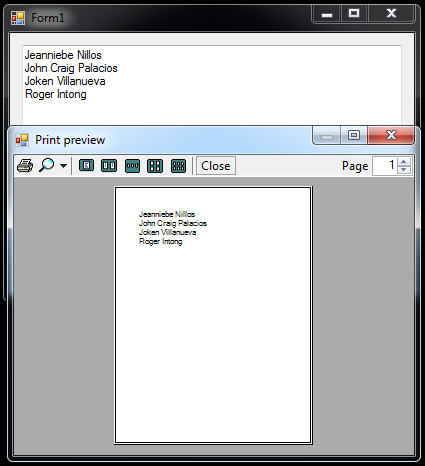
Then, double click the Button and do the following code for the Print Preview will appear.
Now, run your project.
The complete source code is included. Download and run it on your computer.
Now, double click the PrintDocument and do this following code for setting up the font,margin and the process where in the message in the Textbox will appear in the PrintDocument.
- Private Sub PrintDocument1_PrintPage(ByVal sender As System.Object, ByVal e As System.Drawing.Printing.PrintPageEventArgs) Handles PrintDocument1.PrintPage
- 'DECLARE A STATIC VARIABLE
- 'HOLD THE POSITION OF THE LAST PRINTED CHARACTER
- 'AND IT CAN REFERECE THE SUBSEQUET PRINTPAGE EVENTS.
- Static CurCharInt As Int32
- 'SET THE FONT THAT YOU WANT TO USE FOR PRINTING.
- Dim fnt As New Font("Segoe UI", 20)
- Dim printheightInt, printwidthInt, leftmargin, topmargin As Int32
- With PrintDocument1.DefaultPageSettings
- ' SET THE VARIABLE THAT HOLD THE LIMITS OF THE PRINTING AREA RECTANGLE
- printheightInt = .PaperSize.Height - .Margins.Top - .Margins.Bottom
- printwidthInt = .PaperSize.Width - .Margins.Left - .Margins.Right
- ' SET THE VARIABLES TO HOLD THE VALUES OF THE MARGIN THAT WILL WORK FOR
- 'THE X AND Y COORDINATES OF THE UPPER LEFT CORNER OF THE PRINTING AREA RECTANGLE
- leftmargin = .Margins.Left ' X coordinate
- topmargin = .Margins.Top ' Y coordinate
- End With
- ' COMPUTE THE TOTAL LINES IN THE DOCUMENT BASED ON THE HEIGHT OF THE FONT AND ITS PRINTING AREA.
- Dim linecountInt As Int32 = CInt(printheightInt / fnt.Height)
- ' SET THE RECTANGLE STRUCTURE THAT SERVES AS THE PRINTING AREA.
- Dim printAreaRec As New RectangleF(leftmargin, topmargin, printwidthInt, printheightInt)
- ' INSTANTIATE THE STRINGFORMAT CLASS THAT CONTAINS TEXT LAYOUT INFORMATION,
- 'DISPLAY MANIPULATIONS AND OPENTYPE FEATURES.
- Dim format As New StringFormat(StringFormatFlags.LineLimit)
- Dim linesfilledInt As Int32 'MUST BE PASSED WHEN PASSING CHARFIT.
- Dim charsfittedInt As Int32 'USED WHEN CALCULATING CurCharInt AND HasMorePages.
- 'CALL MEASURESTRING TO KNOW HOW MANY CHARACTERS THAT WILL FIT IN THE PRINTING AREA RECTANGLE.
- e.Graphics.MeasureString(Mid(TextBox1.Text, CurCharInt + 1), fnt, _
- New SizeF(printwidthInt, printheightInt), format, _
- charsfittedInt, linesfilledInt)
- 'IN THIS AREA, THE TEXT WILL BE PRINT IN THE PAGE
- e.Graphics.DrawString(Mid(TextBox1.Text, CurCharInt + 1), fnt, _
- Brushes.Black, printAreaRec, format)
- 'FORMULA FOR ADVANCING THE CURRENT TO THE LAST CHARACTER PRINTED ON THIS PAGE.
- CurCharInt += charsfittedInt
- 'CHECKING IF WHETHER THE PRINTING MODULE SHOULD BE FIRE TO ANOTHER PRINTPAGE EVENT
- If CurCharInt < TextBox1.Text.Length Then
- e.HasMorePages = True
- Else
- e.HasMorePages = False
- 'RESET CurCharInt AS IT IS STATIC.
- CurCharInt = 0
- End If
- End Sub
- Private Sub btnprev_Click(ByVal sender As System.Object, ByVal e As System.EventArgs) Handles btnprev.Click
- PrintPreviewDialog1.Document = PrintDocument1 'SET THE DOCUMENT TO PREVIEW
- PrintPreviewDialog1.ShowDialog() 'THE MODAL DIALOG BOX WITH THE CURRENT ACTIVE WINDOW SET AS ITS OWNER
- End Sub