Inserting Data using PHP into MySQL Database
Submitted by GeePee on Saturday, April 18, 2015 - 22:59.
In this course we will focus on how to INSERT data using PHP into MySQL Database. When inserting data into Mysql Database tables we need to remember the names and types of table columns. For example if you set your field as the name of the person so as expected you must insert string value or if you are referring into the age of a person meaning you need to enter a numeric value. Below are the sample code for inserting data into MySQL database table.
After successfully executed, we will proceed now in improving our program because in real world application all the data must be based on user inputs through html forms before it will be taken using PHP scripts and will be inserted into a MySQL database.
This time we're going to create an html file that will accept user input(s) and name it as “AddStudent.php”
Then create a new PHP file that will process the user input and save the values to the MySQL database save this as “process_addstud.php”.
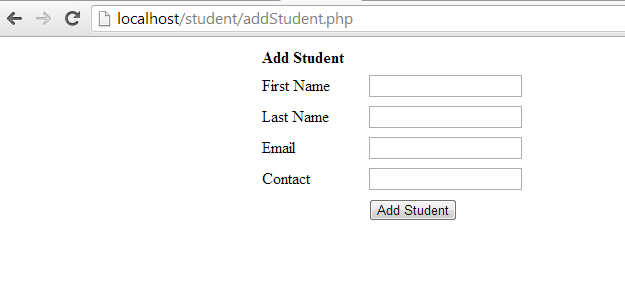
The process of using this program to work for us. First open any web browser available in the computer then on the address bar type this http://localhost/student/addStudent.php and when you press enter you will see looks like as shown below.
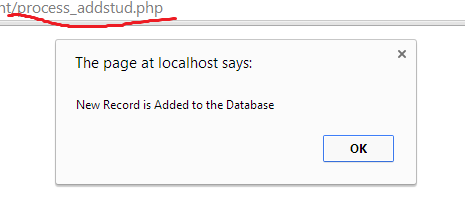
 Add fill up the following like the First Name, Last Name, Email and Contact and finally click “add Student” button you will be redirected into “process_addstud.php”. And if saved successful it will give a message like as shown below. And when you click OK button you be again redirected into "addStudent.php".
 In this project I attached the studentdb for your convenience. If you have some question or any suggestion you can send a message. Hope you enjoy reading this stuff.
- <?php
- //set up for mysql Connection
- $dbhost = 'localhost';
- $dbuser = 'root';
- $dbpass = '';
- //test if the connection is established successfully then it will proceed in next process else it will throw an error message
- if(! $conn )
- {
- }
- //we specify here the Database name we are using
- //It wiil insert a row to our tblstudent`
- $sql = "INSERT INTO `studentdb`.`tblstudent` (`s_id`, `firstname`, `lastname`, `email`, `phone`)
- VALUES (NULL, 'Joken', 'Villanueva', '[email protected]', '09983344318');";
- //we are using mysql_query function. it returns a resource on true else False on error
- if(! $retval )
- {
- }
- echo "Entered data successfully\n";
- //close of connection
- ?>
- <html>
- <head>
- <title>Add Student Record</title>
- </head>
- <body>
- <form method="post" action="process_addstud.php">
- <table width="400" border="0" cellspacing="1" cellpadding="2" align="center">
- <th colspan="2" align="left">Add Student</h2>
- <tr>
- <td width="100">First Name</td>
- <td><input name="f_name" type="text" id="f_name"></td>
- </tr>
- <tr>
- <td width="100">Last Name</td>
- <td><input name="l_name" type="text" id="l_name"></td>
- </tr>
- <tr>
- <td width="100">Email</td>
- <td><input name="email" type="text" id="email"></td>
- </tr>
- <tr>
- <td width="100">Contact</td>
- <td><input name="contact" type="text" id="contact"></td>
- </tr>
- <td width="100"> </td>
- <td>
- <input name="save" type="submit" id="save" value="Add Student">
- </td>
- </tr>
- </table>
- </form>
- </body>
- </html>
- <?php
- //set up for mysql Connection
- $dbhost = 'localhost';
- $dbuser = 'root';
- $dbpass = '';
- //test if the connection is established successfully then it will proceed in next process else it will throw an error message
- if(! $conn )
- {
- }
- //we specify here the Database name we are using
- $f_name = $_POST['f_name'];
- $l_name = $_POST['l_name'];
- $email = $_POST['email'];
- $contact= $_POST['contact'];
- //It wiil insert a row to our tblstudent`
- $sql = "INSERT INTO `studentdb`.`tblstudent` (`s_id`, `firstname`, `lastname`, `email`, `phone`)
- VALUES (NULL, '{$f_name}', '{$l_name}', '{$email}', '{$contact}');";
- //we are using mysql_query function. it returns a resource on true else False on error
- if(! $retval )
- {
- }
- ?>
- <script type="text/javascript">
- alert("New Record is Added to the Database");
- window.location = "addStudent.php";
- </script>
- <?php
- //close of connection
- ?>
Add fill up the following like the First Name, Last Name, Email and Contact and finally click “add Student” button you will be redirected into “process_addstud.php”. And if saved successful it will give a message like as shown below. And when you click OK button you be again redirected into "addStudent.php".
In this project I attached the studentdb for your convenience. If you have some question or any suggestion you can send a message. Hope you enjoy reading this stuff.