In the previous tutorials with regard to XML, we have discussed on How to Create XML file from MySQL Database using PHP/MySQLi and on How to Display XML File using PHP. This time, we are going to discussed on how to create CRUD Operation on XML File.
This tutorial tackles how to create a CRUD(create, read, update and delete) operation also knows as add, edit, delete in XML Files using PHP with Bootstrap Modal to handle our Forms. XML stands for eXtensible Markup Language which is designed to store and transport data and sometimes used as a database substitute.
Getting Started
I've used bootstrap and jQuery in this tutorial to enable bootstrap modals. These files are included in the downloadable of this tutorial but, if you want, you may download them using the links below:
Preparing our XML File to use
I've included a sample XML file in the downloadable of this tutorial located in files folder. This file is what we are going to use in this tutorial. If you want to start from scratch, create a new file inside the files folder naming members.xml. Copy/Paste the xml script below in the xml file you created.
<?xml version="1.0"?>
<users>
</users>
Displaying XML Data
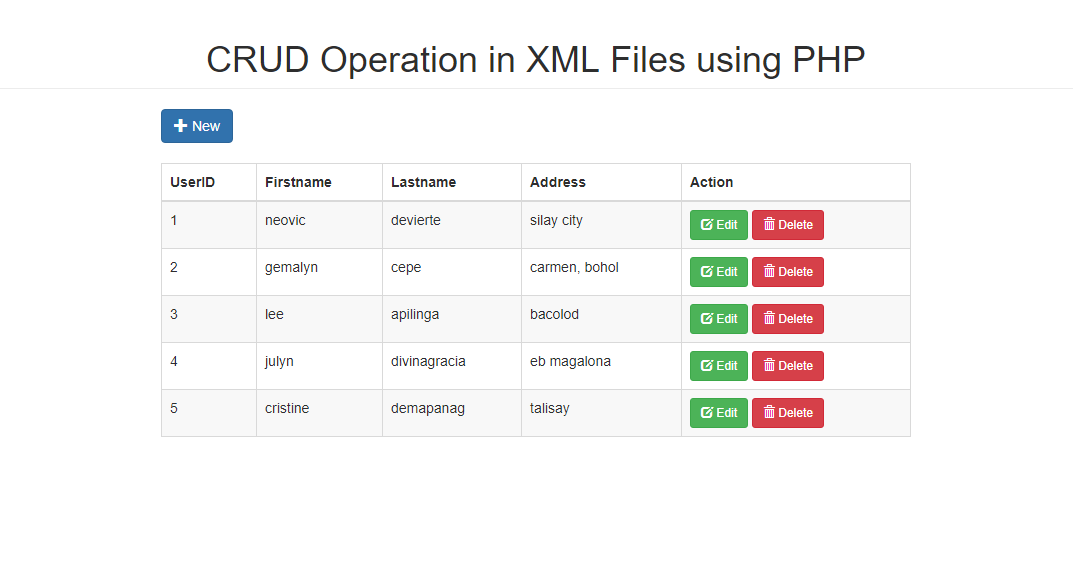
Next, we are going to display the data in our XML file by creating a table and adding the three buttons to our add, edit and delete functions. If you created a new XML file, the list/table will be empty at first till member data will be added.
Create a new file, name it as index.php and paste the below codes.
<!DOCTYPE html>
<html>
<head>
<meta charset="utf-8">
<title>CRUD Operation in XML Files using PHP</title>
<link rel="stylesheet" type="text/css" href="bootstrap/css/bootstrap.css">
</head>
<body>
<div class="container">
<h1 class="page-header text-center">CRUD Operation in XML Files using PHP</h1>
<div class="row">
<div class="col-sm-8 col-sm-offset-2">
<a href="#addnew" class="btn btn-primary" data-toggle="modal"><span class="glyphicon glyphicon-plus"></span> New</a>
<?php
if(isset($_SESSION['message'])){ ?>
<div class="alert alert-info text-center" style="margin-top:20px;">
<?php echo $_SESSION['message']; ?>
</div>
<?php
unset($_SESSION['message']); }
?>
<table class="table table-bordered table-striped" style="margin-top:20px;">
<thead>
<th>UserID</th>
<th>Firstname</th>
<th>Lastname</th>
<th>Address</th>
<th>Action</th>
</thead>
<tbody>
<?php
//load xml file
foreach($file->user as $row){
?>
<tr>
<td><?php echo $row->id; ?></td>
<td><?php echo $row->firstname; ?></td>
<td><?php echo $row->lastname; ?></td>
<td><?php echo $row->address; ?></td>
<td>
<a href="#edit_<?php echo $row->id; ?>" data-toggle="modal" class="btn btn-success btn-sm"><span class="glyphicon glyphicon-edit"></span> Edit</a>
<a href="#delete_<?php echo $row->id; ?>" data-toggle="modal" class="btn btn-danger btn-sm"><span class="glyphicon glyphicon-trash"></span> Delete</a>
</td>
<?php include('edit_delete_modal.php'); ?>
</tr>
<?php
}
?>
</tbody>
</table>
</div>
</div>
</div>
<?php include('add_modal.php'); ?>
<script src="jquery.min.js"></script>
<script src="bootstrap/js/bootstrap.min.js"></script>
</body>
</html>
Creating our Modals
Next, we are going to create the modals for our add, edit and delete.
Create the ff files:
add_modal.php
<!-- Add New -->
<div class="modal fade" id="addnew" tabindex="-1" role="dialog" aria-labelledby="myModalLabel" aria-hidden="true">
<div class="modal-dialog">
<div class="modal-content">
<div class="modal-header">
<button type="button" class="close" data-dismiss="modal" aria-hidden="true">×</button>
<center><h4 class="modal-title" id="myModalLabel">Add New</h4></center>
</div>
<div class="modal-body">
<div class="container-fluid">
<form method="POST" action="add.php">
<div class="row form-group">
<div class="col-sm-2">
<label class="control-label" style="position:relative; top:7px;">ID:</label>
</div>
<div class="col-sm-10">
<input type="text" class="form-control" name="id">
</div>
</div>
<div class="row form-group">
<div class="col-sm-2">
<label class="control-label" style="position:relative; top:7px;">Firstname:</label>
</div>
<div class="col-sm-10">
<input type="text" class="form-control" name="firstname">
</div>
</div>
<div class="row form-group">
<div class="col-sm-2">
<label class="control-label" style="position:relative; top:7px;">Lastname:</label>
</div>
<div class="col-sm-10">
<input type="text" class="form-control" name="lastname">
</div>
</div>
<div class="row form-group">
<div class="col-sm-2">
<label class="control-label" style="position:relative; top:7px;">Address:</label>
</div>
<div class="col-sm-10">
<input type="text" class="form-control" name="address">
</div>
</div>
</div>
</div>
<div class="modal-footer">
<button type="button" class="btn btn-default" data-dismiss="modal"><span class="glyphicon glyphicon-remove"></span> Cancel</button>
<button type="submit" name="add" class="btn btn-primary"><span class="glyphicon glyphicon-floppy-disk"></span> Save</a>
</form>
</div>
</div>
</div>
</div>
edit_delete_modal.php
<!-- Edit -->
<div class="modal fade" id="edit_<?php echo $row->id; ?>" tabindex="-1" role="dialog" aria-labelledby="myModalLabel" aria-hidden="true">
<div class="modal-dialog">
<div class="modal-content">
<div class="modal-header">
<button type="button" class="close" data-dismiss="modal" aria-hidden="true">×</button>
<center><h4 class="modal-title" id="myModalLabel">Edit Member</h4></center>
</div>
<div class="modal-body">
<div class="container-fluid">
<form method="POST" action="edit.php">
<div class="row form-group">
<div class="col-sm-2">
<label class="control-label" style="position:relative; top:7px;">ID:</label>
</div>
<div class="col-sm-10">
<input type="text" class="form-control" name="id" value="<?php echo $row->id; ?>" readonly>
</div>
</div>
<div class="row form-group">
<div class="col-sm-2">
<label class="control-label" style="position:relative; top:7px;">Firstname:</label>
</div>
<div class="col-sm-10">
<input type="text" class="form-control" name="firstname" value="<?php echo $row->firstname; ?>">
</div>
</div>
<div class="row form-group">
<div class="col-sm-2">
<label class="control-label" style="position:relative; top:7px;">Lastname:</label>
</div>
<div class="col-sm-10">
<input type="text" class="form-control" name="lastname" value="<?php echo $row->lastname; ?>">
</div>
</div>
<div class="row form-group">
<div class="col-sm-2">
<label class="control-label" style="position:relative; top:7px;">Address:</label>
</div>
<div class="col-sm-10">
<input type="text" class="form-control" name="address" value="<?php echo $row->address; ?>">
</div>
</div>
</div>
</div>
<div class="modal-footer">
<button type="button" class="btn btn-default" data-dismiss="modal"><span class="glyphicon glyphicon-remove"></span> Cancel</button>
<button type="submit" name="edit" class="btn btn-success"><span class="glyphicon glyphicon-check"></span> Update</a>
</form>
</div>
</div>
</div>
</div>
<!-- Delete -->
<div class="modal fade" id="delete_<?php echo $row->id; ?>" tabindex="-1" role="dialog" aria-labelledby="myModalLabel" aria-hidden="true">
<div class="modal-dialog">
<div class="modal-content">
<div class="modal-header">
<button type="button" class="close" data-dismiss="modal" aria-hidden="true">×</button>
<center><h4 class="modal-title" id="myModalLabel">Delete Member</h4></center>
</div>
<div class="modal-body">
<p class="text-center">Are you sure you want to Delete</p>
<h2 class="text-center"><?php echo $row->firstname.' '.$row->lastname; ?></h2>
</div>
<div class="modal-footer">
<button type="button" class="btn btn-default" data-dismiss="modal"><span class="glyphicon glyphicon-remove"></span> Cancel</button>
<a href="delete.php?id=<?php echo $row->id; ?>" class="btn btn-danger"><span class="glyphicon glyphicon-trash"></span> Yes</a>
</div>
</div>
</div>
</div>
Creating our Add Script
Next, we are going to create our add script to add a new item to our XML file.
Create a new file, name it as add.php and paste the below codes.
<?php
if(isset($_POST['add'])){ //open xml file
$user = $users->addChild('user');
$user->addChild('id', $_POST['id']);
$user->addChild('firstname', $_POST['firstname']);
$user->addChild('lastname', $_POST['lastname']);
$user->addChild('address', $_POST['address']);
// Save to file
// file_put_contents('files/members.xml', $users->asXML());
// Prettify / Format XML and save
$dom = new DomDocument();
$dom->preserveWhiteSpace = false;
$dom->formatOutput = true;
$dom->loadXML($users->asXML());
$dom->save('files/members.xml');
// Prettify / Format XML and save
$_SESSION['message'] = 'Member added successfully';
header('location: index.php'); }
else{
$_SESSION['message'] = 'Fill up add form first';
header('location: index.php'); }
?>
Creating our Update Script
Next, we are going to create our update script by creating a new file, name it as edit.php and paste the below codes.
<?php
if(isset($_POST['edit'])){ foreach($users->user as $user){
if($user->id == $_POST['id']){
$user->firstname = $_POST['firstname'];
$user->lastname = $_POST['lastname'];
$user->address = $_POST['address'];
break;
}
}
$_SESSION['message'] = 'Member updated successfully';
header('location: index.php'); }
else{
$_SESSION['message'] = 'Select member to edit first';
header('location: index.php'); }
?>
Creating our Delete Script
Lastly, we create our delete script by creating a new file, name it as delete.php and paste the below codes.
<?php
$id = $_GET['id'];
//we're are going to create iterator to assign to each user
$index = 0;
$i = 0;
foreach($users->user as $user){
if($user->id == $id){
$index = $i;
break;
}
$i++;
}
unset($users->user[$index]);
$_SESSION['message'] = 'Member deleted successfully';
header('location: index.php');
?>
DEMO
And that's the end of this tutorial. Test the simple web you made on your end and if there's an error occurred, kindly recheck the code in each file or you can also download the working source code that I have created in this tutorial.
I hope this will help you with what you are looking for and you'll find this tutorial useful for your future PHP Projects. Explore more on this website for more tutorials and free source codes.
Happy Coding :)
Note: Due to the size or complexity of this submission, the author has submitted it as a .zip file to shorten your download time. After downloading it, you will need a program like Winzip to decompress it.
Virus note: All files are scanned once-a-day by SourceCodester.com for viruses, but new viruses come out every day, so no prevention program can catch 100% of them.
FOR YOUR OWN SAFETY, PLEASE:
1. Re-scan downloaded files using your personal virus checker before using it.
2. NEVER, EVER run compiled files (.exe's, .ocx's, .dll's etc.)--only run source code.