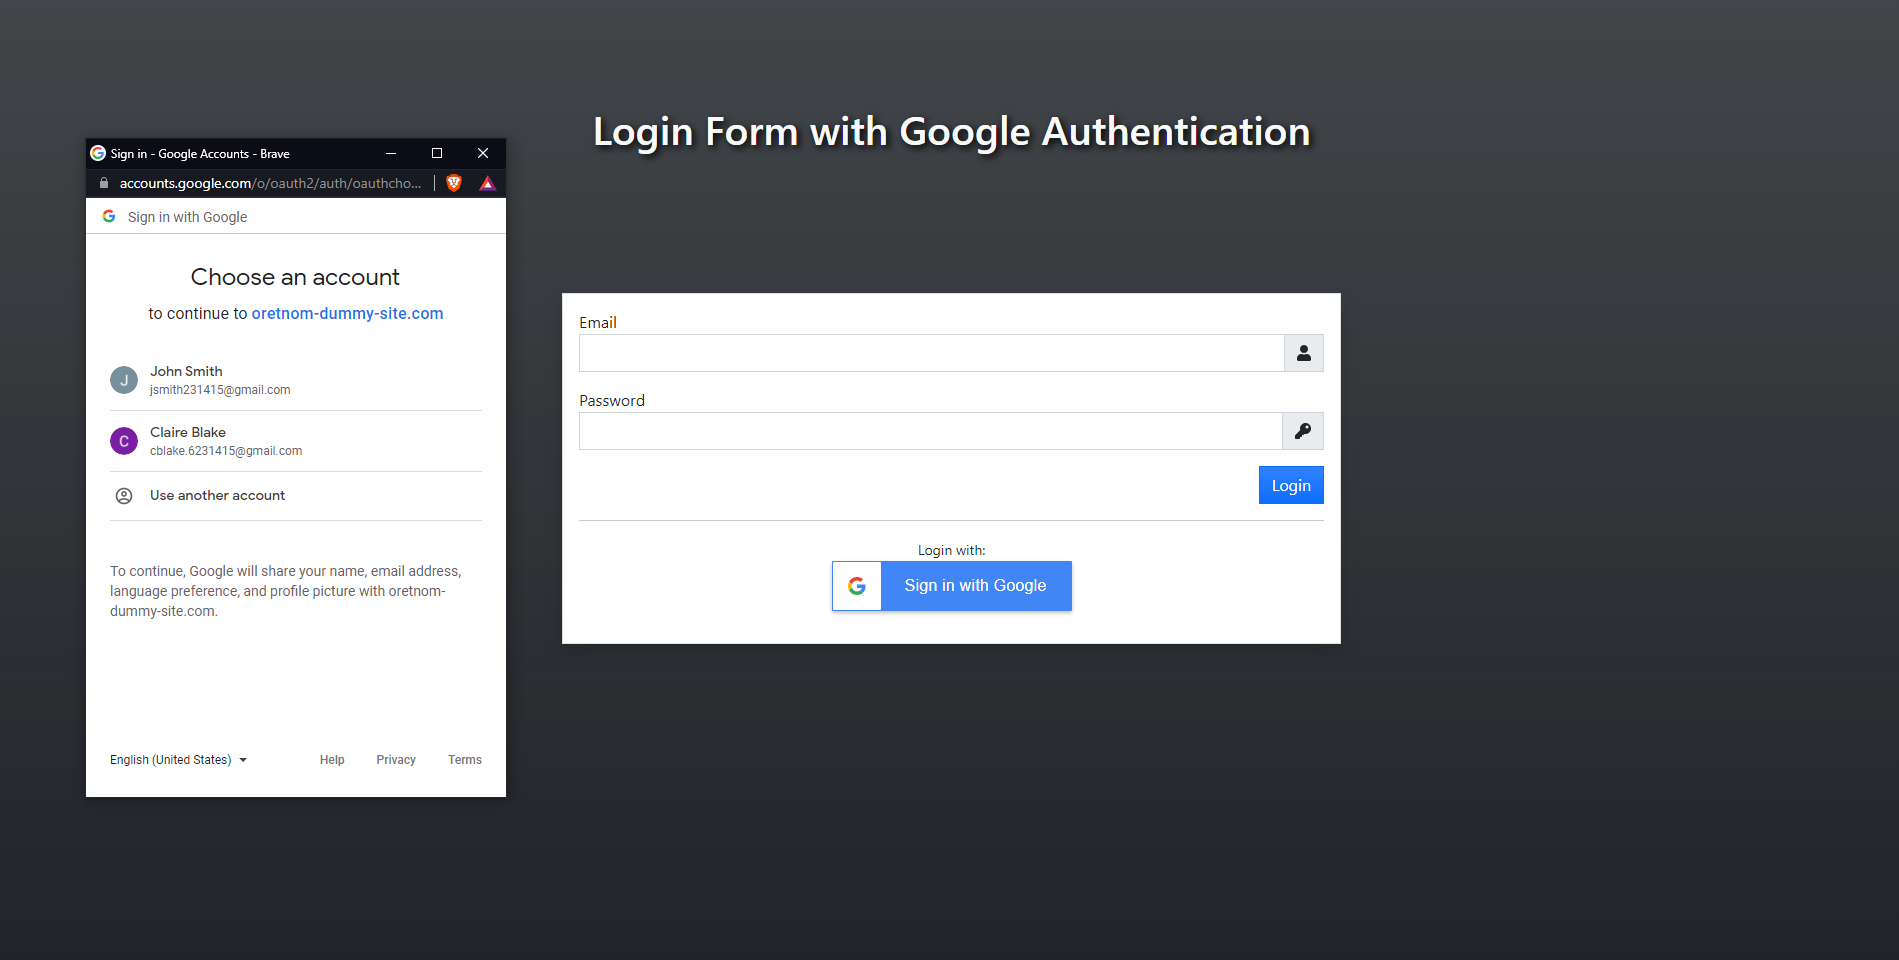
In this tutorial, we will tackle about how to create a web application Login Form with Google Authentication/ Google OAuth API. Here, you will learn how to set up a project and register the app in google console developer. Also, we will be creating a simple login form web application with the said login authentication. The scripts will be written in HTML, CSS, JavaScript, and PHP. In the application, the user credential will also be stored in the database using MySQL Database.
Let's Get Started!
Google Console Setup
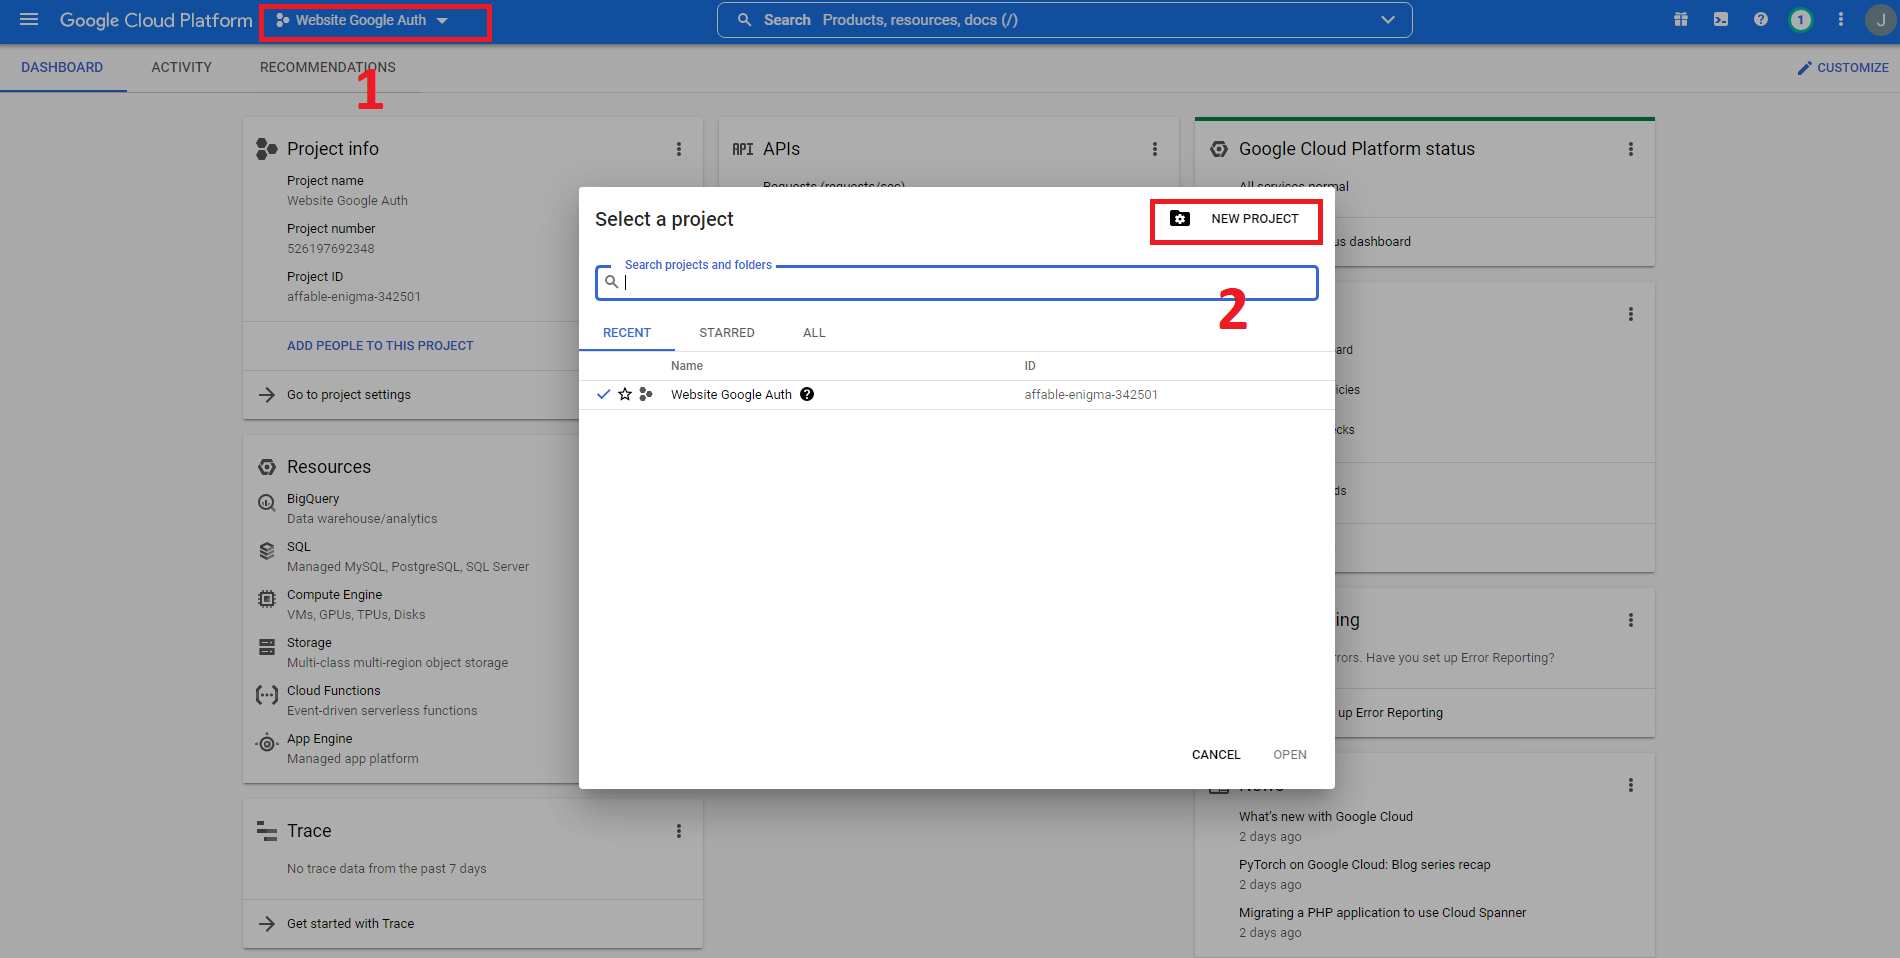
First, we have to setup a project in the Google Console Developer to achieve our goal. Here, we will register our web application oAuth API. Follow the step below. Here is the the Google Console Developer link, https://console.developers.google.com/
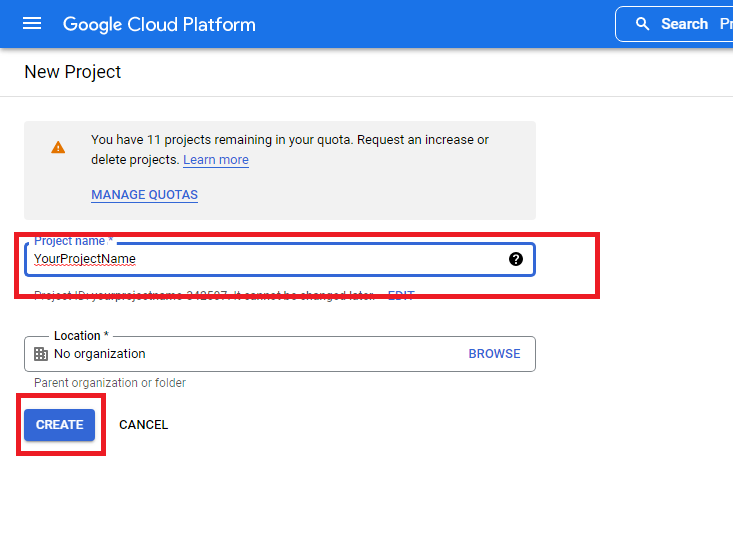
Step 1: Create a New Project
Follow the step that you can in the image below.
Next,
Next, select your newly created project. After that you will be redirected to the Project's Dashboard. You will see an APIs Panel, click the Go to APIs overview. Then proceed to next step.
Step 2: Setup App OAuth
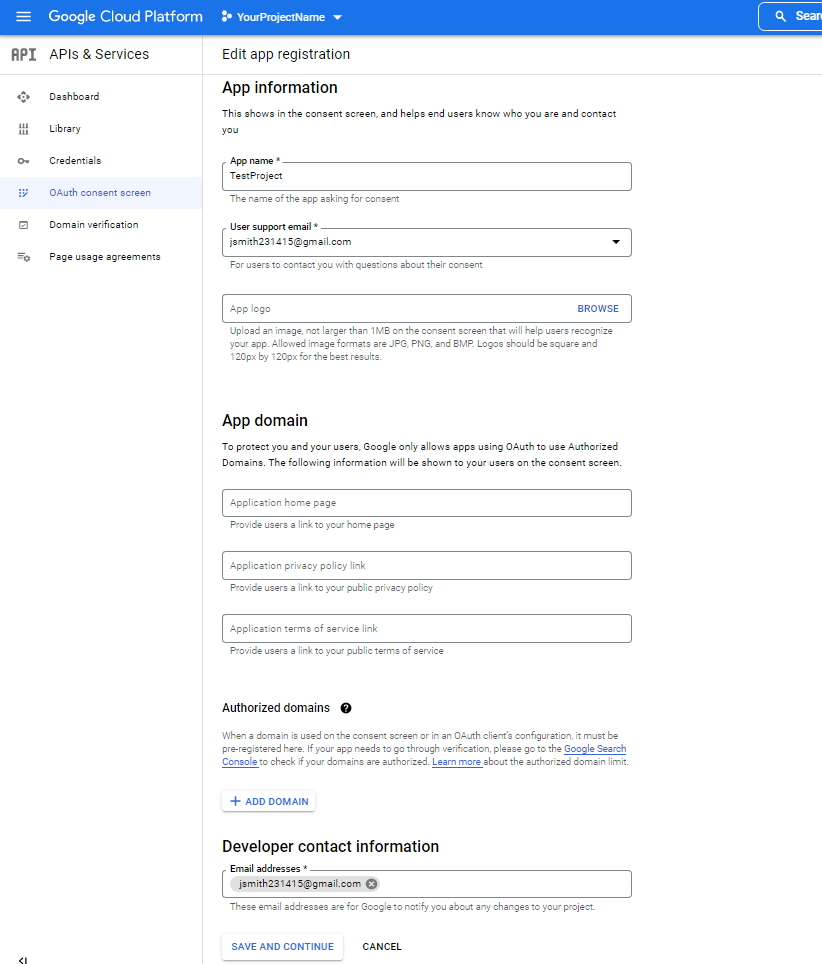
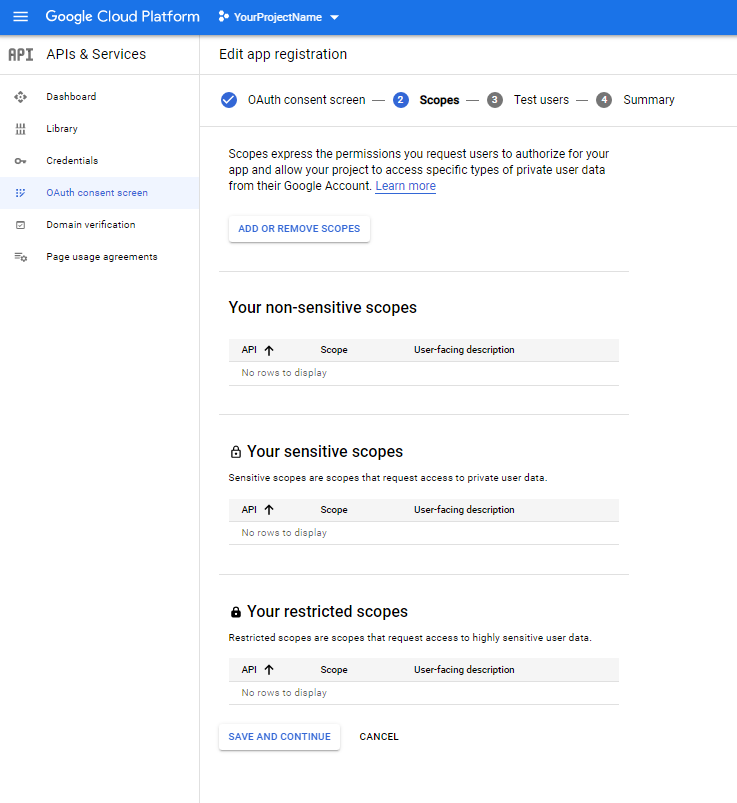
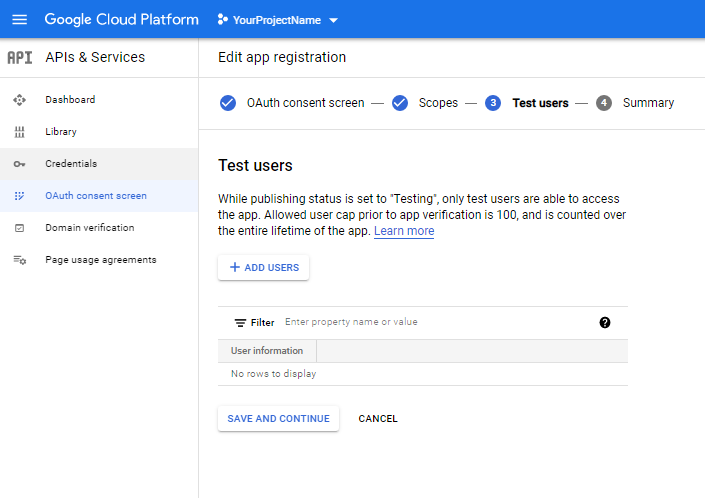
In your APIs & Services Page, navigate the page to the OAuth consent screen. Register your app API like.
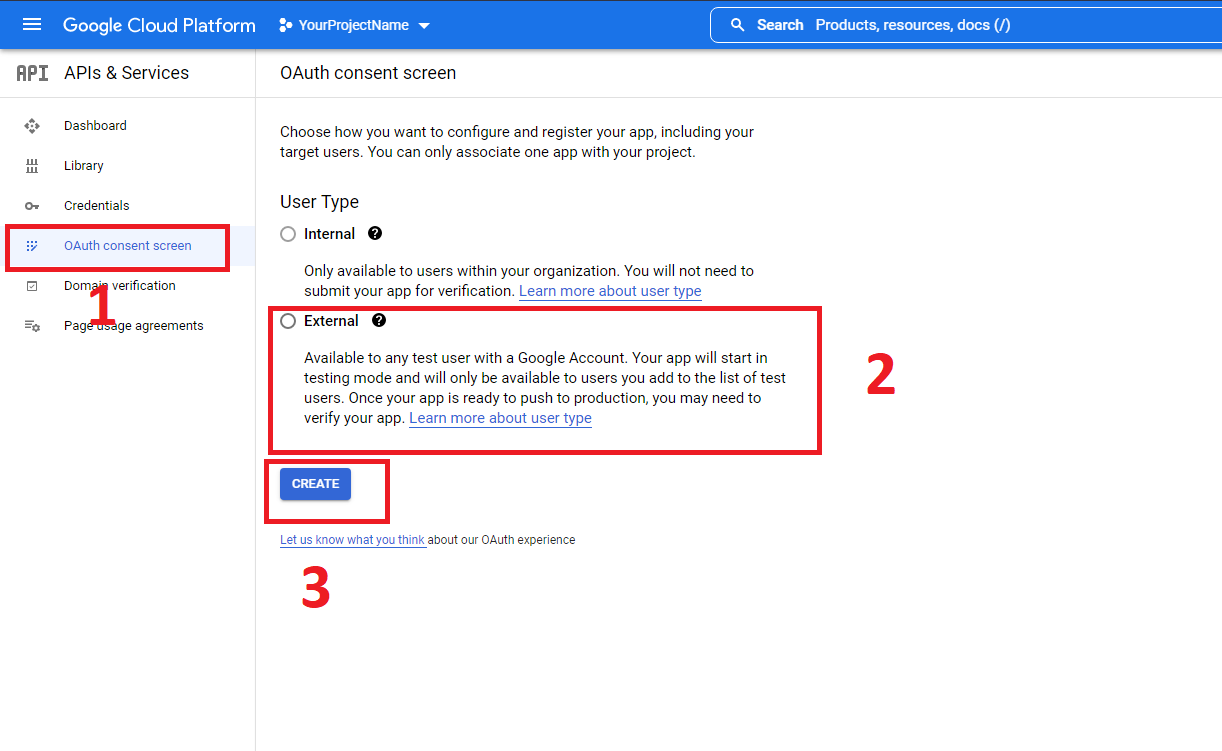
Next, navigate the page to Credentials and proceed to the next step.
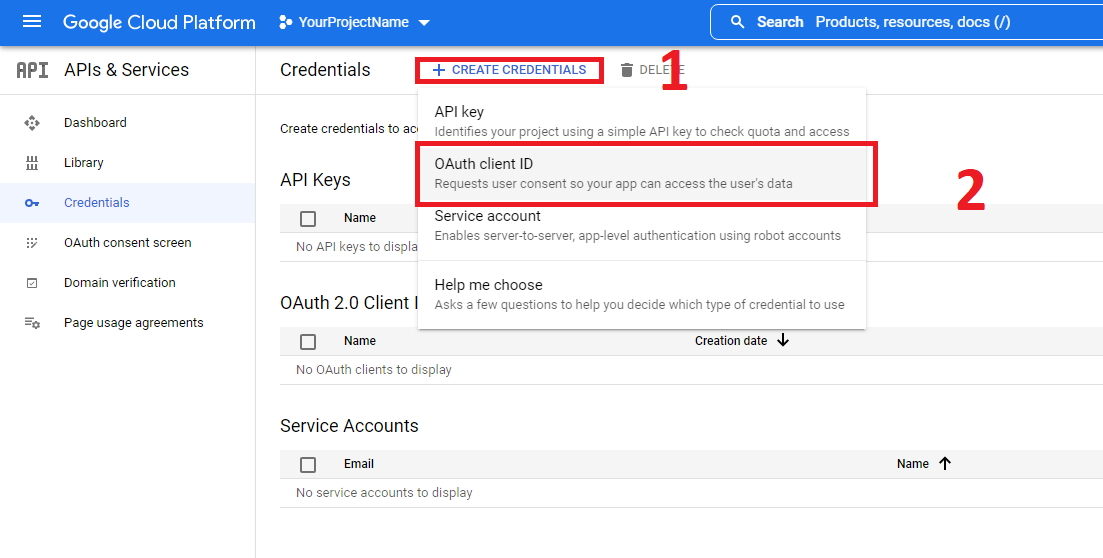
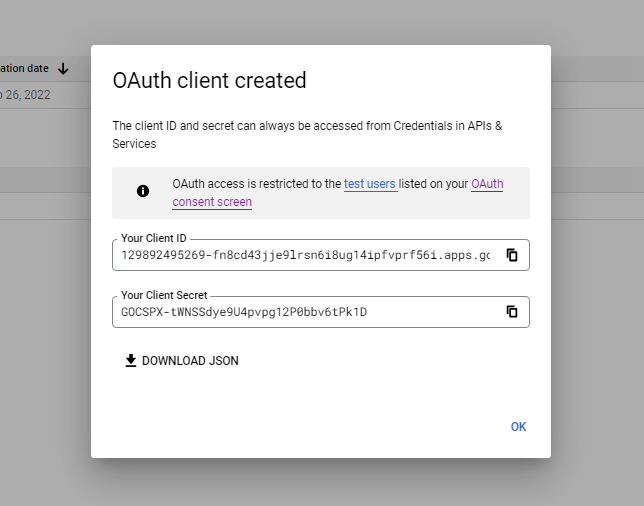
Step 3: Creating OAuth Client ID
In the Credential Page, create an OAuth Client ID. Refer to the images below on how to do it.
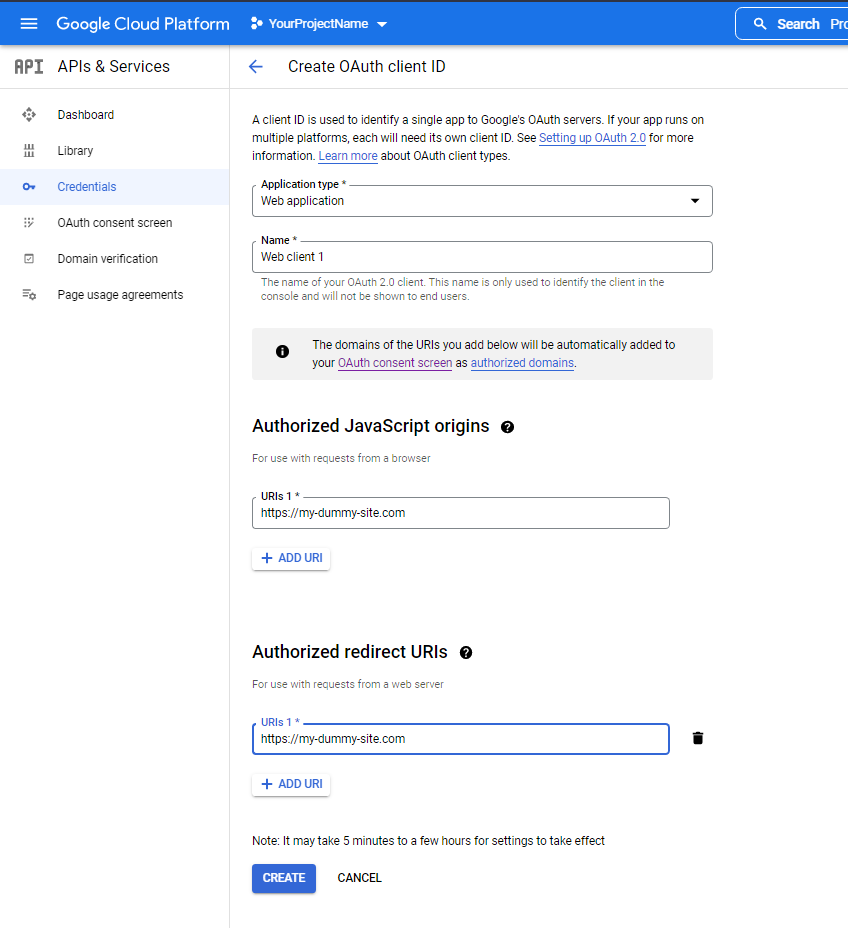
Next, copy the generated Client ID. We will use this in coding later.
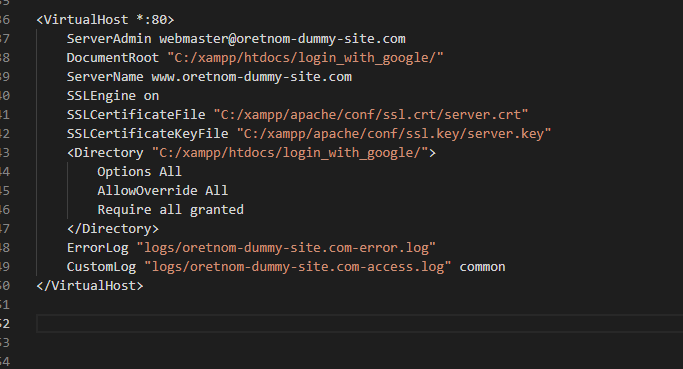
Note: URI's fields in OAuth Client ID Form will not accept localhost. To setup Virtual Host using XAMPP, follow the configuration below.
XAMPP Virtual Host Configuration
Open your XAMPP's http-vhost.conf file. This file is located inside the C:\xampp\apache\conf\extra directory. Follow the changes below. Change the values according to you setup.
Next, check the virtual host if already uncommented just like below image. The file is located at C:\xampp\apache\conf\httpd.conf

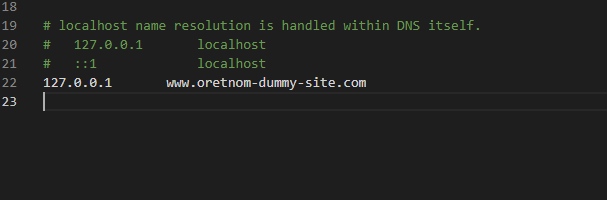
Lastly, follow the below image host configuration to allow your local machine browse your localhost using your given Virtual Host's Server name.
Creating the Database
Open your XAMPP's Control Panel and start the Apache and MySQL. If you already started the said servers, please restart them to ensure that the changes of above configuration will be executed.
Open your XAMPP's PHPMyAdmin and create a new database naming glogin_db. Then navigate the page to the SQL Page and copy paste the SQL Script below to create the database table and columns.
Let's do the Coding...
Creating the Database Connection
In your source code folder, create a new PHP File naming db_connect.php. Then copy and paste the following code.
<?php
$host = "localhost";
$username = "root";
$pw = "";
$dbname = "glogin_db";
$conn = new mysqli($host, $username, $pw, $dbname);
if(!$conn){
die('Cannot connect to the database. Error: '.$conn->error); }
?>
Creating the Interfaces
In this tutorial , I am using Bootstrap and jQuery. Kindly download it also in your end.
Creating the Custom Style Sheet
This script contains the scripts of the custom styles. This a CSS or Cascading Style Sheet File. Save this file as styles.css. In my cas this file is located inside the css directory.
html,
body {
height: 100%;
width: 100%;
}
main {
display: block;
min-height: 100%;
}
main * {
font-family: Comic Sans MS;
}
#project-title {
padding: 2.5em 1em !important;
text-shadow: 3px 3px 7px #000;
}
Login Page
Create a new file in your source code folder naming index.php and copy the following script.
Important: kindly change the client ID in the google-signin-client_id meta in the header. This is located at the Line 7.
<!DOCTYPE html>
<meta http-equiv="X-UA-Compatible" content="IE=edge"> <meta name="viewport" content="width=device-width, initial-scale=1.0"> <meta name="google-signin-client_id" content="526197692348-jeir3g34trr0utasmecj3doo4i8haagq.apps.googleusercontent.com"> <link rel="stylesheet" href="./font-awesome/css/all.min.css"> <link rel="stylesheet" href="./css/bootstrap.min.css"> <link rel="stylesheet" href="./css/styles.css"> <script src="https://apis.google.com/js/platform.js?onload=renderButton" async defer></script>
<body class="bg-gradient bg-dark"> <h1 class="text-center my-2 text-light" id="project-title">Login Form with Google Authentication
</h1> <div class="clear-fix py-3"></div> <div class="row justify-content-center"> <div class="col-lg-5 col-md-6 col-sm-12 col-sm-12"> <div class="card shadow rounded-0"> <form action="" id="login-form"> <div class="form-group mb-3 "> <label for="email" class="control-label">Email
</label> <div class="input-group rounded-0"> <input type="email" name="email" required class="form-control rounded-0"> <span class="input-group-text rounded-0"><i class="fa fa-user"></i></span> <div class="form-group mb-3 "> <label for="password" class="control-label">Password
</label> <div class="input-group rounded-0"> <input type="password" name="password" required class="form-control rounded-0"> <span class="input-group-text rounded-0"><i class="fa fa-key"></i></span> <div class="form-group mb-3 text-end"> <button class="btn btn-primary bg-gradient rounded-0">Login
</button> <div class="form-group mb-3 text-center">
Setting Up User's Password Page
Save the following script as set_password.php. This is the page where the new user set ups their password.
<?php
session_start();
if(!isset($_SESSION['id'])){
header('location:./');
}
if(isset($_SESSION['password']) && (!empty($_SESSION['password']) || !is_null($_SESSION['password']))){
header('location:./home.php');
}
?>
<!DOCTYPE html>
<meta http-equiv="X-UA-Compatible" content="IE=edge"> <meta name="viewport" content="width=device-width, initial-scale=1.0"> <link rel="stylesheet" href="./font-awesome/css/all.min.css"> <link rel="stylesheet" href="./css/bootstrap.min.css"> <link rel="stylesheet" href="./css/styles.css">
<body class="bg-gradient bg-dark"> <h1 class="text-center my-2 text-light" id="project-title">Login Form with Google Authentication
</h1> <div class="clear-fix py-3"></div> <div class="row justify-content-center"> <div class="col-lg-5 col-md-6 col-sm-12 col-sm-12"> <div class="card shadow rounded-0"> <form action="" id="update_password"> <input type="hidden" name="id" value="<?= $_SESSION['id'] ?>">
<div class="form-group mb-3 "> <label for="password" class="control-label">New Password
</label> <div class="input-group rounded-0"> <input type="password" name="password" id="password" required class="form-control rounded-0"> <span class="input-group-text rounded-0"><i class="fa fa-key"></i></span> <div class="form-group mb-3 "> <label for="cpassword" class="control-label">Confirm New Password
</label> <div class="input-group rounded-0"> <input type="password" id="cpassword" required class="form-control rounded-0"> <span class="input-group-text rounded-0"><i class="fa fa-key"></i></span> <div class="form-group mb-3 text-end"> <button class="btn btn-primary bg-gradient rounded-0">Save
</button>
Home Page
This is the page where the users will be redirected after login in the system. Save the file as home.php
<?php
session_start();
if(!isset($_SESSION['id'])){
header('location:./');
}
if(!isset($_SESSION['password']) || (isset($_SESSION['password']) && (empty($_SESSION['password']) || is_null($_SESSION['password'])))){
header('location:./set_password.php');
}
?>
<!DOCTYPE html>
<meta http-equiv="X-UA-Compatible" content="IE=edge"> <meta name="viewport" content="width=device-width, initial-scale=1.0"> <link rel="stylesheet" href="./font-awesome/css/all.min.css"> <link rel="stylesheet" href="./css/bootstrap.min.css"> <link rel="stylesheet" href="./css/styles.css"> <body class="bg-gradient bg-dark"> <h1 class="text-center my-2 text-light" id="project-title">Welcome to XYZ Web Application
</h1> <div class="clear-fix py-3"></div> <div class="row justify-content-center"> <div class="col-lg-5 col-md-6 col-sm-12 col-sm-12"> <div class="card shadow rounded-0"> <div class="d-flex w-100 mb-3"> <div class="col-auto px-2 py-3"> <center><img src="<?= isset($_SESSION['image_path']) ? $_SESSION['image_path'] : "" ?>" alt="" class="img-fluid bg-gradient bg-dark img-thumbnail" id="profilePicture">
</center> <div class="col-auto flex-shrink-1 flex-grow-1 px-2 py-3"> <dt class="text-muted">Fullname
</dt> <dd><?= (isset($_SESSION['firstname']) && isset($_SESSION['lastname'])) ? ucwords($_SESSION['firstname'] . " " .$_SESSION['lastname']) : "" ?></dd> <dt class="text-muted">Email
</dt> <dd><?= (isset($_SESSION['firstname'])) ? $_SESSION['email'] : "" ?></dd> <dt class="text-muted">Google Authenticated Login
</dt> <?php if(isset($_SESSION['oauth_login'])): ?>
<?php if($_SESSION['oauth_login'] == 1): ?>
<span class="badge bg-success rounded-pill">Yes
</span> <?php else: ?>
<span class="badge bg-danger rounded-pill">No
</span> <?php endif; ?>
<?php else: ?>
<span class="badge badge-default border rounded-pill">N/A
</span> <?php endif; ?>
<dt class="text-muted">Last Login:
</dt> <dd><?= (isset($_SESSION['last_login'])) ? date("M d, Y h:i A", strtotime($_SESSION['last_login'])) : "" ?></dd> <a class="btn btn-sm btn-danger bg-gradient rounded-0" href="./logout.php">Logout
</a>
Creating the JavaScript File
This is a JavaScript file that contains the scripts of the Google Sign Button, Form Submission scripts, etc. Save this file as script.js. In my case this file is located in side the js directory.
var _googleUser = {};
function onSuccess(googleUser) {
if (googleUser.isSignedIn()) {
$('.err-msg').remove()
var el = $('<div>')
el.addClass("alert alert-danger err-msg");
el.hide()
var data = {
access_token: googleUser.getAuthResponse().id_token,
firstname: googleUser.getBasicProfile().getGivenName(),
lastname: googleUser.getBasicProfile().getFamilyName(),
email: googleUser.getBasicProfile().getEmail(),
image_path: googleUser.getBasicProfile().getImageUrl(),
}
gapi.auth2.getAuthInstance().disconnect()
$.ajax({
url: "./action.php?f=glogin",
method: 'POST',
data: data,
dataType: 'json',
error: err => {
console.error(err)
},
success: function(resp) {
if (resp.status == 'success') {
location.replace("./home.php");
} else if (!!resp.msg) {
el.text(resp.msg)
$('#login-form').prepend(el)
el.show('slow')
} else {
el.text("An error occurred.")
$('#login-form').prepend(el)
el.show('slow')
}
}
})
}
}
function onFailure(error) {
console.log(error);
}
function renderButton() {
gapi.signin2.render('gAuth-btn', {
'scope': 'profile email',
'width': 240,
'height': 50,
'longtitle': true,
'theme': 'dark',
'onsuccess': onSuccess,
'onfailure': onFailure
});
}
$(document).ready(function() {
var auth2;
$('#update_password').submit(function(e) {
e.preventDefault();
var _this = $(this)
$('.err-msg').remove()
var el = $('<div>')
el.addClass("alert alert-danger err-msg");
el.hide()
_this.find('button').attr('disabled', true)
if ($('#password').val() != $('#cpassword').val()) {
el.text('Password does not match')
_this.prepend(el)
el.show('slow')
_this.find('button').attr('disabled', false)
return false;
}
$.ajax({
url: "./action.php?f=update_password",
method: 'POST',
data: $(this).serialize(),
dataType: 'json',
error: err => {
console.error(err)
},
success: function(resp) {
if (resp.status == 'success') {
alert("Password has been set.");
location.replace("./home.php");
} else if (!!resp.msg) {
el.text(resp.msg)
_this.prepend(el)
el.show('slow')
} else {
el.text("An error occurred.")
_this.prepend(el)
el.show('slow')
}
_this.find('button').attr('disabled', false)
}
})
})
$('#login-form').submit(function(e) {
e.preventDefault();
var _this = $(this)
$('.err-msg').remove()
var el = $('<div>')
el.addClass("alert alert-danger err-msg");
el.hide()
_this.find('button').attr('disabled', true)
$.ajax({
url: "./action.php?f=login",
method: 'POST',
data: $(this).serialize(),
dataType: 'json',
error: err => {
console.error(err)
},
success: function(resp) {
if (resp.status == 'success') {
location.replace("./home.php");
} else if (!!resp.msg) {
el.text(resp.msg)
_this.prepend(el)
el.show('slow')
} else {
el.text("An error occurred.")
_this.prepend(el)
el.show('slow')
}
_this.find('button').attr('disabled', false)
}
})
})
})
Creating the PHP APIs
The following PHP Files contains the login, logout, and the update password scripts. Save the following files according to the given name above each scritps.
action.php
<?php
require_once('db_connect.php');
if($_SERVER['REQUEST_METHOD'] != "POST" || !isset($_GET['f'])){ echo '<script> alert("Unable to access the page."); location.reload();</script>';
}
$action = $_GET['f'];
if($action == "glogin"){
$register_check = $conn->query("SELECT * FROM `user_list` where email = '{$email}' ");
if($register_check->num_rows > 0){
$get = $register_check->fetch_array();
foreach($get as $k=> $v){
$_SESSION[$k] = $v;
}
}
$_SESSION['user_type'] = 'registered';
$resp['status'] = 'success';
$data = " access_token = '{$access_token}'";
$data .= ", oauth_login = 1";
$data .= ", last_login = CURRENT_TIMESTAMP";
$update = $conn->query("UPDATE `user_list` set {$data} where id = '{$get['id']}'");
if($update){
$_SESSION['oauth_login'] = 1;
$_SESSION['access_token'] = $access_token;
$_SESSION['last_login'] =date("Y-m-d H:i"); }
}else{
$data= "";
foreach($_POST as $k => $v){
if(!empty($data)) $data .=", "; $data .= "`$k`='{$v}'";
}
$insert = $conn->query("INSERT INTO `user_list` set {$data} ");
if($insert){
$_SESSION['user_type'] = 'newly_registered';
$resp['status'] = "success";
$id = $conn->insert_id;
$get = $conn->query("SELECT * FROM `user_list` where id = '{$id}' ")->fetch_array();
foreach($get as $k=> $v){
$_SESSION[$k] = $v;
}
}
$data = " access_token = '{$access_token}'";
$data .= ", oauth_login = 1";
$data .= ", last_login = CURRENT_TIMESTAMP";
$update = $conn->query("UPDATE `user_list` set {$data} where id = '$id'");
if($update){
$_SESSION['oauth_login'] = 1;
$_SESSION['access_token'] = $access_token;
$_SESSION['last_login'] =date("Y-m-d H:i"); }
}else{
$resp['status'] = 'failed';
$resp['msg'] = "An error occured while signing in.";
$resp['error'] = $conn->error;
}
}
}
if($action == 'update_password'){
$password = password_hash($password, PASSWORD_DEFAULT);
$update = $conn->query("UPDATE `user_list` set `password` = '{$password}' where id = '{$id}'");
if($update){
$resp['status'] = 'success';
$_SESSION['password'] = $password;
}else{
$resp['status'] = 'failed';
$resp['msg'] = "An error occurred";
$resp['error'] = $conn->error;
}
}
if($action == 'login'){
$stmt = $conn->prepare("SELECT * FROM `user_list` where email = ?");
$stmt->bind_param('s',$email);
$stmt->execute();
$result = $stmt->get_result();
if($result->num_rows > 0){
$get = $result->fetch_array();
if(password_verify($password, $get['password'])){
foreach($get as $k => $v){
$_SESSION[$k] = $v;
}
}
$data = " oauth_login = 0";
$data .= ", last_login = CURRENT_TIMESTAMP";
$update = $conn->query("UPDATE `user_list` set {$data} where id = '{$get['id']}'");
if($update){
$_SESSION['oauth_login'] = 0;
$_SESSION['last_login'] =date("Y-m-d H:i"); }
$resp['status'] = 'success';
}else{
$resp['status'] = 'failed';
$resp['msg'] = "Incorrect Password";
}
}else{
$resp['status'] = 'failed';
$resp['msg'] = "Incorrect Email or Password";
}
}
?>
<?php
if(isset($_SESSION['id'])){ }
?>
There you go. You can now test the application on your end. Check if it works like we planned to. You can also download the working source code I created for this tutorial. The download button is located below this article. Don't forget to change the Client ID in the index.php file.
That's it! i hope this Login Form with Google Authentication (OAuth) will help you with what you are looking for and you'll find it useful for your future PHP Projects..
Explore more on this website for more Tutorials and Free Source Codes.
Enjoy Coding :)