This tutorial tackles how to Ajax CRUD(create, read, update, delete) Operation using PDO with Bootstrap/Modal. We use ajax so that the page won't reload after the successful action and in this tutorial, I've performed ajax using jQuery to our PHP API that uses PDO as an extension.
Getting Started
I've used Bootstrap and jQuery in this tutorial to enable bootstrap modals. These files are included in the downloadable of this tutorial but, if you want, you may download them using the links below:
Also, please Download and Install a local web server such as XAMPP to run a PHP Script.
Before we continue in coding, please make sure that your Apache and MySQL is already started. To do this for XAMPP/WAMP, open the XAMPP/WAMp's Control Panel and start the mentioned web and database server.
Creating our Database
Next, we create our MySQL database. Open the PHPMyAdmin in a brwoser i.e. http://localhost/phpmyadmin. Then, create a new database naming mydatabase.
I've included a .sql file in the downloadable of this tutorial which is a MySQL database file. All you have to do is import the said file. If you have no idea on how to do this, please refer to my tutorial, How import .sql file to restore MySQL database.
Or you can also create the table and columns programmatically. To do that, navigate to the SQL Tab of the PHPMyAdmin and make sure that the newly created database was selected. Then, copy/paste the script below and click the Go Button.
(1, 'neovic', 'devierte', 'silay city'),
(2, 'gemalyn', 'cepe', 'carmen, bohol');
Creating our Connection
Next, we are going to create our connection to our database by creating a Class named Connection. We can do this by creating a new file and name/save it as connection.php and paste the code below.
<?php
Class Connection{
private $server = "mysql:host=localhost;dbname=mydatabase";
private $username = "root";
private $password = "";
private $options = array(PDO
::ATTR_ERRMODE => PDO
::ERRMODE_EXCEPTION,PDO
::ATTR_DEFAULT_FETCH_MODE => PDO
::FETCH_ASSOC,); protected $conn;
public function open(){
try{
$this->conn = new PDO($this->server, $this->username, $this->password, $this->options);
return $this->conn;
}
catch (PDOException $e){
echo "There is some problem in connection: " . $e->getMessage();
}
}
public function close(){
$this->conn = null;
}
}
?>
Creating our Main Page Interface
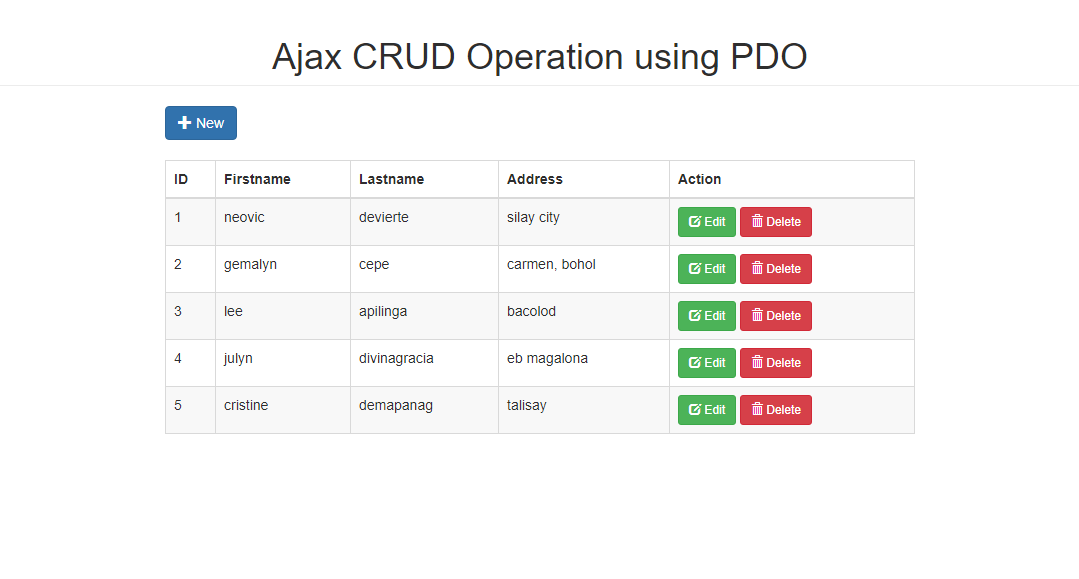
Next, we are going to create our main page where we show our table data and we are going to name this file as index.php.
<!DOCTYPE html>
<html>
<head>
<meta charset="utf-8">
<title>Ajax CRUD Operation using PDO with Bootstrap/Modal</title>
<link rel="stylesheet" type="text/css" href="bootstrap/css/bootstrap.min.css">
</head>
<body>
<div class="container">
<h1 class="page-header text-center">Ajax CRUD Operation using PDO</h1>
<div class="row">
<div class="col-sm-8 col-sm-offset-2">
<button id="addnew" class="btn btn-primary"><span class="glyphicon glyphicon-plus"></span> New</button>
<div id="alert" class="alert alert-info text-center" style="margin-top:20px; display:none;">
<button class="close"><span aria-hidden="true">×</span></button>
<span id="alert_message"></span>
</div>
<table class="table table-bordered table-striped" style="margin-top:20px;">
<thead>
<th>ID</th>
<th>Firstname</th>
<th>Lastname</th>
<th>Address</th>
<th>Action</th>
</thead>
<tbody id="tbody"></tbody>
</table>
</div>
</div>
</div>
<!-- Modals -->
<?php include('modal.html'); ?>
<script src="jquery.min.js"></script>
<script src="bootstrap/js/bootstrap.min.js"></script>
<script src="app.js"></script>
</body>
</html>
Creating our Modal
Next, we create our modal that holds our add, edit and delete form. We do this by creating a new file, name it as modal.html and paste the code below.
<!-- Add New -->
<div class="modal fade" id="add" tabindex="-1" role="dialog" aria-labelledby="myModalLabel" aria-hidden="true"> <div class="modal-dialog"> <div class="modal-content"> <div class="modal-header"> <button type="button" class="close" data-dismiss="modal" aria-hidden="true">×</button> <div class="container-fluid"> <div class="row form-group"> <label class="control-label" style="position:relative; top:7px;">Firstname:
</label> <input type="text" class="form-control" name="firstname"> <div class="row form-group"> <label class="control-label" style="position:relative; top:7px;">Lastname:
</label> <input type="text" class="form-control" name="lastname"> <div class="row form-group"> <label class="control-label" style="position:relative; top:7px;">Address:
</label> <input type="text" class="form-control" name="address"> <div class="modal-footer"> <button type="button" class="btn btn-default" data-dismiss="modal"><span class="glyphicon glyphicon-remove"></span> Cancel
</button> <button type="submit" class="btn btn-primary"><span class="glyphicon glyphicon-floppy-disk"></span> Save
</a>
<!-- Edit -->
<div class="modal fade" id="edit" tabindex="-1" role="dialog" aria-labelledby="myModalLabel" aria-hidden="true"> <div class="modal-dialog"> <div class="modal-content"> <div class="modal-header"> <button type="button" class="close" data-dismiss="modal" aria-hidden="true">×</button> <div class="container-fluid"> <input type="hidden" class="id" name="id"> <div class="row form-group"> <label class="control-label" style="position:relative; top:7px;">Firstname:
</label> <input type="text" class="form-control firstname" name="firstname"> <div class="row form-group"> <label class="control-label" style="position:relative; top:7px;">Lastname:
</label> <input type="text" class="form-control lastname" name="lastname"> <div class="row form-group"> <label class="control-label" style="position:relative; top:7px;">Address:
</label> <input type="text" class="form-control address" name="address"> <div class="modal-footer"> <button type="button" class="btn btn-default" data-dismiss="modal"><span class="glyphicon glyphicon-remove"></span> Cancel
</button> <button type="submit" class="btn btn-success"><span class="glyphicon glyphicon-check"></span> Update
</a>
<!-- Delete -->
<div class="modal fade" id="delete" tabindex="-1" role="dialog" aria-labelledby="myModalLabel" aria-hidden="true"> <div class="modal-dialog"> <div class="modal-content"> <div class="modal-header"> <button type="button" class="close" data-dismiss="modal" aria-hidden="true">×</button> <p class="text-center">Are you sure you want to Delete
</p> <h2 class="text-center fullname"></h2> <div class="modal-footer"> <button type="button" class="btn btn-default" data-dismiss="modal"><span class="glyphicon glyphicon-remove"></span> Cancel
</button> <button type="button" class="btn btn-danger id"><span class="glyphicon glyphicon-trash"></span> Yes
</button>
Creating our Ajax Script
Next, we are going to create the file where we put all our ajax scripts and request. We name this file as app.js.
$(document).ready(function(){
fetch();
//add
$('#addnew').click(function(){
$('#add').modal('show');
});
$('#addForm').submit(function(e){
e.preventDefault();
var addform = $(this).serialize();
//console.log(addform);
$.ajax({
method: 'POST',
url: 'add.php',
data: addform,
dataType: 'json',
success: function(response){
$('#add').modal('hide');
if(response.error){
$('#alert').show();
$('#alert_message').html(response.message);
}
else{
$('#alert').show();
$('#alert_message').html(response.message);
fetch();
}
}
});
});
//
//edit
$(document).on('click', '.edit', function(){
var id = $(this).data('id');
getDetails(id);
$('#edit').modal('show');
});
$('#editForm').submit(function(e){
e.preventDefault();
var editform = $(this).serialize();
$.ajax({
method: 'POST',
url: 'edit.php',
data: editform,
dataType: 'json',
success: function(response){
if(response.error){
$('#alert').show();
$('#alert_message').html(response.message);
}
else{
$('#alert').show();
$('#alert_message').html(response.message);
fetch();
}
$('#edit').modal('hide');
}
});
});
//
//delete
$(document).on('click', '.delete', function(){
var id = $(this).data('id');
getDetails(id);
$('#delete').modal('show');
});
$('.id').click(function(){
var id = $(this).val();
$.ajax({
method: 'POST',
url: 'delete.php',
data: {id:id},
dataType: 'json',
success: function(response){
if(response.error){
$('#alert').show();
$('#alert_message').html(response.message);
}
else{
$('#alert').show();
$('#alert_message').html(response.message);
fetch();
}
$('#delete').modal('hide');
}
});
});
//
//hide message
$(document).on('click', '.close', function(){
$('#alert').hide();
});
});
function fetch(){
$.ajax({
method: 'POST',
url: 'fetch.php',
success: function(response){
$('#tbody').html(response);
}
});
}
function getDetails(id){
$.ajax({
method: 'POST',
url: 'fetch_row.php',
data: {id:id},
dataType: 'json',
success: function(response){
if(response.error){
$('#edit').modal('hide');
$('#delete').modal('hide');
$('#alert').show();
$('#alert_message').html(response.message);
}
else{
$('.id').val(response.data.id);
$('.firstname').val(response.data.firstname);
$('.lastname').val(response.data.lastname);
$('.address').val(response.data.address);
$('.fullname').html(response.data.firstname + ' ' + response.data.lastname);
}
}
});
}
Fetching our Table Data
Next, we fetch the table data that we will be going to display. This file is accessed via ajax request. We name this as fetch.php
.
<?php
include_once('connection.php');
$database = new Connection();
$db = $database->open();
try{
$sql = 'SELECT * FROM members';
foreach ($db->query($sql) as $row) {
?>
<tr>
<td><?php echo $row['id']; ?></td>
<td><?php echo $row['firstname']; ?></td>
<td><?php echo $row['lastname']; ?></td>
<td><?php echo $row['address']; ?></td>
<td>
<button class="btn btn-success btn-sm edit" data-id="<?php echo $row['id']; ?>"><span class="glyphicon glyphicon-edit"></span> Edit</button>
<button class="btn btn-danger btn-sm delete" data-id="<?php echo $row['id']; ?>"><span class="glyphicon glyphicon-trash"></span> Delete</button>
</td>
</tr>
<?php
}
}
catch(PDOException $e){
echo "There is some problem in connection: " . $e->getMessage();
}
//close connection
$database->close();
?>
Creating our Add Script/Query
Next, we are going to create our add script which is also accessed via ajax request. We name this file as add.php.
<?php
include_once('connection.php');
$output = array('error' => false);
$database = new Connection();
$db = $database->open();
try{
//make use of prepared statement to prevent sql injection
$stmt = $db->prepare("INSERT INTO members (firstname, lastname, address) VALUES (:firstname, :lastname, :address)");
//if-else statement in executing our prepared statement
if ($stmt->execute(array(':firstname' => $_POST['firstname'] , ':lastname' => $_POST['lastname'] , ':address' => $_POST['address'])) ){ $output['message'] = 'Member added successfully';
}
else{
$output['error'] = true;
$output['message'] = 'Something went wrong. Cannot add member';
}
}
catch(PDOException $e){
$output['error'] = true;
$output['message'] = $e->getMessage();
}
//close connection
$database->close();
?>
Fetching Single Row
Next, we fetch a single row of data from our database also via an Ajax request which will be used in our edit and delete form. Create a new file and name it as fetch_row.php.
<?php
include_once('connection.php');
$output = array('error' => false);
$database = new Connection();
$db = $database->open();
try{
$id = $_POST['id'];
$stmt = $db->prepare("SELECT * FROM members WHERE id = :id");
$stmt->bindParam(':id', $id);
$stmt->execute();
$output['data'] = $stmt->fetch();
}
catch(PDOException $e){
$output['error'] = true;
$output['message'] = $e->getMessage();
}
//close connection
$database->close();
?>
Creating our Edit Script/Query
Next, we are going to create our edit script and also access it via Ajax request by creating a new file, name it as edit.php and paste the code below.
<?php
include_once('connection.php');
$output = array('error' => false);
$database = new Connection();
$db = $database->open();
try{
$id = $_POST['id'];
$firstname = $_POST['firstname'];
$lastname = $_POST['lastname'];
$address = $_POST['address'];
$sql = "UPDATE members SET firstname = '$firstname', lastname = '$lastname', address = '$address' WHERE id = '$id'";
//if-else statement in executing our query
$output['message'] = 'Member updated successfully';
}
else{
$output['error'] = true;
$output['message'] = 'Something went wrong. Cannot update member';
}
}
catch(PDOException $e){
$output['error'] = true;
$output['message'] = $e->getMessage();
}
//close connection
$database->close();
?>
Creating our Delete Script/Query
Lastly, we create our delete script which is also accessed via ajax request. Create a new file and name it as delete.php.
<?php
include_once('connection.php');
$output = array('error' => false);
$database = new Connection();
$db = $database->open();
try{
$sql = "DELETE FROM members WHERE id = '".$_POST['id']."'";
//if-else statement in executing our query
$output['message'] = 'Member deleted successfully';
}
else{
$output['error'] = true;
$output['message'] = 'Something went wrong. Cannot delete member';
}
}
catch(PDOException $e){
$output['error'] = true;
$output['message'] = $e->getMessage();;
}
//close connection
$database->close();
?>
DEMO
That's it! You can now test your work by browsing the web application in a browser i.e. http://localhost/[source_code_folder_name]. If you encountered an error on your end, please review the codes or download the working source code that I created for this tutorial. The Download Button is located below.
That ends this tutorial. I hope this tutorial will help you with what you are looking for. Explore more on this website for more Free Source Code and Tutorials.
Happy Coding :)Note: Due to the size or complexity of this submission, the author has submitted it as a .zip file to shorten your download time. After downloading it, you will need a program like Winzip to decompress it.
Virus note: All files are scanned once-a-day by SourceCodester.com for viruses, but new viruses come out every day, so no prevention program can catch 100% of them.
FOR YOUR OWN SAFETY, PLEASE:
1. Re-scan downloaded files using your personal virus checker before using it.
2. NEVER, EVER run compiled files (.exe's, .ocx's, .dll's etc.)--only run source code.