Calculator Using Switch
In this tutorial you will learn:
JAVA coding essentials
Taking input in java console
What is switch statement
Difference between switch and if else statement
JAVA code for making the calculator using Switch Statements
What is switch statement
In JAVA programming the switch is the implementation by which we evaluate a variable and on the basis of which we change the control flow of our program. Through switch statement we define the multiple task which will be executed depending upon the value inside the variable. Example below will make your concept clear.
Difference between switch and if else statement
The basic functionality of both the statements is same as both evaluate the expression and accordingly perform a task but in case of ‘if else’ the series of conditions is checked before performing a task, this make it a bit more resource using conditional statement. The switch statement executes without the execution of the following switch statements and the break operation is used with the case statement.
Basic Syntax of Switch Statment
switch ( variable) {
case value:
Some_Code;
break;
case value:
Some_Code;
break;
default:
Code_for_the_Condition_Other_than_above_values;
}
Basic Java console program:
Open Eclipse > Workspace
File > new > java project
File > new > class
Basic Coding Strategy for making a Calculator
In this tutorial I will teach you guys how to make a calculator using the switch statements, calculator is a basic task, by using the example of this easy example you can also do complex tasks. The typical way for the coding of calculator is using the if-else statement but the switch statements are also widely used.
In case of the switch statements just like if else statements we evaluate a variable on the basis of which we perform certain operations. In this program we will be using variable named ‘choice’ to serve the purpose.
Java programming is totally object oriented based, and everything here is done in classes, so here we have first declared the main(which is also inside the class) of the program here in which we are first taking the inputs by the user, as you can clearly see that for the first number ,by using the scanner class object we get the number and store it in the variable ‘num1’, then same procedure is followed for the second integer which is ‘num2’ and also for the symbol declared as ‘choice’. Here the data types must be carefully determined.
import java.util.Scanner;
public class Calculator
{
public static void main
(String[] args
) { int num1,num2;
char choice;
}
In this part of the code we are taking the inputs from the user and storing it in the variables ‘num1’,’num2’ and ‘choice’ which we declared in the above code. ‘System.out.print’ command is used here to display whatever it is given input on the screen and we are using the input scanner object to store the data into the variables. It must be noted here that the syntax for the char data type is different, it is because the scanner object is specifically made for the int as can be seen in the code below.
System.
out.
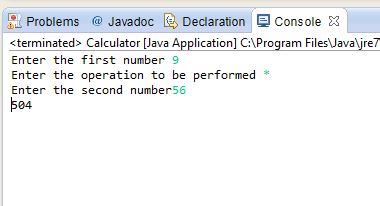
print("Enter the first number "); Scanner inputScanner
= new Scanner
(System.
in);num1 = inputScanner.nextInt();
System.
out.
print("Enter the operation to be performed "); choice = inputScanner.next().charAt(0);//1 for addition
System.
out.
print("Enter the second number"); num2 = inputScanner.nextInt();
In this part of the code we are using the switch statements to perform the different operations on a calculator. Each time the variable ‘choice’ which is inside the parenthesis against the switch is checked and depending upon the variable the control flow of our program is changed. For example if we entered ‘*’ inside the choice variable. The compiler will start hunting for the ‘*’ in the case statements which are under the switch statement, when it finds out the statement it executes the code written against it. It must be noted that there is the ’break;’ statement used which breaks the program whenever one of the statement is executed. This is done so because unlike if-else statement the switch works in a goto mechanism and after the execution of its statement the program has to end. In each case statement the result is printed out to the user using ‘system.out.printIn’ command.
switch(choice){
case '+':
System.
out.
println(num1
+num2
); //add break;
case '-':
System.
out.
println(num1
-num2
); //subtract break;
case '*':
System.
out.
println(num1
*num2
); //multiply break;
case '/':
System.
out.
println(num1
/num2
); //divide break;
default:
}//end switch
}//end main
}//end class
In this tutorial I have taught you guys to make a calculator using the switch statement. We can also use functions for the purpose , each time by looking at the case statement we will call a specific function. Keep following they will be taught in upcoming tutorials