Cropping Image using JCROP and Save to Database PHP >=5
Submitted by nurhodelta_17 on Saturday, December 2, 2017 - 16:36.
Getting Started
Please take note that Bootstrap used in this tutorial are hosted so you need internet connection for them to work.Creating our Database
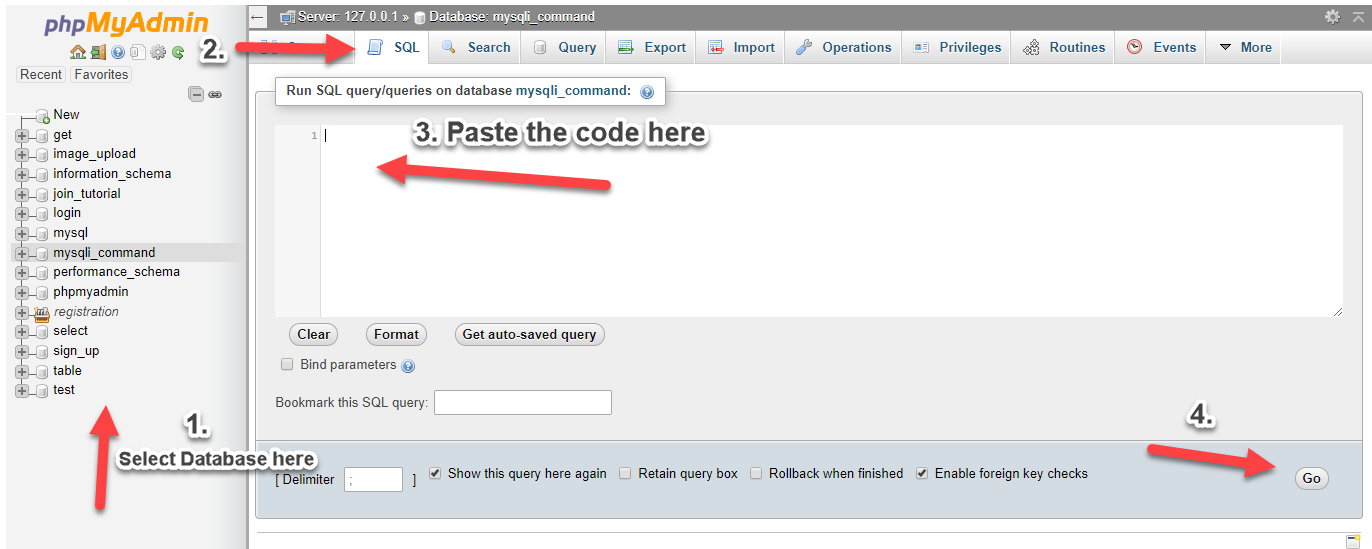
1. Open phpMyAdmin. 2. Click databases, create a database and name it as crop. 3. After creating a database, click the SQL and paste the below codes. See image below for detailed instruction.- CREATE TABLE `images` (
- `imageid` INT(11) NOT NULL AUTO_INCREMENT,
- `location` VARCHAR(200) NOT NULL,
- `date_added` datetime NOT NULL,
- PRIMARY KEY(`imageid`)
- ) ENGINE=InnoDB DEFAULT CHARSET=latin1;
Creating our Output Folder
Next, we create a new folder and we're gonna name it upload. This will be our output folder for uploaded images.index.php
This is our index which contains our upload form.- <?php
- $folder = 'upload/';
- $or_w = 500;
- $image = $_FILES['image']['tmp_name'];
- $or_h = ($height/$width)* $or_w;
- }
- ?>
- <!DOCTYPE html>
- <html>
- <head>
- <title>Cropping Image using JCROP</title>
- <link href="https://maxcdn.bootstrapcdn.com/bootstrap/3.3.7/css/bootstrap.min.css" rel="stylesheet">
- </head>
- <body>
- <div class="container">
- <h1 class="page-header text-center">Cropping Image using JCROP</h1>
- <div class="col-md-4 col-md-offset-4">
- <form method="POST" action="<?php echo $_SERVER['PHP_SELF']; ?>" enctype="multipart/form-data">
- <input type="file" name="image" id="image" required><br>
- <input type="submit" value="Upload" name="upload" class="btn btn-primary">
- </form>
- </div>
- </div>
- </body>
- </body>
- </html>
crop.php
This is our cropping page.- <?php $filename = $_GET['file']; ?>
- <!DOCTYPE html>
- <html lang="en">
- <head>
- <title>Cropping Image using JCROP</title>
- <link href="https://maxcdn.bootstrapcdn.com/bootstrap/3.3.7/css/bootstrap.min.css" rel="stylesheet">
- <meta http-equiv="Content-type" content="text/html;charset=UTF-8" />
- <script src="js/jquery.min.js"></script>
- <script src="js/jquery.Jcrop.js"></script>
- <link rel="stylesheet" href="css/jquery.Jcrop.css" type="text/css" />
- <script type="text/javascript">
- $(function(){
- $('#cropbox').Jcrop({
- aspectRatio: 1,
- onSelect: updateCoords
- });
- });
- function updateCoords(c){
- $('#x').val(c.x);
- $('#y').val(c.y);
- $('#w').val(c.w);
- $('#h').val(c.h);
- };
- function checkCoords(){
- if (parseInt($('#w').val())) return true;
- alert('Please select a crop region then press submit.');
- return false;
- };
- </script>
- </head>
- <body>
- <div class="container">
- <h1 class="page-header text-center">Cropping Image using JCROP</h1>
- <div class="row">
- <div class="col-md-8 col-md-offset-2">
- <img src="upload/<?php echo $filename; ?>" id="cropbox">
- <form action="save.php?file=<?php echo $filename; ?>" method="post" onsubmit="return checkCoords();">
- <input type="hidden" id="x" name="x" />
- <input type="hidden" id="y" name="y" />
- <input type="hidden" id="w" name="w" />
- <input type="hidden" id="h" name="h" />
- <br>
- <input type="submit" value="Save Image" class="btn btn-primary btn-large btn-inverse">
- <br><br>
- </form>
- </div>
- </div>
- </div>
- </body>
- </html>
save.php
This is our PHP code in saving the cropped images.- <?php
- $file = $_GET['file'];
- $location = 'upload/'.$file;
- $newloc = 'upload/'.$newFile;
- $targ_w = $targ_h = 250;
- $targ_w,$targ_h,$_POST['w'],$_POST['h']);
- //connection
- $conn = new mysqli('localhost', 'root', '', 'crop');
- $sql="insert into images (location, date_added) values ('$newloc', NOW())";
- $conn->query($sql);
- ?>
view.php
This contains our images table.- <!DOCTYPE html>
- <html>
- <head>
- <title>Cropping Image using JCROP</title>
- <link href="https://maxcdn.bootstrapcdn.com/bootstrap/3.3.7/css/bootstrap.min.css" rel="stylesheet">
- </head>
- <body>
- <div class="container">
- <h1 class="page-header text-center">Images Table</h1>
- <div class="col-md-8 col-md-offset-2">
- <div class="row">
- <div class="col-md-12">
- <a href="index.php" class="btn btn-primary pull-right">Home</a>
- </div>
- </div><br>
- <table class="table table-bordered table-striped">
- <thead>
- <th>Image</th>
- <th>Location</th>
- <th>Date Added</th>
- </thead>
- <tbody>
- <?php
- $conn = new mysqli('localhost', 'root', '', 'crop');
- $sql="select * from images order by imageid desc";
- $query=$conn->query($sql);
- while($row=$query->fetch_array()){
- ?>
- <tr>
- <td><a href="<?php echo $row['location']; ?>"><img src="<?php echo $row['location']; ?>" width="30px" height="30px" class="thumbnail"></td>
- <td><?php echo $row['location']; ?></td>
- </tr>
- <?php
- }
- ?>
- </tbody>
- </table>
- </div>
- </div>
- </body>
- </html>