How to Sanitize Request Data Values in PHP?

This tutorial focuses on Data Sanitization in PHP. It is designed to serve as a comprehensive guide with practical examples for students and beginners looking to learn essential techniques for safeguarding data in PHP projects or web applications. Here, you will gain valuable insights and access a sample website that includes a feature for sanitizing request data values when submitting form data.
Why Sanitize Request Data Values?
In PHP and other programming languages, the purpose of sanitizing request data values, including `POST` and `GET` data, is to boost the security and reliability of web applications. Sanitization involves the process of validating and cleansing user inputs and other incoming data, such as form submissions, query parameters, or cookies, before utilizing them within the application or storing them in a database.
Here are several important reasons for sanitizing request data values:
- Enhanced Security: The process of sanitizing request data values in web applications is crucial in preventing security threats, including SQL Injection, Cross-Site Scripting (XSS), and Cross-Site Request Forgery (CSRF) attacks.
- Data Validation: Sanitizing request data values ensures that inputs conform to expected formats, such as URLs, email addresses, and more.
- Improved User Experience: Proper data sanitization contributes to a positive user experience by preventing errors and ensuring secure and accurate display of user-generated content.
These reasons highlight the advantages and benefits of implementing the sanitization process in web applications.
How to Sanitize Request Data Values in PHP?
Now, let's develop a basic web application that includes a Post Request Data Value Sanitization feature. This web application illustrates a straightforward implementation of sanitizing POST request data from a simple form submission. Before we begin, please make sure to download and install the following components if they are not already installed:
- Web server package or software like XAMPP or WAMP
- Code Editor such as Sublime Text, Microsoft Visual Studio Code, or Notepad++
Once you've installed the web server, ensure that you run or start the `Apache` or a similar service.
Creating the Request Data Sanitization Class
In your chosen Code Editor, start by creating a new `PHP` file and save it as `SanitizeRequestData.class.php`. This file houses a PHP class specifically crafted for sanitizing request data values using data filters. Please review the PHP script provided below:
- <?php
- class SanitizeRequestData{
- private $filters;
- function __construct(){
- $this->filters = [
- "email" => FILTER_SANITIZE_EMAIL,
- "addslashes" => FILTER_SANITIZE_ADD_SLASHES,
- "float" => FILTER_SANITIZE_NUMBER_FLOAT,
- "int" => FILTER_SANITIZE_NUMBER_INT,
- "special_characters" => FILTER_SANITIZE_SPECIAL_CHARS,
- "url" => FILTER_SANITIZE_URL
- ];
- }
- public function sanitize($value="", $filter= "special_characters"){
- if($filter == 'float')
- else
- }
- }
- ?>
If you wish to utilize additional filters, you can explore various Sanitization and Validation filters at https://www.php.net/manual/en/filter.filters.php.
Creating the Simple Form Interface
Next, let's construct the user interface for the basic website, which includes a sample form. Begin by creating a new `PHP` file named `index.php`. This file also contains the script responsible for loading the class we created earlier and sanitizing the submitted data values.
- <?php
- if($_SERVER['REQUEST_METHOD'] == "POST"){
- require_once("SanitizeRequestData.class.php");
- $sanitizeRequestData = new SanitizeRequestData();
- /**
- * Filter to use in Sanitizing the request data
- * key => request data key
- * value => sanitazation filter
- */
- $filter = [
- "site_url" => "url",
- "site_email" => "email",
- "site_name" => "addslashes",
- "sample_float" => "float",
- "sample_int" => "int",
- "sample_html" => "special_characters"
- ];
- /**
- * Sanitize POST Data
- */
- foreach($_POST as $key => $value){
- $_POST[$key] = $sanitizeRequestData->sanitize($value, $filter[$key]);
- }
- $dataJSONpath = __DIR__."/request-data.json";
- }
- ?>
- <!DOCTYPE html>
- <html lang="en">
- <head>
- <meta charset="UTF-8">
- <meta name="viewport" content="width=device-width, initial-scale=1.0">
- <title>Sample Website Form</title>
- <!-- Bootstrap 5.3 CSS-->
- <link rel="stylesheet" href="https://cdn.jsdelivr.net/npm/[email protected]/dist/css/bootstrap.min.css">
- <!-- jQuery -->
- <script src="https://cdnjs.cloudflare.com/ajax/libs/jquery/3.7.1/jquery.min.js"></script>
- <!-- Bootstrap 5.3 JS-->
- <script src=" https://cdn.jsdelivr.net/npm/[email protected]/dist/js/bootstrap.bundle.min.js"></script>
- </head>
- <body>
- <nav class="navbar navbar-expand-lg bg-body-tertiary">
- <div class="container-fluid">
- <a class="navbar-brand" href="#">Sample Form</a>
- <button class="navbar-toggler" type="button" data-bs-toggle="collapse" data-bs-target="#navbarNav" aria-controls="navbarNav" aria-expanded="false" aria-label="Toggle navigation">
- <span class="navbar-toggler-icon"></span>
- </button>
- <div class="collapse navbar-collapse" id="navbarNav">
- <ul class="navbar-nav">
- <li class="nav-item">
- <a class="nav-link <?= $page == 'home' ? "active" : '' ?>" href="./">Home</a>
- </li>
- </ul>
- </div>
- </div>
- </nav>
- <div class="container-md py-4">
- <div class="card rounded-0 mx-auto col-lg-5 col-md-7 col-sm-12 col-12">
- <div class="card-header rounded-0">
- <h5 class="card-title">Sample Form</h5>
- </div>
- <div class="card-body rounded-0">
- <div class="bg-dark text-light px-2 py-3">
- <?php
- foreach($_POST as $k => $v){
- }
- ?>
- </div>
- <?php endif; ?>
- <form action="" id="sample-form" method="POST">
- <div class="container-fluid">
- <div class="mb-3">
- <label for="site_url" class="form-label">Site URL</label>
- <input type="text" id="site_url" name="site_url" class="form-control form-control-sm rounded-0" required="required">
- </div>
- <div class="mb-3">
- <label for="site_email" class="form-label">Site Email</label>
- <input type="text" id="site_email" name="site_email" class="form-control form-control-sm rounded-0" required="required">
- </div>
- <div class="mb-3">
- <label for="site_name" class="form-label">Site Name</label>
- <input type="text" id="site_name" name="site_name" class="form-control form-control-sm rounded-0" required="required">
- </div>
- <div class="mb-3">
- <label for="sample_float" class="form-label">Sample Float Field</label>
- <input type="text" id="sample_float" name="sample_float" class="form-control form-control-sm rounded-0" required="required">
- </div>
- <div class="mb-3">
- <label for="sample_int" class="form-label">Sample Integer Field</label>
- <input type="text" id="sample_int" name="sample_int" class="form-control form-control-sm rounded-0" required="required">
- </div>
- <div class="mb-3">
- <label for="sample_html" class="form-label">Sample HTML Field</label>
- <textarea rows="5" id="sample_html" name="sample_html" class="form-control form-control-sm rounded-0" required="required"></textarea>
- </div>
- <div class="d-flex justify-content-center align-items-center w-100">
- <div class="col-lg-4 col-md-6 col-sm-8 col-12">
- <button class="btn btn-primary rounded-pills">Submit Data</button>
- </div>
- </div>
- </div>
- </form>
- </div>
- </div>
- </div>
- </body>
- </html>
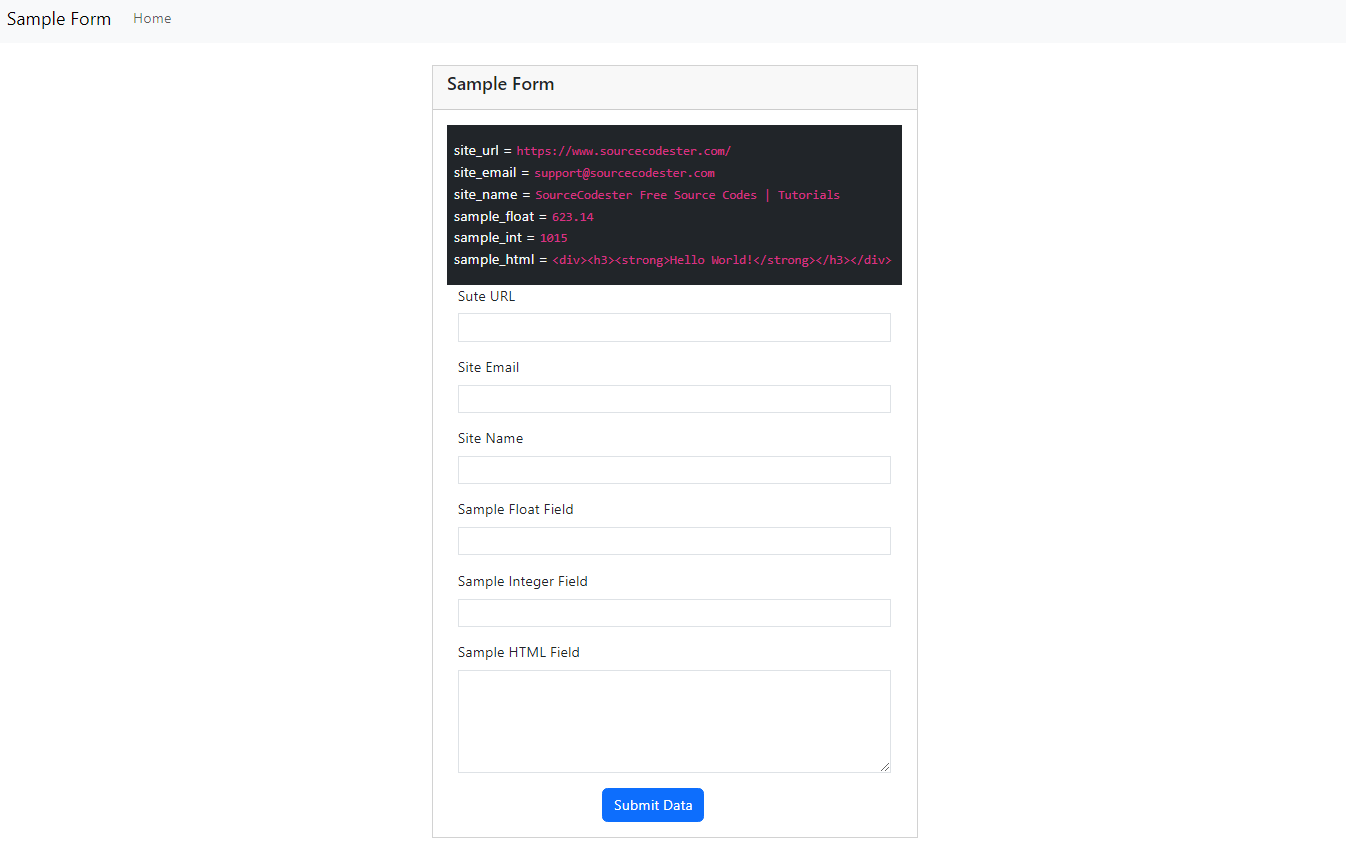
After submitting the form, a container located above the form fields will become visible, showing the sanitized data submitted. Additionally, the script generates a new JSON file, which contains the raw sanitized data in JSON format. This file is named `request-data.json`.
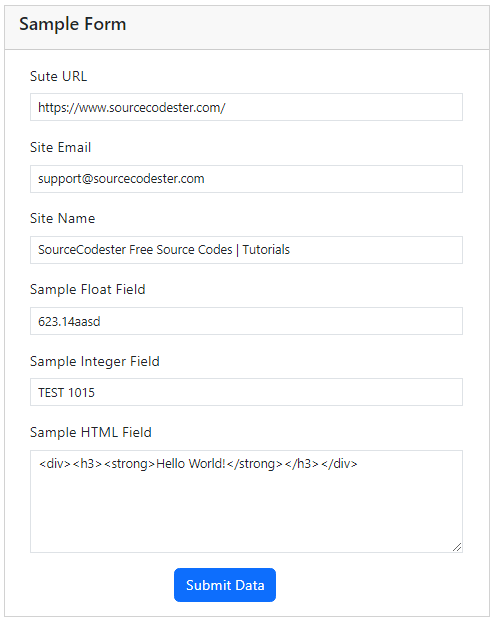
Here are some images that depict the outcomes produced by the provided script:
Website UI
Sample Filled Form
Sanitized Data Result in Browser

Unparsed Sanitized Data Result in JSON File

And that's it! I hope that this `Sanitizing Request Data Values in PHP Tutorial` will be of great assistance to you in your current and future PHP projects. Feel free to explore our website for additional resources, including Free Source Code, Tutorials, and Articles covering a wide range of programming languages.