Exporting MySQL Data into a CSV File in PHP Tutorial
In this tutorial, you will learn how to create a Export MySQL Data to CSV File. With the use of some built-in PHP Functions such as PHP fopen() and fputcsv() we can create a CSV file with data. This tutorial can be useful for your future projects that requires a CSV Exportation Functionality.
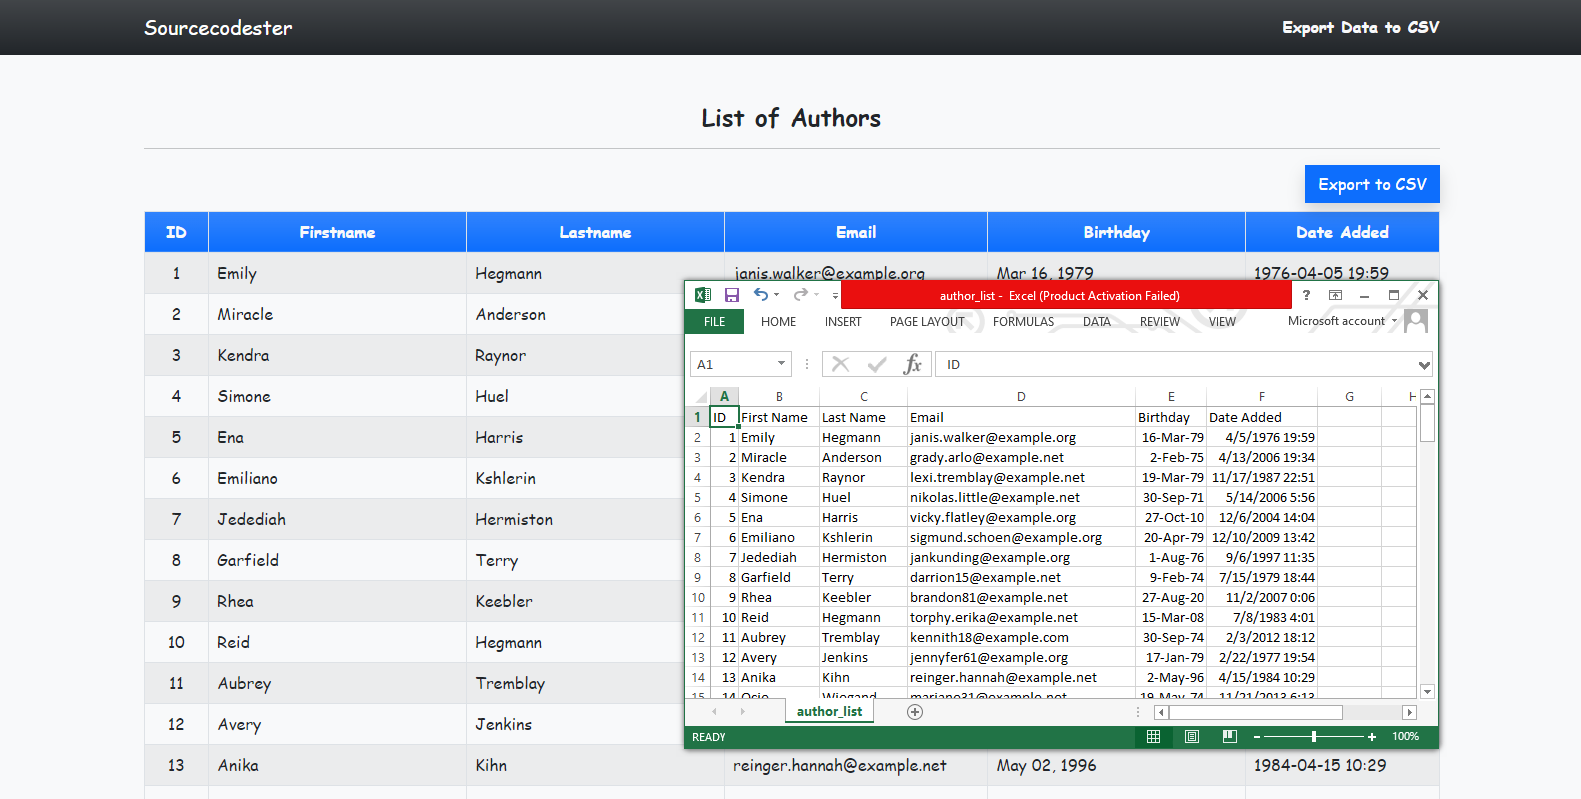
Here, we will create a simple PHP application with dummy MySQL data and has an anchor/button that triggers to export the data to CSV File.
Getting Started
Download XAMPP as your local web server to run our PHP Script. After Installing the virtual server, open the XAMPP's Control Panel and start the Apache Server and MySQL.
Download Bootstrap v5 for the interface design of the application that we'll be creating. After that move the library directory to the folder where you will store the source code on your end.
Creating The Database
Open a new tab in your browser and browse the XAMPP's PHPMyAdmin. Next, create a new database naming dummy_db. Then, navigate the page into the SQL Tab/Page and paste SQL Script below to the provided text field. Lastly, click the Go Button to execute the script.
Or, you can also import the SQL File I provided along with working source code file. The file is known as dummy_db.sql and located inside the db folder.
Creating The Database Connection
Next, create a new PHP File and save it as dummy_db.sql. This file will contain the PHP Script that connects to the MySQL Database.
- <?php
- $host = 'localhost';
- $username = 'root';
- $password = '';
- $dbname ='dummy_db';
- $conn = new mysqli($host, $username, $password, $dbname);
- if(!$conn){
- }
Creating the Interface
Below is the Script of the Main Page that contains the HTML Code of the elements to be shown to the end-users. It also contains the anchor/button to export the data to CSV. Save this file as index.php.
- <?php require_once('db-connect.php') ?>
- <!DOCTYPE html>
- <html lang="en">
- <head>
- <meta charset="UTF-8">
- <meta http-equiv="X-UA-Compatible" content="IE=edge">
- <meta name="viewport" content="width=device-width, initial-scale=1.0">
- <link rel="stylesheet" href="./Font-Awesome-master/css/all.min.css">
- <link rel="stylesheet" href="./css/bootstrap.min.css">
- <style>
- :root {
- --bs-success-rgb: 71, 222, 152 !important;
- }
- html,
- body {
- height: 100%;
- width: 100%;
- font-family: Apple Chancery, cursive;
- }
- .btn-info.text-light:hover,
- .btn-info.text-light:focus {
- background: #000;
- }
- </style>
- </head>
- <body class="bg-light">
- <nav class="navbar navbar-expand-lg navbar-dark bg-dark bg-gradient" id="topNavBar">
- <div class="container">
- <a class="navbar-brand" href="https://sourcecodester.com">
- Sourcecodester
- </a>
- <div>
- </div>
- </div>
- </nav>
- <div class="container py-5" id="page-container">
- <hr>
- <div class="row justify-content-end my-2">
- <div class="col-md-4 text-end">
- </div>
- </div>
- <!-- Authors Table -->
- <table class="table table-striped table-bordered">
- <colgroup>
- <col width="5%">
- <col width="20%">
- <col width="20%">
- <col width="20%">
- <col width="20%">
- <col width="15%">
- </colgroup>
- <thead>
- <tr class="bg-gradient bg-primary text-light">
- </tr>
- </thead>
- <tbody>
- <?php
- // Selecting all authors in the database
- $qry = $conn->query("SELECT * FROM `authors` order by id asc ");
- // looping list of authos into a table rows
- while($row = $qry->fetch_assoc()):
- ?>
- <tr>
- </tr>
- <?php endwhile; ?>
- </tbody>
- </table>
- <!-- Authors Table -->
- </div>
- <?php
- if(isset($conn)) $conn->close();
- ?>
- </body>
- </html>
Creating The Main Function
Lastly, create a new PHP File naming export.php. This file contains the PHP Codes for exporting the MySQL Data into a CSV File.
- <?php
- // Load the database connection
- require_once('db-connect.php');
- //CSV Filename
- $fname = 'author_list.csv';
- // Header Row Data: Array
- $header = ["ID","First Name", "Last Name", "Email", "Birthday", "Date Added"];
- // Selecting all authors query
- $qry = $conn->query("SELECT * FROM `authors` order by `id` asc");
- if($qry->num_rows <= 0){
- echo "<script> alert('No data has fetched.'); location.href = './'; </script>";
- exit;
- }
- //Open a File
- // Attach Header
- // Loop the authors and put it into the CSV file
- while($row = $qry->fetch_assoc()){
- }
- // Add headers to download the file
- // Read File
- exit;
That's it! You can now test the application in your browser and see if we have met our goal on this tutorial. If ever you have encountered any errors, please review your source code by differentiating it from the source code I provided above. You can also test the working source code I created for this tutorial. You can download the source code zip file below this article.
DEMO VIDEO
That is the end of this tutorial. I hope you'll find this Exporting MySQL Data to CSV Tutorial useful for your current and future PHP projects.