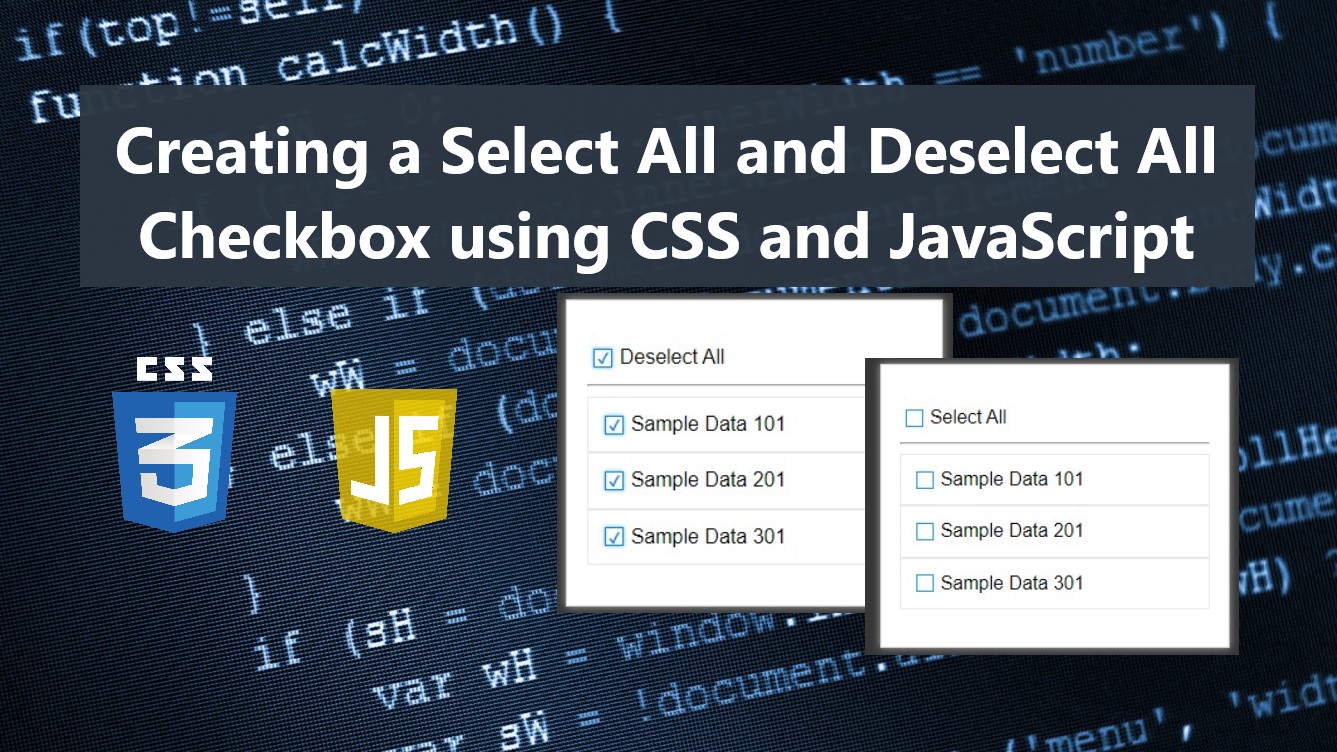
Creating a Select All and Deselect All Checkbox using CSS and JavaScript Tutorial
In this tutorial, you can learn how to create a Select All and Deselect All Checkbox functionality using CSS and JavaScript. This tutorial aims to provide students and beginners with a reference for learning some useful techniques and components for building creative web application features. Here, I will be providing a simple web page script that demonstrates the creation of the Select All and Deselect All Checkbox functionality.
What is the Select All and Deselect All Checkbox?
Select All and Deselect All Checkbox is a software feature that allows users to easily select and deselect multiple data or checkboxes. This component is usually or commonly implement with the website or feature for bulk actions such as bulk deletion of data.
How to create a Select All and Deselect All Checkbox?
Creating a Select All and Deselect All Checkbox can be achieved easily using JavaScript. JavaScript comes with built-in methods and APIs that are useful to achieve this. We can create this functionality by Identifying the current state of a checkbox every time the user updates the checkbox value. Check out the web page scripts that I have provided below to understand this more.
Sample Web Page
The script below results in a simple web application page that contains a static list with checkboxes. It has the capability to check and uncheck all the checkboxes at once. In addition, the main checkbox is automatically updated to checked or unchecked if the child checkboxes are manually managed.
Page Interface
Here's the HTML file script of the page that contains the page layout and static content elements.
- <!DOCTYPE html>
- <html lang="en">
- <head>
- <meta charset="UTF-8">
- <meta http-equiv="X-UA-Compatible" content="IE=edge">
- <meta name="viewport" content="width=device-width, initial-scale=1.0">
- <link rel="preconnect" href="https://fonts.googleapis.com">
- <link rel="preconnect" href="https://fonts.gstatic.com" crossorigin>
- <link rel="stylesheet" href="https://fonts.googleapis.com/css2?family=Material+Symbols+Outlined:opsz,wght,FILL,[email protected],100..700,0..1,-50..200" />
- <link rel="stylesheet" href="style.css">
- </head>
- <body>
- <div id="wrapper">
- <hr style="margin:auto; width:25px">
- <div id="checklist-wrapper">
- <div id="main-check">
- <div class="check-item">
- <input type="checkbox" id="selectAll">
- </div>
- <div>
- </div>
- </div>
- <hr>
- <div class="list-group">
- <div class="list-item">
- <div class="check-item">
- <input type="checkbox" id="checkbox1" checked>
- </div>
- <div>
- </div>
- </div>
- <div class="list-item">
- <div class="check-item">
- <input type="checkbox" id="checkbox2">
- </div>
- <div>
- </div>
- </div>
- <div class="list-item">
- <div class="check-item">
- <input type="checkbox" id="checkbox3">
- </div>
- <div>
- </div>
- </div>
- </div>
- </div>
- </div>
- </body>
- </html>
Stylesheet
Here's the CSS script that I created for the design of the page and custom checkbox.
- @import url('https://fonts.googleapis.com/css2?family=Courgette&family=Secular+One&display=swap" rel="stylesheet');
- :root{
- --secular-font: 'Secular One', sans-serif;
- }
- *{
- box-sizing: border-box;
- }
- body *{
- font-family: 'Rubik', sans-serif;
- }
- /**
- Page Design
- */
- body,
- html{
- height: 100%;
- width: 100%;
- margin: 0;
- padding: 0;
- }
- body{
- background-color: #363636;
- }
- /* Page Wrapper */
- #wrapper{
- width: 100%;
- padding: 3em 5em;
- }
- .page-title{
- font-size: 2.5rem;
- font-weight: 500;
- color: #fff;
- letter-spacing: 3px;
- font-family: var(--secular-font);
- text-align: center;
- }
- /* Checklist Wrapper */
- #checklist-wrapper{
- width: 300px;
- padding: 2em 1em;
- background-color: #fff;
- border: 1px solid #d3d3d3;
- box-shadow:0px 0px 7px #a5a5a5;
- margin: auto;
- margin-top: 1em;
- }
- #main-check{
- display: flex;
- width: 100%;
- align-items: center;
- }
- /* Checklist */
- #checklist-wrapper .list-group{
- position: relative;
- width:100%;
- }
- /* Checklist */
- #checklist-wrapper .list-group .list-item{
- position: relative;
- width:100%;
- display: flex;
- flex-wrap: wrap;
- align-items: center;
- padding: 0.5em 0.5em;
- border: 1px solid #e9e9e9;
- }
- /* Checkboxes Items */
- .check-item {
- padding: .35em;
- }
- .check-item input[type="checkbox"]{
- display: none;
- }
- /* Checkboxes Items Label/Custom Checkbox */
- .check-item input[type="checkbox"] ~ label{
- width: 15px;
- height: 15px;
- border: 1px solid #0e93ff;
- display: flex;
- align-items:center;
- justify-content:center;
- cursor: pointer;
- }
- .check-item input[type="checkbox"]:checked ~ label{
- border-color: #0086f3;
- box-shadow: 0px 0px 3px #0086f3a4;
- }
- .check-item input[type="checkbox"]:checked ~ label:before{
- content: "\2714";
- font-size: 12px;
- color: #0086f3;
- }
JavaScript
Lastly, here is the JavaScript file script that contains the code that makes the select/deselect all functionality possible.
- const mainCheck = document.getElementById('selectAll')
- const checkboxes = document.querySelectorAll('.list-group .check-item input[type="checkbox"]')
- /** Select/Deselect All Check boxes */
- mainCheck.addEventListener('change',()=>{
- if(mainCheck.checked == true){
- checkboxes.forEach(checkbox => {
- checkbox.checked = true
- })
- }else{
- checkboxes.forEach(checkbox => {
- checkbox.checked = false
- })
- }
- UpdateMainLabel();
- })
- /** Update Main Checkbox Label */
- const UpdateMainLabel = ()=>{
- if(mainCheck.checked == true){
- document.querySelector('#mainCheckLabel').innerText = "Deselect All"
- }else{
- document.querySelector('#mainCheckLabel').innerText = "Select All"
- }
- }
- /** Update Main Checkbox when child checkboxes has changes */
- checkboxes.forEach(checkbox =>{
- checkbox.addEventListener('change', ()=>{
- checkedboxes = document.querySelectorAll('.list-group .check-item input[type="checkbox"]:checked')
- if(checkboxes.length == checkedboxes.length){
- mainCheck.checked = true
- }else{
- mainCheck.checked = false
- }
- UpdateMainLabel();
- })
- })
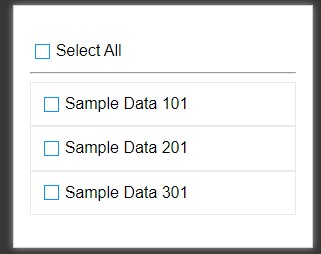
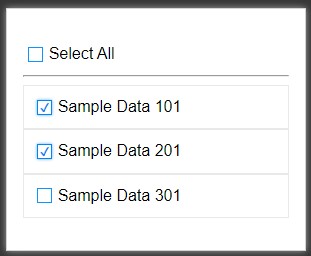
Result
Here are the snapshots of the overall result of the script I have provided above:
Select All Checkboxes
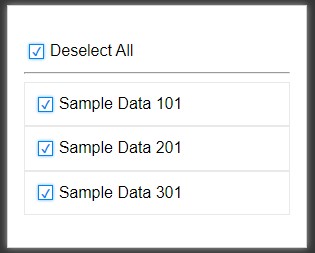
Deselect All Checkboxes
Partially Select Checkboxes
There you go! I have also provided the complete source code zip file that I created for this tutorial on this website and it is free to download. Feel free to download and modify it to make some experiments to enhance your knowledge and skills. The download button is located below this tutorial's content.
That's it! I hope this Creating a Select All and Deselect All Checkbox using CSS and JavaScript Tutorial will help you with what you are looking for and will be useful for your current and future web application projects.
Explore more on this website for more Tutorials and Free Source Codes.