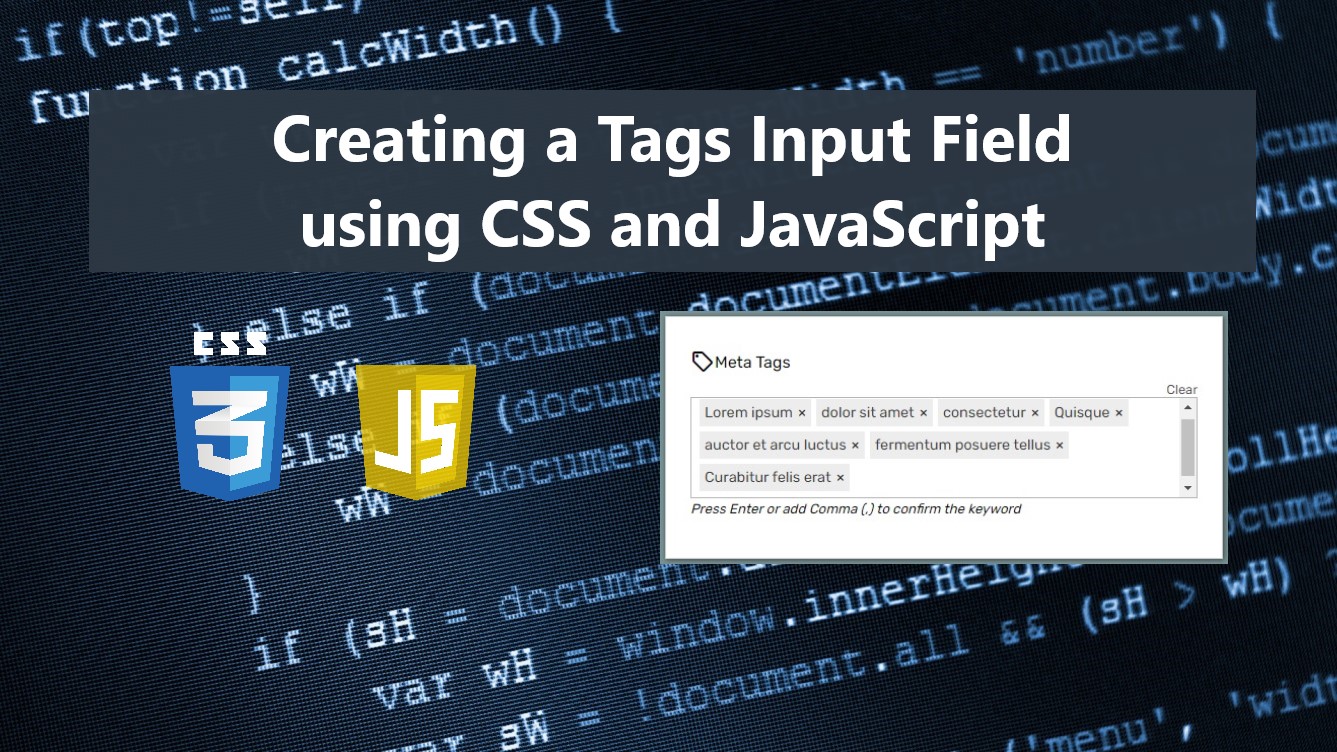
Creating a Tags Input Field using CSS and JavaScript Tutorial
In this tutorial, you can learn how to create a simple Tags Input Field for your web forms or CMS projects. The tutorial aims to provide students and beginners with a reference for learning of building a useful website or web application component and providing them with a free web library for generating Tag Input Fields. Here, I created a simple web page script using the simple library that I created to demonstrate the main goal of this article.
What is a Tags Input Field?
The Tag Input Field is a custom component of a website or web application form that allows the users to dynamically add, update, and remove multiple keywords. This component is often used in a Content Management System or CMS project which allows the author or writers to insert the meta keywords regarding the article they are about to publish. Basically, this feature is compressing the keywords into one field to save some space on the page screen and to easily manage the list of keywords.
How to create a Tags Input Field?
The Tags Input Field can be easily achieved using HTML elements, CSS, and pure JavaScript. Using HTML input, div elements, and some CSS we can build and design a simple form input or more likely a textarea where the keywords will be input. JavaScript will be helpful for giving a creative UI/UX for managing the keywords inside the text field. Check out the sample web page scripts that I provided below to have a better idea of creating this component for an actual web project.
Sample Web Page
The scripts below result in a simple web page that contains a form field for keywords or meta descriptions. The keywords are displayed with a small container with a remove link or button beside each keyword to remove it. It contains also a validation feature for checking duplicates.
Page Interface
The below script is the HTML file script named index.html. It contains the page layout's elements and the Tags Input Field Container.
- <!DOCTYPE html>
- <html lang="en">
- <head>
- <meta charset="UTF-8">
- <meta http-equiv="X-UA-Compatible" content="IE=edge">
- <meta name="viewport" content="width=device-width, initial-scale=1.0">
- <link rel="preconnect" href="https://fonts.googleapis.com">
- <link rel="preconnect" href="https://fonts.gstatic.com" crossorigin>
- <link rel="stylesheet" href="https://fonts.googleapis.com/css2?family=Material+Symbols+Outlined:opsz,wght,FILL,[email protected],100..700,0..1,-50..200" />
- <link rel="stylesheet" href="style.css">
- <link rel="stylesheet" href="tagInput.css">
- </head>
- <body>
- <div id="wrapper">
- <hr style="width:25px">
- <div id="content-wrapper">
- <div>
- <!-- Tag Input Field -->
- <!-- Tag Input Field -->
- </div>
- </div>
- </div>
- <script>
- /*
- * Initialize Tag Input to selected Element
- * options = (object)
- * - placeholder
- * - inputName
- * - containerClass
- * - values (Array)
- */
- let SampleTagField = new TagInput('tagSampleField',{
- placeholder:"Enter Keywords Here...",
- inputName:'sampleTagField1',
- containerClass:'MyAdditionalClassName',
- // values: ['test1', '123']
- })
- SampleTagField.init()
- </script>
- </body>
- </html>
Here's the stylesheet of the web page that contains the CSS styles of the layout design of the page interface. The file script is known as the style.css that is loaded on the index page file script.
- @import url('https://fonts.googleapis.com/css2?family=Rubik&display=swap');
- @import url('https://fonts.googleapis.com/css2?family=Courgette&family=Secular+One&display=swap" rel="stylesheet');
- :root{
- --secular-font: 'Secular One', sans-serif;
- --satisfy-font: 'Satisfy', cursive;
- }
- *{
- box-sizing: border-box;
- }
- body *{
- font-family: 'Rubik', sans-serif;
- }
- /**
- Page Design
- */
- body,
- html{
- height: 100%;
- width: 100%;
- margin: 0;
- padding: 0;
- }
- body{
- background-color: #789395;
- }
- /* Page Wrapper */
- #wrapper{
- width: 100%;
- height: 100%;
- display: flex;
- flex-direction: column;
- align-items: center;
- justify-content: center;
- }
- .page-title{
- font-size: 35px;
- font-family: var(--secular-font);
- letter-spacing: 2px;
- text-align: center;
- color:#fff;
- text-shadow: 0px 0px 5px #7070709c;
- }
- /* Content Wrapper */
- #content-wrapper{
- width: 550px;
- min-height: 200px;
- background: #fff;
- border: 1px solid #cfcfcf;
- box-shadow: 1px 1px 5px #282828c4;
- padding:2em 1.5em;
- }
- @media (max-width:550px){
- #content-wrapper{
- width: 100%;
- }
- }
- label {
- display: flex;
- align-items: center;
- margin-bottom:.5em;
- }
Tag Input Fields Stylesheet
The script below is the CSS code that contains the styles of the Tag Input Field elements. This file is known as tagInput.css which is also loaded on the index page file script.
- /* Tag Input Field */
- .tag-input-field {
- margin-bottom:.5em;
- }
- /* Text Field/Area of the keywords */
- .tag-input-field .tag-input{
- width:100%;
- min-height: 50px;
- max-height: 100px;
- overflow-x: hidden;
- display: flex;
- flex-wrap: wrap;
- border:1px solid #b4b4b4;
- padding: .5em .5em;
- }
- /* Text Field */
- .tag-input-field .text-field{
- outline: none;
- padding: .35em;
- }
- .tag-input .tag-item span[contenteditable="true"]{
- outline: none;
- }
- /* Text Field Placeholder*/
- .tag-input-field:not(:has(.tag-item)) .text-field:empty:before{
- content:var(--inputPlaceHolder);
- font-size: 15px;
- font-style: italic;
- color:#dbdbdb;
- }
- /* Keyword items */
- .tag-input-field .tag-item{
- padding: .35em;
- display: flex;
- align-items:center;
- font-size:.9rem;
- background-color: #ededed;
- color:#3c3c3c;
- margin-right:.35em;
- margin-bottom:.35em;
- }
- /* Item Remove Element */
- .tag-input-field .tag-item .tag-item-remove{
- text-decoration:none;
- display: flex;
- align-items: center;
- justify-content: center;
- padding-left:.35em;
- color:#222222;
- cursor: pointer;
- }
- .tag-input-field .tag-item .tag-item-remove:before{
- content: "\00D7";
- }
- /*Keywords Hidden inputs*/
- .tag-input-field .tag-input-added{
- visibility: none;
- display: none;
- }
- /*Clear All Keywords Element*/
- .tag-input-field div:has(.clear-tag-input){
- display: flex;
- flex-wrap: wrap;
- justify-content: end;
- }
- .tag-input-field .clear-tag-input{
- text-decoration: none;
- color:#504f4f;
- font-size: .8rem;
- }
Tag Input Fields JavaScript
Lastly, the below script is the JS file script that contains the code for initializing and making the Tags Field functional. The script is written using the JS OOP Approach or JS Class Object. The file is known as tagInput.js and it is loaded also at the index page.
- /**
- * Tag Input Field Class Object
- * Description: Creates an Input Field where user can dynamically, update, and remove element.
- * Purpose: This was built for educational purposes only but can be also used in an actual project.
- * Developer: Carlo Montero ([email protected])
- */
- /**
- * Syntax
- * let myDiv = new TagInput('ElementId', optionsObject);
- * myDiv.init();
- */
- /**
- * Option Objects
- * placeholder (optional)- the text to be shown when the field is empty or not filled yet.
- * inputName (optional)- name of the input array for submitting the keywords (default: ElementID)
- * containerClass (optional)- additional class name of the tag field element
- * values (optional)[array] - Default Keywords
- */
- class TagInput {
- TagField;
- // Creating the Tag Input Field container
- tagFieldHTML = document.createElement('div');
- // Creating the Tag Input Field Item container
- tagItem = document.createElement('div');
- ItemConfirmKeyCodes = [13, 44];
- options;
- constructor(ElementID, options = {}){
- // Element Selector where to place the tag input
- this.TagField = document.getElementById(ElementID)
- // Tag Field HTML's properties
- this.tagFieldHTML.classList.add('tag-input-field')
- this.tagFieldHTML.innerHTML = `
- <div>
- <a class="clear-tag-input" href="#" title="Remove All Keywords" tabindex="-1">Clear</a>
- </div>
- <div class="tag-input">
- <div class="text-field" contenteditable="true"></div>
- </div>
- <div><small><em>Press Enter or add Comma (,) to confirm the keyword</em></small></div>
- <div class="tag-input-added">
- </div>`;
- // Tag Field Items properties
- this.tagItem.classList.add('tag-item')
- this.tagItem.innerHTML += `<span contenteditable="true">Sample keyword</span><a href="#" class="tag-item-remove" tabindex="-1"></a>`
- //Class options
- this.options = options
- this.options.inputName = this.options.inputName || ElementID
- this.options.placeholder = this.options.placeholder || "Enter keywords here..."
- }
- /** Initialize Tag Field */
- init(){
- // Insert Tag Field Elements inside the given parent Element
- this.TagField.innerHTML = this.tagFieldHTML.outerHTML
- //Adding the addional Class Name if given
- if(!!this.options.containerClass){
- this.TagField.classList.add(this.options.containerClass)
- }
- //Setting the placeholder text's CSS Variable
- this.TagField.querySelector('.text-field').style = `--inputPlaceHolder:'${this.options.placeholder}'`
- // Trigger focus to text field
- this.TagField.querySelector('.tag-input').addEventListener('click', (e) =>{
- e.preventDefault()
- if(e.target == this.TagField.querySelector('.tag-input') )
- this.TagField.querySelector('.text-field').focus()
- })
- // Event Listener when keypress
- this.TagField.querySelector('.text-field').addEventListener('keypress', e=>{
- var code = e.keyCode || e.which
- if(this.ItemConfirmKeyCodes.includes(code)){
- e.preventDefault()
- var textValue = this.TagField.querySelector('.text-field').innerText
- this.InsertKeyword(textValue)
- }
- })
- //Clear/Remove All Keywords
- this.TagField.querySelector('.clear-tag-input').addEventListener('click', e =>{
- e.preventDefault()
- this.removeAllKeywords()
- })
- /** Insert Default Values */
- if(!!this.options.values){
- if(!Array.isArray(this.options.values)){
- throw Error('Tag Element Default Value requires an Array Value');
- }else{
- this.options.values.forEach(textValue => {
- this.InsertKeyword(textValue)
- })
- }
- }
- }
- /** Insert Keyword as an Item */
- InsertKeyword(TextValue=""){
- var item = this.tagItem.cloneNode(true)
- var textValue = String(TextValue).trim()
- if(textValue === ""){
- return false;
- }
- // List Current keyword iputs
- var currentInputs = [...this.TagField.querySelectorAll('.tag-input-added input')]
- // Check if Text Value already Exists
- var has_duplicate = currentInputs.filter(input => ((input.value).trim()).toLowerCase() == textValue.toLowerCase())
- if(has_duplicate.length <= 0){
- /** Insert If Not Existing Yet */
- var id = Math.floor(Math.random() * (1000 - 1) + 1)
- while(true){
- if(this.TagField.querySelector(`.tag-item[data-id='${id}']`) !== null){
- id = Math.floor(Math.random() * (1000 - 1) + 1)
- }else{
- break;
- }
- }
- item.dataset.id = id
- var input = document.createElement('input')
- input.dataset.id= id;
- input.name = `${this.options.inputName}[]`;
- input.value = textValue
- item.querySelector('span[contenteditable="true"]').innerText = textValue
- //insert Keyword input
- this.TagField.querySelector('.tag-input-added').appendChild(input)
- //Insert Keyword Item
- if(this.TagField.querySelectorAll('.tag-item').length > 0){
- this.TagField.querySelectorAll('.tag-item')[this.TagField.querySelectorAll('.tag-item').length - 1].after(item)
- }else{
- this.TagField.querySelector('.tag-input').insertBefore(item, this.TagField.querySelector('.text-field'))
- }
- //result text field
- this.TagField.querySelector('.text-field').innerText = ''
- //Add event listner to item for updating the value
- item.querySelector('span[contenteditable="true"]').addEventListener('input', (e) => {
- this.updateTagElement(item.querySelector('span[contenteditable="true"]'))
- })
- item.querySelector('.tag-item-remove').addEventListener('click', (e) => {
- e.preventDefault()
- this.TagInputItemRemove(item)
- })
- }else{
- //show dialog if keyword is already listed
- alert("Keyword Already Exists!")
- }
- }
- TagInputItemRemove(el){
- // Function for removing the Item
- var item_id = el.dataset.id
- if(item_id !== undefined){
- if(this.TagField.querySelector(`.tag-input-added [data-id="${item_id}"]`) !== null){
- this.TagField.querySelector(`.tag-input-added [data-id="${item_id}"]`).remove()
- }
- }
- el.remove();
- this.TagField.querySelector('.tag-input').click()
- }
- updateTagElement(el){
- //Function for updating the Keyword input
- var item_id = el.parentElement.dataset.id
- var textValue = (el.innerText).trim()
- if(textValue !== ""){
- if(item_id !== undefined){
- if(this.TagField.querySelector(`.tag-input-added [data-id="${item_id}"]`) !== null){
- this.TagField.querySelector(`.tag-input-added [data-id="${item_id}"]`).value = textValue
- }
- }
- }else{
- this.TagInputItemRemove(el.parentElement)
- }
- }
- removeAllKeywords(){
- //Clear/Remove Items function
- this.TagField.querySelectorAll('.tag-item').forEach(item =>{
- item.remove()
- })
- this.TagField.querySelector('.tag-input-added').innerHTML = ''
- this.TagField.click()
- }
- }
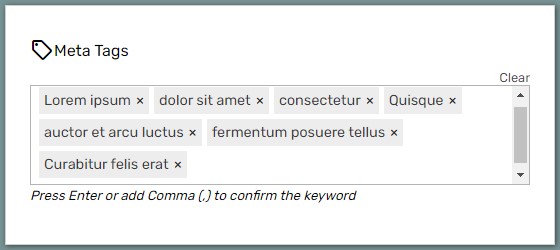
Result
The following images are the snapshots of the results using the scripts I have provided above.
Page Layout
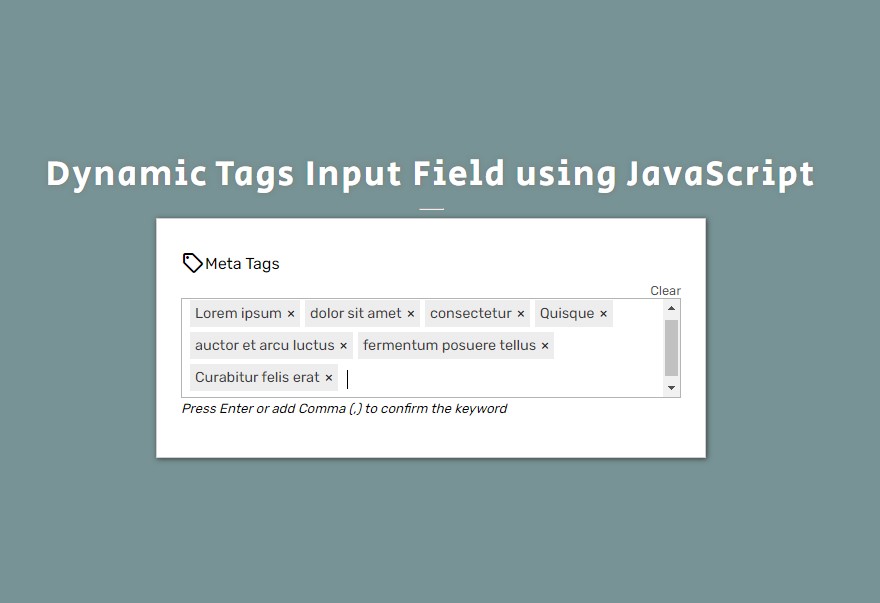
Tags Input Field
I have also provided the complete source code's zip file on this website and it is free to download. The download button is located below this tutorial's content.
In addition, the CSS and JS script is ready to use in an actual project or for your current and future projects. To implement it, follow the instruction below.
Steps for using the Tags Input Field Library
- Copy and paste the tagInput.css and tagInput.js into your project directory.
- Load the files inside your web page file scripts.
Example
- Add a new HTML div tag in your form page script with an id attribute. This element will serve as the parent container of the Tag Input Field.
Example
- Lastly, initiate the Tag Input Field like the following syntax:
- /*
- * Initialize Tag Input to selected Element
- * options = (object)
- * - placeholder (string) [optional]
- * - inputName (string) [optional]
- * - containerClass (string) [optional]
- * - values (Array) [optional]
- */
- let tagField = new TagInput('tagField',{
- placeholder:"Enter Keywords Here...",
- inputName:'tags',
- containerClass:'MyAdditionalClassName',
- values: ['Sample Keyword 1', 'Sample Keyword 2']
- })
- tagField.init()
There you go! I hope this Creating a Tags Input Field using CSS and JavaScript Tutorial and the free library will help you with what you are looking for and will be useful for your current and future web application projects.
Explore more on this website for more Tutorials and Free Source Codes.