Display jQuery Ajax Progress using Bootstrap Progress Bar Tutorial
Introduction
In this tutorial, I will teach you how to Display jQuery's AJAX Progress using the Bootstrap Progress Bar. This tutorial aims to provide IT/CS students or those new programmers with a reference and guide to learn to enhance their JavaScript programming capabilities. Here, snippets with some explanation will be provided. This can give them another knowledge on how they can provide a better web application for their end-users.
What is AJAX?
AJAX stands for Asynchronous JavaScript And XML. AJAX enables asynchronous updating of web pages by quietly sharing data with a web server. This indicates that a web page can be updated in sections without requiring a page reload. With the use of XML, HTML, CSS, and JavaScript, AJAX enables the creation of more effective, quick, and interactive online applications.
What is Bootstrap Progress?
Bootstrap Progress is one of the components of the Bootstrap Framework. It is built using two HTML elements, a width setting in CSS, and a few attributes. Visit the Bootstrap Official Website to know more about this content.
How to Display jQuery's AJAX Progress using Bootstrap Progress Bar?
This web application feature can be achieved with a few lines of JavaScript codes or scripts. Using the XHR setting option of jQuery's Ajax, we can capture the upload and download progress of the request. Here's an example snippet.
- $.ajax({
- xhr: function(){
- var xhr = $.ajaxSettings.xhr();
- // Upload Progress
- xhr.upload.addEventListener('progress', function(e){
- if(e.lengthComputable){
- var completed = e.loaded/e.total;
- console.log("Upload Progress:", completed)
- }
- }, false)
- // Download Progress
- xhr.addEventListener('progress', function(e){
- if(e.lengthComputable){
- var completed = e.loaded/e.total;
- var perc = Math.floor(completed * 100);
- console.log("Download Progress:", completed)
- }
- }, false)
- return xhr;
- },
- })
Using the above script you can now update your Bootrstrap's progress bar. You can update your progress width and CSS using some JavaScript or jQuery methods. Below is an example of updating your progress bar.
- // Updating the Progress Bar Label
- $('#progressBar').text(completedPercentage+'%');
- // Updating the Progress Bar Filled width
- $('#progressBar').css('width',completedPercentage+'%');
Example
Below is a simple web application that demonstrates our main goal for this tutorial. The application was written in HTML, CSS, JS, and PHP. It uploads an image or video and stores it on the server. The progress will start each time the user uploads a video or an image file to the given file input field. The progress bar will be shown above the input.
Interface
The below script holds the HTML and PHP Scripts of the application that display the elements or shows the application's user interface. It contains the form for uploading the file and the progress bar.
- <!DOCTYPE html>
- <html lang="en">
- <head>
- <meta charset="UTF-8">
- <meta http-equiv="X-UA-Compatible" content="IE=edge">
- <meta name="viewport" content="width=device-width, initial-scale=1.0">
- <title>JS Ajax Progress</title>
- <link rel="stylesheet" href="https://cdn.jsdelivr.net/npm/[email protected]/dist/css/bootstrap.min.css" integrity="sha384-Zenh87qX5JnK2Jl0vWa8Ck2rdkQ2Bzep5IDxbcnCeuOxjzrPF/et3URy9Bv1WTRi" crossorigin="anonymous">
- <script src="https://code.jquery.com/jquery-3.6.1.min.js" integrity="sha256-o88AwQnZB+VDvE9tvIXrMQaPlFFSUTR+nldQm1LuPXQ=" crossorigin="anonymous"></script>
- <script src="https://cdn.jsdelivr.net/npm/[email protected]/dist/js/bootstrap.min.js" integrity="sha384-IDwe1+LCz02ROU9k972gdyvl+AESN10+x7tBKgc9I5HFtuNz0wWnPclzo6p9vxnk" crossorigin="anonymous"></script>
- <style>
- html, body{
- min-height:calc(100%);
- width: calc(100%);
- }
- body{
- min-height: 100vh;
- width: 100vw;
- display: flex;
- flex-direction: column;
- align-items: center;
- justify-content: center;
- }
- </style>
- </head>
- <body class="bg-light bg-gradient">
- <div class="container-fluid w-100">
- <h1 class="text-center fw-bolder my-4">Displaying the Ajax Progress using Bootstrap Progress Bar</h1>
- <div class="d-flex justify-content-center">
- <hr class="col-4">
- </div>
- <div class="card rounded-0 shadow col-lg-5 col-md-7 col-sm-12 mx-auto">
- <div class="card-body">
- <div class="container-fluid">
- <form action="" id="sample-form">
- <div class="mb-3 d-none" id="progress-holder">
- <div class="progress">
- <div class="progress-bar" id="progress_bar" role="progressbar" aria-label="Example with label" style="width: 0%;" aria-valuenow="0" aria-valuemin="0" aria-valuemax="100">0%</div>
- </div>
- </div>
- <div class="mb-3">
- <label for="formFile" class="form-label">Choose Image</label>
- <input class="form-control" type="file" accept="image/*, video/*" name="upload" id="formFile" required>
- </div>
- </form>
- </div>
- <table class="table table-striped table-bordered">
- <colgroup>
- <col width="20%">
- <col width="80%">
- </colgroup>
- <thead>
- <tr class="bg-primary text-light">
- <th class="text-center">#</th>
- <th class="text-center">Filename</th>
- </tr>
- </thead>
- <tbody>
- <?php
- $dir = "uploads/";
- $i = 1;
- foreach($scandr as $file):
- continue;
- ?>
- <tr>
- <th class="text-center"><?= $i++ ?></th>
- <td><a href="<?= $dir.$file ?>" target="_blank"><?= $file ?></a></td>
- </tr>
- <?php endforeach; ?>
- <?php endif; ?>
- </tbody>
- </table>
- </div>
- </div>
- </div>
- </body>
- <script src="./app.js"></script>
- </html>
Creating JS Script
Here is the JavaScript code that executes jQuery's Ajax Request. The request will be triggered when the file input field detects any changes. This file is included or loaded at the interface page script.
app.js
- $(document).ready(function(){
- $('#formFile').change(function(){
- var inpFile = $(this).clone()
- var newForm = new FormData();
- newForm.append('uploaded', inpFile[0].files[0])
- // return false
- // newForm.append('uploaded', inpFile[0].files[0])
- $('#progress-holder').removeClass('d-none')
- var progressBar = $('#progress_bar');
- progressBar.text('0%');
- progressBar.attr('aria-valuenow',0);
- progressBar.css('width',0);
- $.ajax({
- url:"upload.php",
- data:newForm,
- method:'POST',
- type:"POST",
- processData:false,
- contentType:false,
- dataType:'JSON',
- error: err=>{
- console.error(err)
- alert("error")
- },
- xhr: function(){
- var xhr = $.ajaxSettings.xhr();
- xhr.upload.addEventListener('progress', function(e){
- if(e.lengthComputable){
- var completed = e.loaded/e.total;
- var perc = Math.floor(completed * 100);
- console.log("Upload:", perc)
- progressBar.text(perc+'%');
- progressBar.attr('aria-valuenow',perc);
- progressBar.css('width',perc+'%');
- }
- }, false)
- xhr.addEventListener('progress', function(e){
- if(e.lengthComputable){
- var completed = e.loaded/e.total;
- var perc = Math.floor(completed * 100);
- console.log("Download:",perc)
- progressBar.text(perc+'%');
- progressBar.attr('aria-valuenow',perc);
- progressBar.css('width',perc+'%');
- }
- }, false)
- return xhr;
- },
- success:function(response){
- var MyInterval = setInterval(function(){
- console.log("progress now:", progressBar.attr('aria-valuenow'))
- if(progressBar.attr('aria-valuenow') == 100){
- if(response.status == 'success'){
- console.log("Uploaded Filename:", response.filename)
- alert("File has been uploaded successfully")
- }else{
- alert(response.error)
- }
- clearInterval(MyInterval);
- location.reload()
- }
- },1000)
- }
- })
- })
- })
Creating the API
Here are the PHP Scripts that handle or store the uploaded file. The script creates the upload directory if not existed yet. It returns JSON data to validate if the file was uploaded successfully or not.
upload.php
- <?php
- $dir = "uploads/";
- }
- $fname = $_FILES['uploaded']['name'];
- $i = 0;
- while(true){
- $tmp_name = $dir.($i > 0 ? $i."_" :'').$fname;
- $i++;
- }else{
- $fname = $tmp_name;
- break;
- }
- }
- if($upload){
- }else{
- }
- }
- ?>
That's it! The complete source code file of the above example application is also provided on this website and is free to download. Feel free to download and modify it to do more experiments. The download button is located below this article.
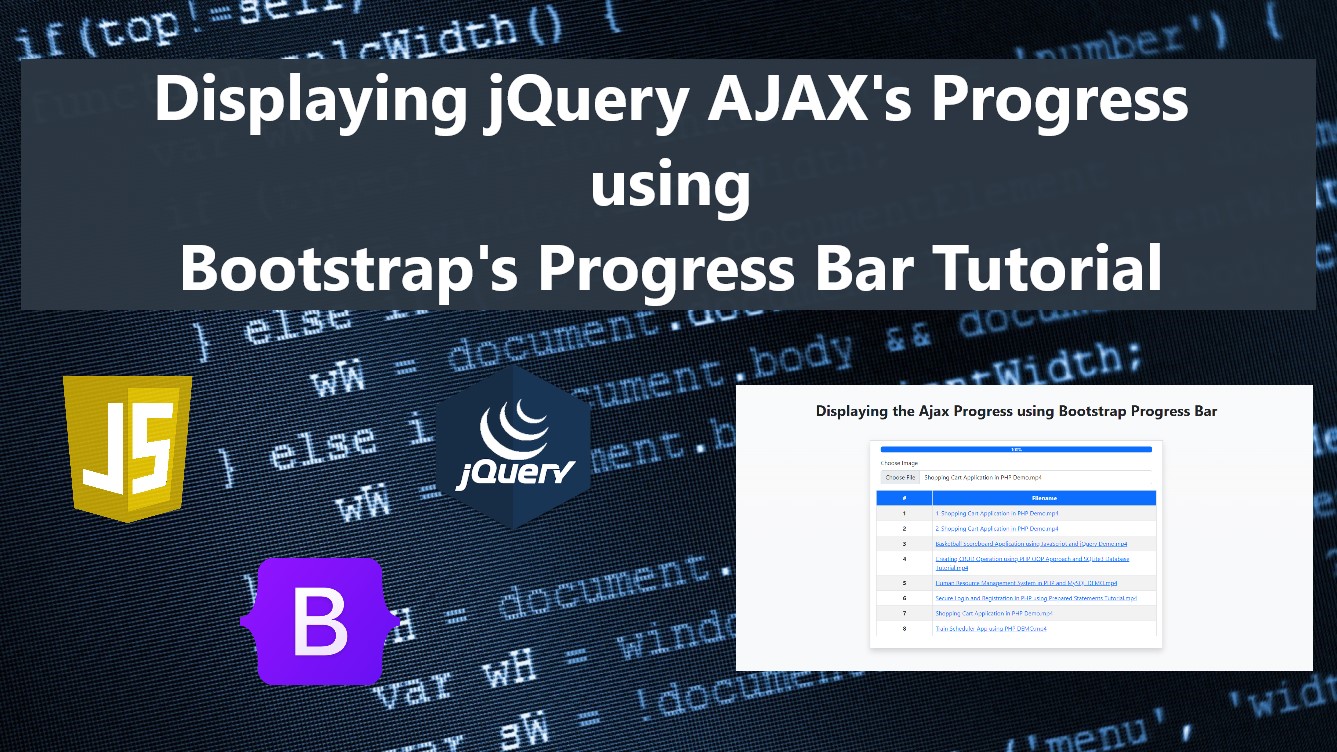
Snaphot
Here is the snapshot of the result of the example web application

DEMO VIDEO
That's the end of this tutorial. I hope this Displaying Ajax Progress using Bootstrap Progress Bar Tutorial helps you with what you are looking for and that you'll find this useful for your current and future web application projects.
Explore more on this website for more Tutorials and Free Source Codes.