Populate Entry Text On Double Click Using Python Source Code

In this tutorial we will create a Populate Entry Text On Double Click using Python. This code will populate the entry widget when user double click a row. The code use tkinter module to design a layout and call a specific functions. A function will automatically call when the user double click a row in order to populate the entry widget. We will be using Python programming language because it is widely used as an advance-level programming language for a general technique to the developer. Beginners find Python a clean syntax and indentation structure based, and it is easy to learn because of its less semi colon problem.

Getting started:

First you will have to download & install the Python IDLE's, here's the link for the Integrated Development And Learning Environment for Python https://www.python.org/downloads/.

Installing SQLite Browser

After you installed Python, we will now then install the SQLite, here's the link for the DB Browser for SQLite http://sqlitebrowser.org/.

Importing Modules

After setting up the installation and the database, run the IDLE and click file and then new file. After that a new window will appear containing a black file this will be the text editor for the python. Then copy code that I provided below and paste it inside the IDLE text editor.
  1. from tkinter import*
  2. import tkinter.ttk as ttk
  3. import tkinter.messagebox as tkMessageBox
  4. import connection

Setting up the Main Frame

After importing the modules, we will now then create the main frame for the application. To do that just copy the code below and paste it inside the IDLE text editor.
  1. root = Tk()
  2. root.title("Populate Entry Text On Double Click")
  3. screen_width = root.winfo_screenwidth()
  4. screen_height = root.winfo_screenheight()
  5. width = 900
  6. height = 500
  7. x = (screen_width/2) - (width/2)
  8. y = (screen_height/2) - (height/2)
  9. root.geometry('%dx%d+%d+%d' % (width, height, x, y))
  10. root.resizable(0, 0)

Creating the Database Connection

Then after setting up the design we will now create the database function. To do that just simply copy the code below and paste it inside the IDLE text editor, then save it as connection.py.
  1. import sqlite3
  2.  
  3. def Database():
  4. global conn, cursor
  5. conn = sqlite3.connect('db_member.db')
  6. cursor = conn.cursor()
  7. cursor.execute("CREATE TABLE IF NOT EXISTS `member` (mem_id INTEGER PRIMARY KEY AUTOINCREMENT NOT NULL, firstname TEXT, lastname TEXT, address TEXT, username TEXT, password TEXT)")
  8.  

Assigning Variables

This is where the we will assign the variables. This code will assign each of the variables to be use later in the application.
  1. #==================================VARIABLES==========================================
  2. FIRSTNAME = StringVar()
  3. LASTNAME = StringVar()
  4. ADDRESS = StringVar()
  5. USERNAME = StringVar()
  6. PASSWORD = StringVar()

Designing the Layout

After creating the Main Frame we will now add some layout to the application. Just kindly copy the code below and paste it inside the IDLE text editor.
  1. #==================================FRAME==============================================
  2. Top = Frame(root, width=900, height=50, bd=8, relief="raise")
  3. Top.pack(side=TOP)
  4. Left = Frame(root, width=600, height=500, bd=8, relief="raise")
  5. Left.pack(side=LEFT)
  6. Right = Frame(root, width=300, height=500, bd=8, relief="raise")
  7. Right.pack(side=RIGHT)
  8. Forms = Frame(Right, width=300, height=450)
  9. Forms.pack(side=TOP)
  10. Buttons = Frame(Right, width=300, height=100, bd=8, relief="raise")
  11. Buttons.pack(side=BOTTOM)
  12. RadioGroup = Frame(Forms)
  13.  
  14. #==================================LABEL WIDGET=======================================
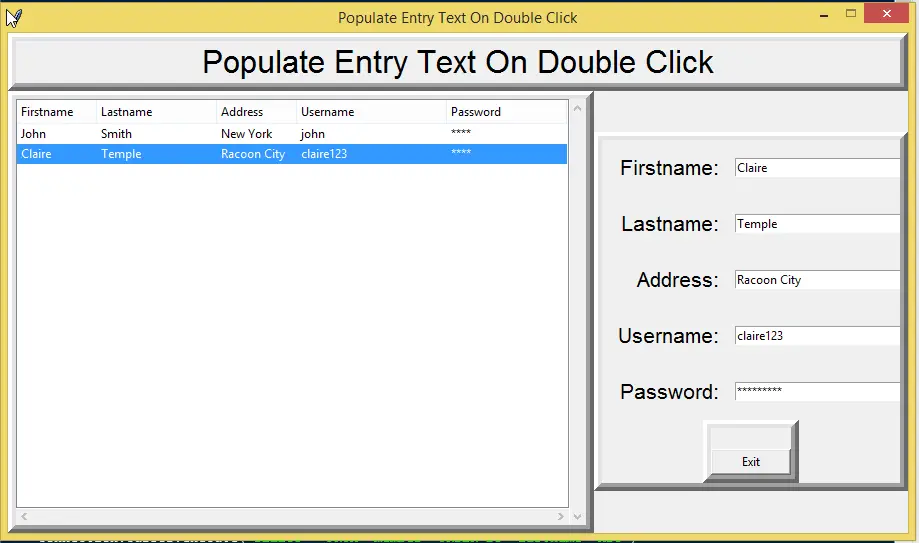
  15. txt_title = Label(Top, width=900, font=('arial', 24), text = "Populate Entry Text On Double Click")
  16. txt_title.pack()
  17. txt_firstname = Label(Forms, text="Firstname:", font=('arial', 16), bd=15)
  18. txt_firstname.grid(row=0, stick="e")
  19. txt_lastname = Label(Forms, text="Lastname:", font=('arial', 16), bd=15)
  20. txt_lastname.grid(row=1, stick="e")
  21. txt_address = Label(Forms, text="Address:", font=('arial', 16), bd=15)
  22. txt_address.grid(row=2, stick="e")
  23. txt_username = Label(Forms, text="Username:", font=('arial', 16), bd=15)
  24. txt_username.grid(row=3, stick="e")
  25. txt_password = Label(Forms, text="Password:", font=('arial', 16), bd=15)
  26. txt_password.grid(row=4, stick="e")
  27. txt_result = Label(Buttons)
  28. txt_result.pack(side=TOP)
  29.  
  30. #==================================ENTRY WIDGET=======================================
  31. firstname = Entry(Forms, textvariable=FIRSTNAME, width=30)
  32. firstname.grid(row=0, column=1)
  33. lastname = Entry(Forms, textvariable=LASTNAME, width=30)
  34. lastname.grid(row=1, column=1)
  35. address = Entry(Forms, textvariable=ADDRESS, width=30)
  36. address.grid(row=2, column=1)
  37. username = Entry(Forms, textvariable=USERNAME, width=30)
  38. username.grid(row=3, column=1)
  39. password = Entry(Forms, textvariable=PASSWORD, show="*", width=30)
  40. password.grid(row=4, column=1)
  41.  
  42. #==================================BUTTONS WIDGET=====================================
  43. btn_exit = Button(Buttons, width=10, text="Exit", command=Exit)
  44. btn_exit.pack(side=LEFT)
  45.  
  46. #==================================LIST WIDGET========================================
  47. scrollbary = Scrollbar(Left, orient=VERTICAL)
  48. scrollbarx = Scrollbar(Left, orient=HORIZONTAL)
  49. tree = ttk.Treeview(Left, columns=("MemID", "Firstname", "Lastname", "Address", "Username", "Password"), selectmode="extended", height=500, yscrollcommand=scrollbary.set, xscrollcommand=scrollbarx.set)
  50. scrollbary.config(command=tree.yview)
  51. scrollbary.pack(side=RIGHT, fill=Y)
  52. scrollbarx.config(command=tree.xview)
  53. scrollbarx.pack(side=BOTTOM, fill=X)
  54. tree.heading('Firstname', text="Firstname", anchor=W)
  55. tree.heading('Lastname', text="Lastname", anchor=W)
  56. tree.heading('Address', text="Address", anchor=W)
  57. tree.heading('Username', text="Username", anchor=W)
  58. tree.heading('Password', text="Password", anchor=W)
  59. tree.column('#0', stretch=NO, minwidth=0, width=0)
  60. tree.column('#1', stretch=NO, minwidth=0, width=0)
  61. tree.column('#2', stretch=NO, minwidth=0, width=80)
  62. tree.column('#3', stretch=NO, minwidth=0, width=120)
  63. tree.column('#4', stretch=NO, minwidth=0, width=80)
  64. tree.column('#5', stretch=NO, minwidth=0, width=150)
  65. tree.column('#6', stretch=NO, minwidth=0, width=120)
  66. tree.pack()
  67. tree.bind('<Double-Button-1>', selectedRow)

Creating the Main Function

This is where the code that contains the main funcitions. This code will populate the entry widget when a row double clicked To do that just copy and write these blocks of code.
  1. #==================================METHODS============================================
  2. def selectedRow(event):
  3. global mem_id;
  4. curItem = tree.focus()
  5. contents =(tree.item(curItem))
  6. selecteditem = contents['values']
  7. mem_id = selecteditem[0]
  8. FIRSTNAME.set("")
  9. LASTNAME.set("")
  10. ADDRESS.set("")
  11. USERNAME.set("")
  12. PASSWORD.set("")
  13. FIRSTNAME.set(selecteditem[1])
  14. LASTNAME.set(selecteditem[2])
  15. ADDRESS.set(selecteditem[3])
  16. USERNAME.set(selecteditem[4])
  17. PASSWORD.set(selecteditem[4])
  18.  
  19. def displayData():
  20. tree.delete(*tree.get_children())
  21. connection.Database()
  22. connection.cursor.execute("SELECT * FROM `member` ORDER BY `lastname` ASC")
  23. fetch = connection.cursor.fetchall()
  24. for data in fetch:
  25. tree.insert('', 'end', values=(data[0], data[1], data[2], data[3], data[4], '****'))
  26. connection.cursor.close()
  27. connection.conn.close()
  28.  
  29. def Exit():
  30. result = tkMessageBox.askquestion('Populate Entry Text On Double Click', 'Are you sure you want to exit?', icon="warning")
  31. if result == 'yes':
  32. root.destroy()
  33. exit()

Initializing the Application

After finishing the function save the application as index.py. This function will run the code and check if the main application is initialized properly. To do that copy the code below and paste it inside the IDLE text editor.
  1. #==================================INITIALIZATION=====================================
  2. displayData()
  3.  
  4. if __name__ == '__main__':
  5. root.mainloop()
There you have it we just created a Populate Entry Text On Double Click Using Python. I hope that this simple tutorial help you for what you are looking for. For more updates and tutorials just kindly visit this site. Enjoy Coding!!

Comments

Submitted bysaishjkalgutka… (not verified)on Wed, 02/19/2020 - 19:33

Dear Sir/Madam, I am Mrs Saish Kalgutkar .I want a better ideas from your side and some ready projects.

Add new comment