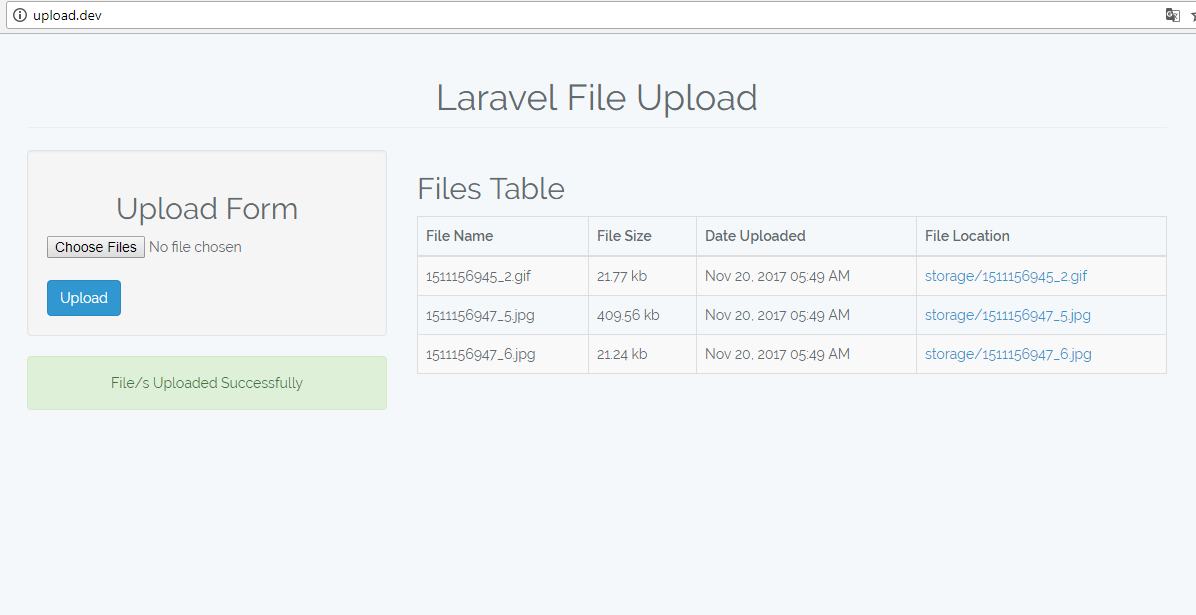
Laravel Multiple File Upload
Submitted by nurhodelta_17 on Monday, November 20, 2017 - 20:21.
Getting Started
First, we're going to create a new project and I'm gonna name it upload and add it to localhost with the name upload.dev. If you have no idea on how to do this, please refer to my tutorial Installing Laravel - PHP Framework.Setting up our Database
1. Open your phpMyAdmin and create a new database. In my case, I've created a database named upload. 2. In our project, open .env file and update the ff lines depending on your setting.
DB_DATABASE=upload
DB_USERNAME=root
DB_PASSWORD=
Creating our Controller
1. In command prompt, navigate to your project and type: php artisan make:controller UploadController This will create our controller in the form of UploadController.php located in app/Http/Controllers folder. 2. Open UploadController.php and edit it with the ff codes:- <?php
- namespace App\Http\Controllers;
- use Illuminate\Http\Request;
- class UploadController extends Controller
- {
- public function index(){
- return view('upload')->with('files', $files);
- }
- public function store(Request $request){
- $messages = [
- 'required' => 'Please select file to upload',
- ];
- $this->validate($request, [
- 'file' => 'required',
- ], $messages);
- $filesize = $file->getClientSize();
- $file->storeAs('public/',$filename);
- $fileModel->name = $filename;
- $fileModel->size = $filesize;
- $fileModel->location = 'storage/'.$filename;
- $fileModel->save();
- }
- return redirect('/')->with('success', 'File/s Uploaded Successfully');
- }
- }
Creating our Model
1. In command prompt, navigate to our project and type: php artisan make:model File -m This will create our model File.php located in app folder. It will also create the migration for us due to the -m that we added in creating the model in the form of, in my case 2017_11_18_065104_create_files_table.php file located in database/migrations folder. 1. Open 2017_11_18_065104_create_files_table.php and edit it with ff codes:- <?php
- use Illuminate\Support\Facades\Schema;
- use Illuminate\Database\Schema\Blueprint;
- use Illuminate\Database\Migrations\Migration;
- class CreateFilesTable extends Migration
- {
- /**
- * Run the migrations.
- *
- * @return void
- */
- public function up()
- {
- Schema::create('files', function (Blueprint $table) {
- $table->increments('id');
- $table->string('name');
- $table->string('size');
- $table->string('location');
- $table->timestamps();
- });
- }
- /**
- * Reverse the migrations.
- *
- * @return void
- */
- public function down()
- {
- Schema::dropIfExists('files');
- }
- }
Migrating
In command prompt, navigate to your project and type: php artisan migrate It will then create our database migration. [Illuminate\Database\QueryException] SQLSTATE[42000]: Syntax error or access violation: 1071 Specified key was t oo long; max key length is 767 bytes (SQL: alter table `users` add unique ` users_email_unique`(`email`)) You can solve this by opening AppServiceProvider.php located in app/Providers folder. Add this line: use Illuminate\Support\Facades\Schema; In boot add this line: Schema::defaultStringLength(191);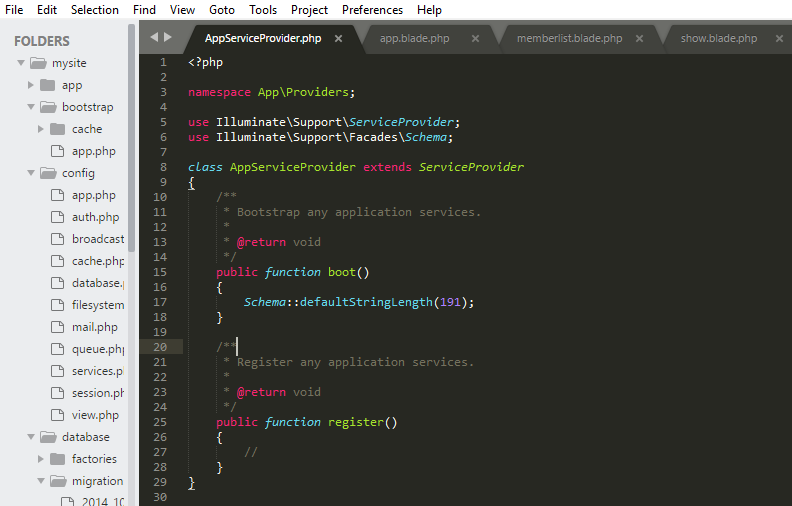 Run php artisan migrate again and make sure that your database is empty because it will have another error if its not.
Creating our Routes
In routes folder, open web.php and edit it with the ff codes:- <?php
- Route::get('/','UploadController@index');
- Route::post('/store','UploadController@store')->name('upload.file');
Creating our Views
In resources/views folder, create the ff files: upload.blade.php- <!DOCTYPE html>
- <html>
- <head>
- <meta charset="UTF-8">
- <link rel="stylesheet" href="https://maxcdn.bootstrapcdn.com/bootstrap/3.3.7/css/bootstrap.min.css" />
- <link rel="stylesheet" href="/css/app.css">
- </head>
- <body>
- <div class="container">
- <div class="row">
- <div class="col-md-4">
- <div class="well">
- <form method="POST" action="{{ route('upload.file') }}" enctype="multipart/form-data">
- {{ csrf_field() }}
- </form>
- </div>
- <div style="margin-top:20px;">
- @if(count($errors) > 0)
- @foreach($errors->all() as $error)
- <div class="alert alert-danger text-center">
- {{$error}}
- </div>
- @endforeach
- @endif
- @if(session('success'))
- <div class="alert alert-success text-center">
- {{session('success')}}
- </div>
- @endif
- </div>
- </div>
- <div class="col-md-8">
- <table class="table table-bordered table-striped">
- <thead>
- </thead>
- <tbody>
- @if(count($files) > 0)
- @foreach($files as $file)
- <tr>
- <td>
- @if($file->size < 1000)
- {{ number_format($file->size,2) }} bytes
- @elseif($file->size >= 1000000)
- {{ number_format($file->size/1000000,2) }} mb
- @else
- {{ number_format($file->size/1000,2) }} kb
- @endif
- </td>
- </tr>
- <!--<img src='storage/upload/{{$file->name}}' name="{{$file->name}}" class="thumbnail">-->
- @endforeach
- @else
- <tr>
- </tr>
- @endif
- </tbody>
- </table>
- </div>
- </div>
- </div>
- </body>
- </html>
Setting up Max Upload Size
We set up our upload size to prevent us from getting errors if the file we uploaded exceeded our upload size. In XAMPP, open php/php.ini. Search for the ff lines and update their value:- post_max_size=120M
- upload_max_filesize=100M