Simple Pagination using PHP/MySQLi Tutorial
In this tutorial, I'm going to show you how to create simple pagination using PHP/MySQLi. Pagination is a set of numbers wherein each number is assigned a page or in some cases used to divide rows of MySQL table to improve visual presentation like in this tutorial.
So, let's get started.
Creating our Database
First step is to create our database.
- Open phpMyAdmin.
- Click databases, create a database, and name it as "pagination".
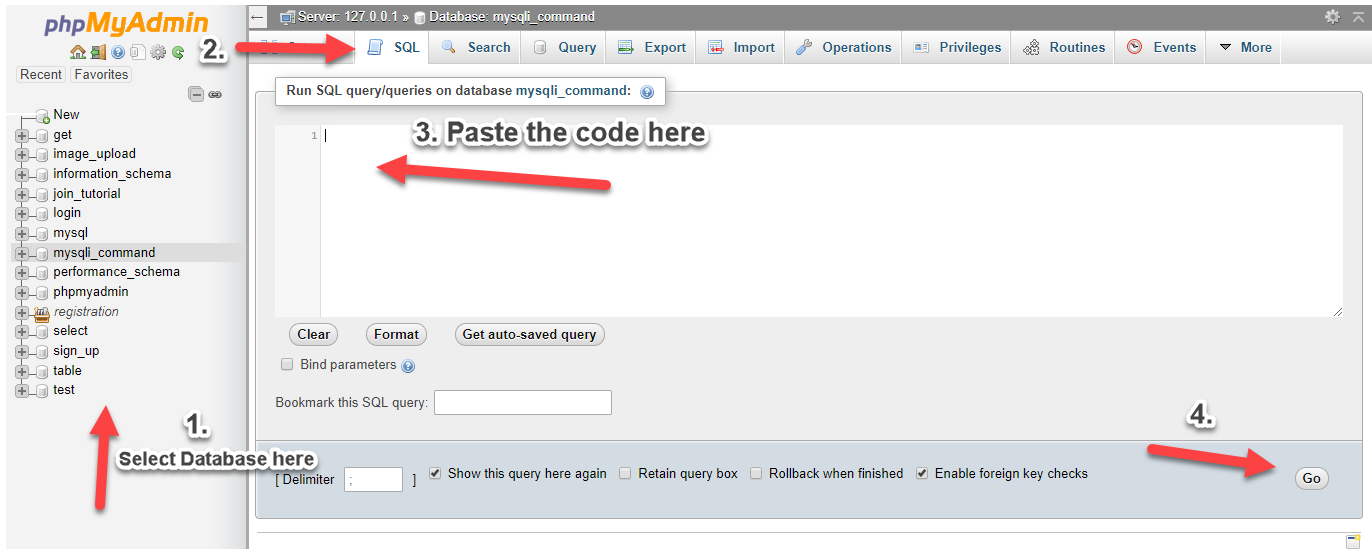
- After creating a database, click the SQL and paste the below code. See the image below for detailed instruction.
- CREATE TABLE `user` (
- `userid` INT(11) NOT NULL AUTO_INCREMENT,
- `firstname` VARCHAR(30) NOT NULL,
- `lastname` VARCHAR(30) NOT NULL,
- `username` VARCHAR(30) NOT NULL,
- PRIMARY KEY(`userid`)
- ) ENGINE=InnoDB DEFAULT CHARSET=latin1;

Inserting Sample Data into our Database
Next is to insert sample data into the database that we have created. We are going to use this in our sample table.
- Click "pagination" database that we have created.
- Click SQL and paste the code below.
- INSERT INTO `user` (`firstname`, `lastname`, `username`) VALUES
- ('neovic', 'devierte', 'nurhodelta'),
- ('julyn', 'divinagracia', 'julyn'),
- ('lee', 'ann', 'lee09'),
- ('tintin', 'demapanag', 'tin45'),
- ('dee', 'tolentino', 'deedee'),
- ('jaira', 'jacinto', 'jjacinto'),
- ('tetai', 'devi', 'tdevi'),
- ('tintin', 'hermosa', 'tinhermosa'),
- ('piolo', 'pascual', 'ppascual'),
- ('lee', 'bagun', 'faker'),
- ('barny', 'dino', 'bdino');
Creating our Connection
Next step is to create a database connection and save it as "conn.php". This file will serve as our bridge between our form and our database. To create the file, open your HTML code editor and paste the code below after the tag.
- <?php
- //MySQLi Procedural
- if (!$conn) {
- }
- ?>
Creating our Pagination Code
Next step is to create our pagination. We name this as "pagination.php".
- <?php
- include("conn.php");
- $rows = $row[0];
- $page_rows = 10;
- if($last < 1){
- $last = 1;
- }
- $pagenum = 1;
- }
- if ($pagenum < 1) {
- $pagenum = 1;
- }
- else if ($pagenum > $last) {
- $pagenum = $last;
- }
- $limit = 'LIMIT ' .($pagenum - 1) * $page_rows .',' .$page_rows;
- $paginationCtrls = '';
- if($last != 1){
- if ($pagenum > 1) {
- $previous = $pagenum - 1;
- $paginationCtrls .= '<a href="'.$_SERVER['PHP_SELF'].'?pn='.$previous.'" class="btn btn-default">Previous</a> ';
- for($i = $pagenum-4; $i < $pagenum; $i++){
- if($i > 0){
- $paginationCtrls .= '<a href="'.$_SERVER['PHP_SELF'].'?pn='.$i.'" class="btn btn-default">'.$i.'</a> ';
- }
- }
- }
- $paginationCtrls .= ''.$pagenum.' ';
- for($i = $pagenum+1; $i <= $last; $i++){
- $paginationCtrls .= '<a href="'.$_SERVER['PHP_SELF'].'?pn='.$i.'" class="btn btn-default">'.$i.'</a> ';
- if($i >= $pagenum+4){
- break;
- }
- }
- if ($pagenum != $last) {
- $next = $pagenum + 1;
- $paginationCtrls .= ' <a href="'.$_SERVER['PHP_SELF'].'?pn='.$next.'" class="btn btn-default">Next</a> ';
- }
- }
- ?>
Creating our Sample Table
Lastly, we create our sample table. We name this as our "index.php".
- <?php include('pagination.php'); ?>
- <!DOCTYPE html>
- <html>
- <head>
- <link rel="stylesheet" href="https://maxcdn.bootstrapcdn.com/bootstrap/3.3.6/css/bootstrap.min.css" />
- <script src="https://maxcdn.bootstrapcdn.com/bootstrap/3.3.7/js/bootstrap.min.js"></script>
- </head>
- <body>
- <div class="container">
- <div style="height: 20px;"></div>
- <div class="row">
- <div class="col-lg-2">
- </div>
- <div class="col-lg-8">
- <table width="80%" class="table table-striped table-bordered table-hover">
- <thead>
- <th>UserID</th>
- <th>Firstname</th>
- <th>Lastname</th>
- <th>Username</th>
- </thead>
- <tbody>
- <?php
- ?>
- <tr>
- <td><?php echo $crow['userid']; ?></td>
- <td><?php echo $crow['firstname']; ?></td>
- <td><?php echo $crow['lastname']; ?></td>
- <td><?php echo $crow['username']; ?></td>
- </tr>
- <?php
- }
- ?>
- </tbody>
- </table>
- <div id="pagination_controls"><?php echo $paginationCtrls; ?></div>
- </div>
- <div class="col-lg-2">
- </div>
- </div>
- </div>
- </body>
- </html>
That's it. In case you're having trouble with the database, I have included sample database in the file of this tutorial located in 'db' folder.
If you have any comments or questions, feel free to comment below or message me here at sourcecodester.com via private message.
Enjoy Coding :)

