Deleting Multiple Rows using PHP
Submitted by alpha_luna on Friday, July 8, 2016 - 12:29.
In this tutorial, we are going to create Deleting Multiple Rows using PHP. The features of this project are to add a data then, you can delete individual data of a user or you can delete multiple data using a checkbox as our selector. Hope you find this useful.
 For the source code of the image above. Kindly copy and paste to your BODY tag of your page.
After adding the user, we are going to show or display the data in the table.
For the source code of the image above. Kindly copy and paste to your BODY tag of your page.
After adding the user, we are going to show or display the data in the table.
 This is the source code of the image below.
After creating the Markup, we are going to create our PHP Query for INSERT and DELETE Statement.
This is the PHP Query for inserting and deleting data in our database table.
Hope that this tutorial will help you a lot.
If you are interested in programming, we have an example of programs that may help you even just in small ways. If you want more tutorials, you can visit our website, click here
Share us your thoughts and comments below. Thank you so much for dropping by and reading this tutorial post. For more updates, don’t hesitate and feel free to visit this website more often and please share this with your friends or email me at [email protected]. Practice Coding. Thank you very much.
This is the source code of the image below.
After creating the Markup, we are going to create our PHP Query for INSERT and DELETE Statement.
This is the PHP Query for inserting and deleting data in our database table.
Hope that this tutorial will help you a lot.
If you are interested in programming, we have an example of programs that may help you even just in small ways. If you want more tutorials, you can visit our website, click here
Share us your thoughts and comments below. Thank you so much for dropping by and reading this tutorial post. For more updates, don’t hesitate and feel free to visit this website more often and please share this with your friends or email me at [email protected]. Practice Coding. Thank you very much.
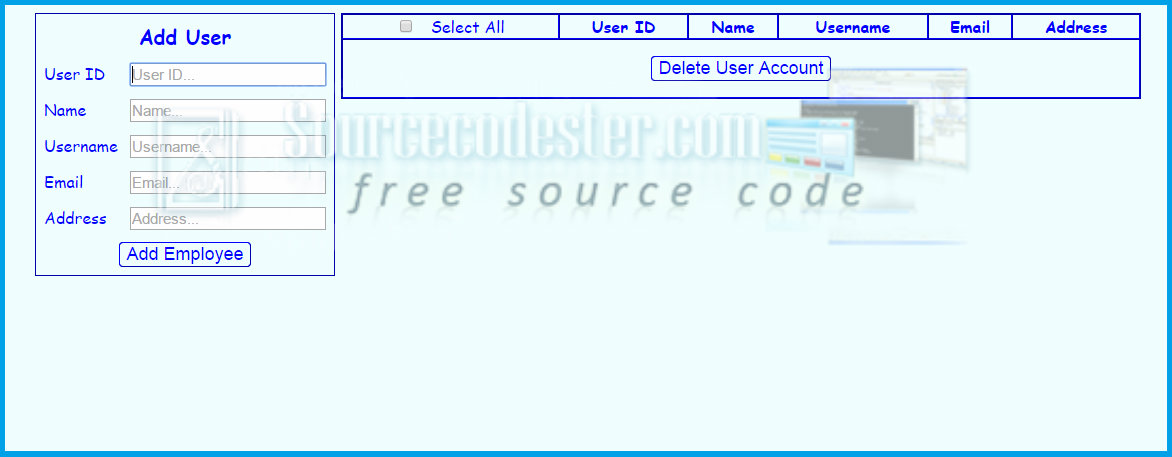
Creating Markup for Adding User
It has five TextBox and one button for adding a new user as shown in the image below.
For the source code of the image above. Kindly copy and paste to your BODY tag of your page.
- <!---Adding User-->
- <form method="post" name="form" action="">
- <table class="table_one" cellpadding="4" cellspacing="4">
- <tbody>
- <tr>
- </tr>
- <tr>
- <td>
- </td>
- <td>
- <input name="userid" style="font-size:15px;" placeholder="User ID..." type="text" id="userid" required />
- </td>
- </tr>
- <tr>
- <td>
- </td>
- <td>
- <input name="name" style="font-size:15px;" placeholder="Name..." type="text" id="name" required />
- </td>
- </tr>
- <tr>
- <td>
- </td>
- <td>
- <input name="username" type="text" style="font-size:15px;" placeholder="Username..." id="username" required />
- </td>
- </tr>
- <tr>
- <td>
- </td>
- <td>
- <input name="email" type="email" style="font-size:15px;" placeholder="Email..." id="email" required />
- </td>
- </tr>
- <tr>
- <td>
- </td>
- <td>
- <input name="address" style="font-size:15px;" placeholder="Address..." type="text" id="address" required />
- </td>
- </tr>
- <tr>
- <td align="center" colspan="2">
- <input type="submit" style="color:blue; background-color:azure; border:1px groove blue; border-radius:4px; font-size:18px; cursor:pointer;" name="submit" value="Add Employee" id="submit" />
- </td>
- </tr>
- </tbody>
- </table>
- </form>
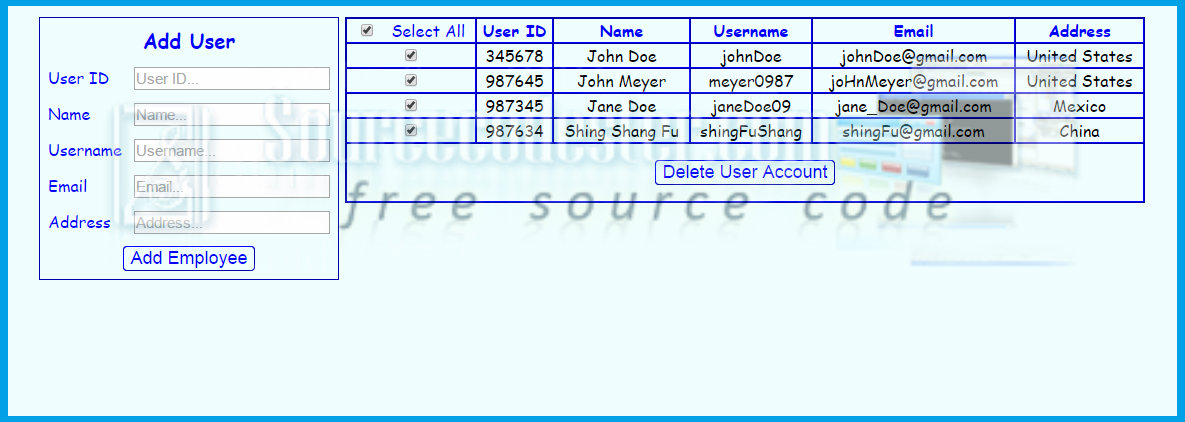
Creating Table for Displaying Data
We are going to show our user data in the table to execute the DELETE Statement using a checkbox as you can see in the image below.
This is the source code of the image below.
- <!---Deleting Multiple Data and Viewing-->
- <form method="post">
- <table border="1" class="table_two" cellpadding="0" cellspacing="0" id="container">
- <tr align="center" style="color:blue; font-family:cursive;">
- <td>
- </td>
- <td>
- </td>
- <td>
- </td>
- <td>
- </td>
- <td>
- </td>
- <td>
- </td>
- </tr>
- <?php
- $result=mysql_query("select * from user order by id ASC ") or die(mysql_error());
- while($user_info=mysql_fetch_array($result)){
- ?>
- <tr align="center">
- <td>
- <input type="checkbox" name="check[]" value="<?php echo $user_info['id']; ?>" id="all" />
- </td>
- <td>
- <?php echo $user_info['userid']; ?>
- </td>
- <td>
- <?php echo $user_info['name']; ?>
- </td>
- <td>
- <?php echo $user_info['username']; ?>
- </td>
- <td>
- <?php echo $user_info['email']; ?>
- </td>
- <td>
- <?php echo $user_info['address']; ?>
- </td>
- </tr>
- <?php } ?>
- <tr>
- <td colspan="6">
- <p align="center">
- <input type="submit" style="color:blue; background-color:azure; border:1px groove blue; border-radius:4px; font-size:18px; cursor:pointer;" name="delete" value="Delete User Account" />
- </p>
- </td>
- </tr>
- </table>
- </form>
- <?php
- {
- $userid=$_POST['userid'];
- $name=$_POST['name'];
- $username=$_POST['username'];
- $email=$_POST['email'];
- $address=$_POST['address'];
- $insert=mysql_query("insert into user (userid,name,username,email,address) values ('$userid','$name','$username','$email','$address')");
- // if($insert)
- // {
- // echo "<script>alert('User has been added'); window.location='index.php'</script>";
- // }
- }
- {
- $check=$_POST['check'];
- for($i=0;$i<$count;$i++){
- $del_id = $check[$i];
- }
- if($delete)
- {
- echo "<script>alert('User/s has been deleted'); window.location='index.php'</script>";
- }
- }
- ?>