Creating Real-Time Chat with Node.js and Socket.IO

The way that people use internet evolved from static pages to Ajax and now to realtime web supported by standards like WebSockets and WebRTC. Making a real-time application, like chat, became increadibly easy with the help of platforms like Node.js and libraries like Socket.io. In this post we'll see how to create a minimalistic chat application form the scratch. Create a separate folder for your new project and type `npm init` in it. Then, install the required dependencies. For this project we will only need express.js and socket.io:
  1. > npm install --save express socket.io
  2. <code>
  3.  
  4. Let's start from a minimalistic express application that can serve static files. Create a file called main.js. Here's how my minimal express app looks:
  5.  
  6. <javascript>
  7. const express = require('express');
  8. const http = require('http');
  9.  
  10. const app = express();
  11. const server = http.createServer(app);
  12.  
  13. app.use(express.static(`${__dirname}/public`));
  14.  
  15. server.listen(3000, () => console.log('Ready on 0.0.0.0:3000'));
  16. </javascript>
  17.  
  18. Notice that I had to use node.js standard module `http` to create server instead of using Express right away. We will need that `server` object later when we'll initialize socket.io.
  19.  
  20. The folder called `public` is the one to keep our static client-side files. Let's create `index.html` right away. Usually I would separate JavaScript code in a separate file, but for this tutorial, I'll keep it all in one file for the sake of readability and navigation.
  21.  
  22. <html4strict>
  23. <!doctype html>
  24. <html lang="en">
  25. <head>
  26. <meta charset="utf-8">
  27. <title>File Upload</title>
  28. </head>
  29. <body>
  30.  
  31. <ul id="chat">
  32. </ul>
  33.  
  34. <form id="say-form">
  35. <input><button type="submit">Say</button>
  36. </form>
  37.  
  38. <script></script>
  39. </body>
  40. </html>
  41. </html4strict>
  42.  
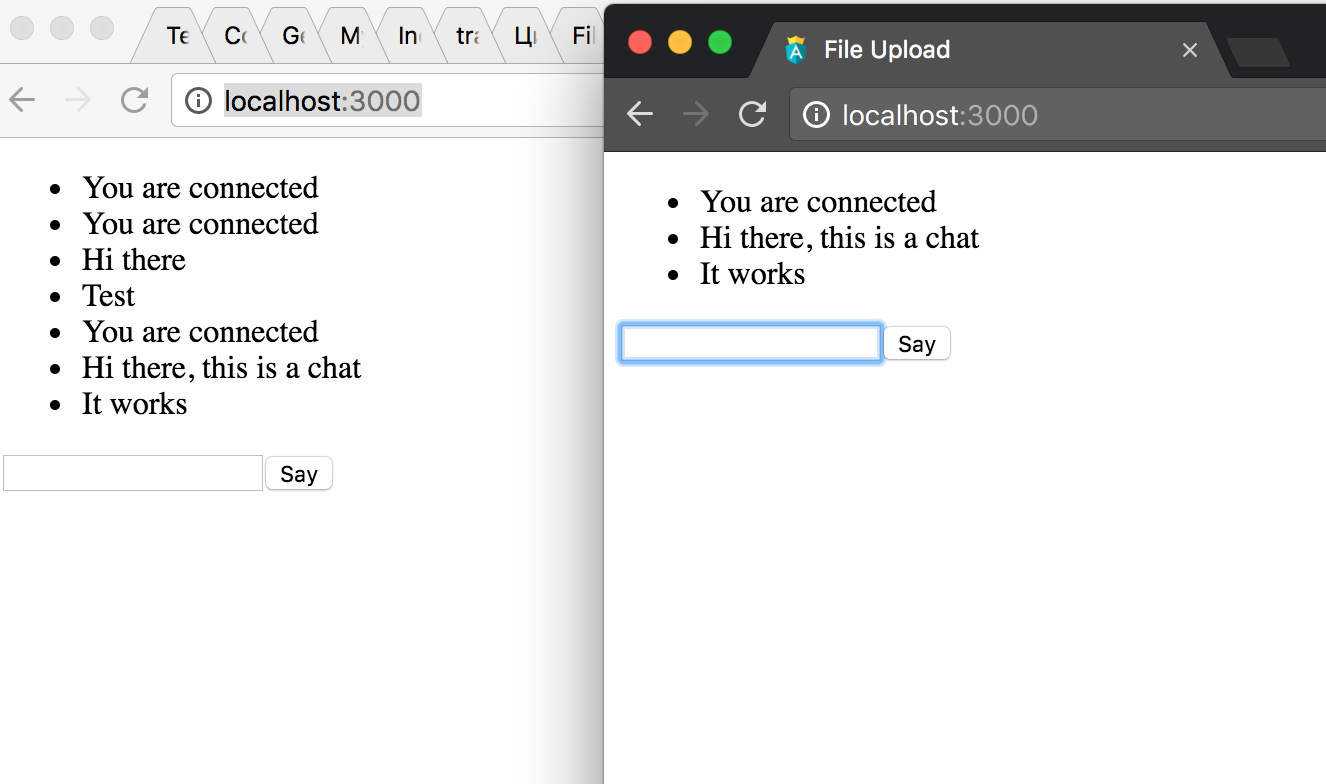
  43. As you see I added some very basic chat controls to this page and placed `<script>` tag for our client-side JS.
  44.  
  45. Let's write some helper chat functions in our client JS. Put the following code in between `<script>` tags.
  46.  
  47. <html4strict>
  48. <script>
  49.  
  50. function onChatMessage(msg) {
  51. var ul = document.querySelector('#chat');
  52. var item = document.createElement('li');
  53. item.innerHTML = msg;
  54. ul.appendChild(item);
  55. }
  56.  
  57. function sendChatMessage(e) {
  58. e.preventDefault();
  59.  
  60. var inp = document.querySelector('#say-form input');
  61. var msg = inp.value;
  62. inp.value = '';
  63.  
  64. // Replace later with actual sending code
  65. onChatMessage(msg);
  66. }
  67.  
  68. (function init() {
  69. var form = document.querySelector('#say-form');
  70. form.addEventListener('submit', sendChatMessage);
  71. })();
  72.  
  73. </script>
  74. </html4strict>
  75.  
  76. This code simply displays the message that you send through the form back on the page. This chat is not yet connected to server (and of course you will not see any other user's messages this way).
  77.  
  78. Let's add some Socket.IO magic to this project and connect all the chats. First thing to do is to initialise socket.io on server. Add the follwowin code to your `main.js` file as follows:
  79.  
  80. <javascript>
  81. const io = require('socket.io')(server);
  82.  
  83. io.on('connection', (sock) => {
  84. sock.emit('msg', 'You are connected');
  85. });
  86. </javascript>
  87.  
  88. This code accepts connection from the client and sends back an event of type `msg` to everyone who connected. The only thing we need to do now is to connect the client and display the message! Let's edit our client-side HTML code again:
  89.  
  90. <javascript>
  91. <script src="/socket.io/socket.io.js"></script>
  92. <script>
  93. var sock = io();
  94. sock.on('msg', onChatMessage);
  95.  
  96. /* rest of the code stays the same */
  97. </javascript>
  98.  
  99. With just that two lines, we will connect to our server and display the message on a page
  100. whenever server sends us something. You can test it right now! Once you open
  101. http://localhost:3000, you'll see the welcome message from the server!
  102.  
  103. Now let's make client talk back to server and send a message each time a user is typing
  104. something in chat.
  105.  
  106. <javascript>
  107. io.on('connection', (sock) => {
  108. sock.emit('msg', 'You are connected');
  109. sock.on('msg', (msg) => io.emit('msg', msg));
  110. });
  111. </javascript>
  112.  
  113. Now, whenever the server receives `msg` from one of the clients, it will broadcast the
  114. same message back to everybody who is connected right now. Test it again! Open two browser
  115. windows and start sending messages and you'll see that the chat is working!
  116.  
  117. Congratulations! In about 30 lines of JavaScript code you managed to build a functional
  118. real-time chat with Node.js and Socket.IO. Let's review the completed code:
  119.  
  120. main.js (server)
  121.  
  122. <javascript>
  123. const express = require('express');
  124. const http = require('http');
  125.  
  126. const app = express();
  127. const server = http.createServer(app);
  128. const io = require('socket.io')(server);
  129.  
  130. io.on('connection', (sock) => {
  131. sock.emit('msg', 'You are connected');
  132. sock.on('msg', (msg) => io.emit('msg', msg));
  133. });
  134.  
  135. app.use(express.static(`${__dirname}/public`));
  136.  
  137. server.listen(3000, () => console.log('Ready on 0.0.0.0:3000'));
  138. </javascript>
  139.  
  140. index.html (client)
  141.  
  142. <html5>
  143. <!doctype html>
  144. <html lang="en">
  145. <head>
  146. <meta charset="utf-8">
  147. <title>File Upload</title>
  148. </head>
  149. <body>
  150.  
  151. <ul id="chat"></ul>
  152.  
  153. <form id="say-form">
  154. <input><button type="submit">Say</button>
  155. </form>
  156.  
  157. <script src="/socket.io/socket.io.js"></script>
  158. <script>
  159. var sock = io();
  160. sock.on('msg', onChatMessage);
  161.  
  162. function onChatMessage(msg) {
  163. var ul = document.querySelector('#chat');
  164. var item = document.createElement('li');
  165. item.innerHTML = msg;
  166. ul.appendChild(item);
  167. }
  168.  
  169. function sendChatMessage(e) {
  170. e.preventDefault();
  171.  
  172. var inp = document.querySelector('#say-form input');
  173. var msg = inp.value;
  174. inp.value = '';
  175.  
  176. sock.emit('msg', msg);
  177. }
  178.  
  179. (function init() {
  180. var form = document.querySelector('#say-form');
  181. form.addEventListener('submit', sendChatMessage);
  182. })();
  183. </script>
  184. </body>
  185. </html>
  186. </html5>

Comments

Add new comment