Sending Mail in Python using Django Framework Tutorial
In this tutorial, we will tackle about Sending Mail in Python using Django Framework. We will be using the GMail STMP as our Email Host for sending mail. Here, you will learn the process or steps that need to be done to send mail from your Python Django App. We will be creating a simple Django Project that contains a Send Us a Message Form. Using the said form, the app will be sending an email to the site email receiver.
Gettign Started
Download Python and pip in your local machine.
Download Django using PIP. Follow the command below.
pip install Django
Let's start the coding ...
Creating a Django Project
First, we nee d to create a new django project. You can name your project whatever you like. In my case, I will be naming my project as 'send_mail'. Open your terminal or command prompt.
Change the current directory to the path you want to store your source code.
cd C://
Creating a Django Project
django-admin startproject send_mail
Creating a Django App
Next, we will be creating our projects app. In my case my app name will be 'contact'.
In your terminal, you will enter the command same as below. Change the 'contact' to your desired app name.
Change you current directory to your django project directory.
cd send_mail
python manage.py startapp contact
Configure Django Settings
Next, we will be configuring the projects settings.py file. This file is located inside the project root folder. Open this file in your preferred Text Editor such as sublime text or notepadd++.
Add your app in the 'INSTALLED_APPS'. Confirm your App Name by opening the file Your App DIR >> apps.py
- from django.apps import AppConfig
- class ContactConfig(AppConfig):
- default_auto_field = 'django.db.models.BigAutoField'
- name = 'contact'
In your settings.py.
- INSTALLED_APPS = [
- 'django.contrib.admin',
- 'django.contrib.auth',
- 'django.contrib.contenttypes',
- 'django.contrib.sessions',
- 'django.contrib.messages',
- 'django.contrib.staticfiles',
- 'contact.apps.ContactConfig'
- ]
Next, add the email confoguration in the same file (settings.py). Add the following into the file.
- #Email Configuration
- EMAIL_BACKEND = 'django.core.mail.backends.smtp.EmailBackend'
- EMAIL_HOST = 'smtp.gmail.com'
- EMAIL_PORT = '587'
- EMAIL_HOST_USER = 'Your Email Here'
- EMAIL_HOST_PASSWORD = 'Your Password Here'
- EMAIL_USE_TLS = True
Configuring the URL Dispatcher
Next, we will be configuring our app URLs. To do that, create a new python file inside your app directory naming urls.py. Then, add the following code.
- from django.urls import path
- from . import views
- urlpatterns = [
- path('', views.contact_form, name="contact-form"),
- ]
Next, include the app urls.py file in the project urls.py. This file is located at the project's root path.
- from django.contrib import admin
- from django.urls import path, include
- urlpatterns = [
- path('admin/', admin.site.urls),
- path('', include('contact.urls'))
- ]
Creating the View
Next, we will be creating our application view. In your application directory, you will see a views.py file. Open the file in your text editor. Then, follow the script below. Make sure that the post data name you will enter will be exactly as your UI text fields name later.
- from django.shortcuts import render
- from django.core.mail import send_mail
- # Create your views here.
- def contact_form(request):
- context = {}
- if request.method == 'POST':
- name = request.POST['name']
- email = request.POST['email']
- message = "From: "+ email + "\n"
- message += "Sender Name: "+ name + "\n\r\n\r"
- message += "-------------------------------------------------------"
- message += "\n\r\n\r"
- message += request.POST['message']
- try:
- send_mail(
- 'SITE Inquiry - '+ name,# subject,
- message,#message
- email,# from email
- #fail_silently=False
- )
- context = {'mail_response':True}
- except Exception as err:
- raise err
- return render(request,'contact_information.html',context)
Creating the Template
Lastly, we will be creating the app user interface. To do that, create a new directory inside your application directory and name it as templates. Then, create a new html file, in my case as you can see at the views.py file script I provided, I rendered an HTML file naming contact_information.html so this should be the file I will create.
- <!DOCTYPE html>
- <html lang="en">
- <head>
- <meta charset="UTF-8">
- <meta http-equiv="X-UA-Compatible" content="IE=edge">
- <meta name="viewport" content="width=device-width, initial-scale=1.0">
- <link href="https://cdn.jsdelivr.net/npm/[email protected]/dist/css/bootstrap.min.css" rel="stylesheet" integrity="sha384-1BmE4kWBq78iYhFldvKuhfTAU6auU8tT94WrHftjDbrCEXSU1oBoqyl2QvZ6jIW3" crossorigin="anonymous">
- <script src="https://cdn.jsdelivr.net/npm/[email protected]/dist/js/bootstrap.bundle.min.js" integrity="sha384-ka7Sk0Gln4gmtz2MlQnikT1wXgYsOg+OMhuP+IlRH9sENBO0LRn5q+8nbTov4+1p" crossorigin="anonymous"></script>
- <style>
- html,
- body {
- height: 100%;
- width: 100%;
- }
- #pre-loader {
- position: absolute;
- top: 0;
- left: 0;
- width: 100%;
- height: 100%;
- display: flex;
- align-items: center;
- justify-content: center;
- backdrop-filter: brightness(.8);
- z-index: 999999999;
- }
- .lds-ring {
- display: inline-block;
- position: relative;
- width: 80px;
- height: 80px;
- }
- .lds-ring div {
- box-sizing: border-box;
- display: block;
- position: absolute;
- width: 64px;
- height: 64px;
- margin: 8px;
- border: 8px solid #fff;
- border-radius: 50%;
- animation: lds-ring 1.2s cubic-bezier(0.5, 0, 0.5, 1) infinite;
- border-color: #fff transparent transparent transparent;
- }
- .lds-ring div:nth-child(1) {
- animation-delay: -0.45s;
- }
- .lds-ring div:nth-child(2) {
- animation-delay: -0.3s;
- }
- .lds-ring div:nth-child(3) {
- animation-delay: -0.15s;
- }
- @keyframes lds-ring {
- 0% {
- transform: rotate(0deg);
- }
- 100% {
- transform: rotate(360deg);
- }
- }
- </style>
- <script>
- var loader = document.createElement('div')
- loader.setAttribute('id', 'pre-loader')
- function start_loader() {
- if (!!document.getElementById('pre-loader'))
- document.getElementById('pre-loader').remove();
- document.querySelector('body').appendChild(loader)
- }
- function end_loader() {
- setTimeout(() => {
- if (!!document.getElementById('pre-loader'))
- document.getElementById('pre-loader').remove();
- }, 500)
- }
- window.addEventListener('load', function() {
- end_loader()
- document.getElementById('email-form').addEventListener('submit', function() {
- start_loader()
- })
- })
- </script>
- </head>
- <body class="bg-dark bg-gradient bg-opacity-50">
- <script>
- start_loader()
- </script>
- <nav class="nav bg-light py-3">
- <div class="container">
- </div>
- </nav>
- <section class="content pt-4">
- <div class="container">
- <div class="row justify-content-center">
- <div class="col-lg-7 col-md-10 col-sm-12 col-xs-12">
- <div class="card card-default border rounded-0">
- <div class="card-body">
- <div class="container-fluid">
- {% if not mail_response %}
- <center>
- <hr>
- </center>
- <form action="{% url 'contact-form' %}" method="POST" id="email-form">
- {% csrf_token %}
- <div class="row">
- <div class="col-md-6">
- <input type="text" id="name" name="name" class="form-control rounded-0" required>
- </div>
- <div class="col-md-6">
- <input type="email" id="email" name="email" class="form-control rounded-0" required>
- </div>
- </div>
- <div class="row">
- <div class="col-md-12">
- </div>
- </div>
- <div class="w-100 d-flex mt-3 justify-content-end">
- <div class="col-auto">
- </div>
- </div>
- </form>
- {% else %}
- {% endif %}
- </div>
- </div>
- </div>
- </div>
- </div>
- </div>
- </section>
- </body>
- </html>
The HTML script I provided is using Bootstrap CDNs for the UI design. Make sure that you have an internet connection before running the application.
Run the Project
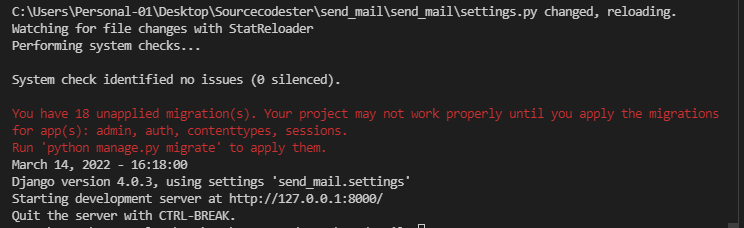
Run your project by entering the following command in your terminal. Make sure that your current directory should be at your project's root path.
python manage.py runserver
After that, you will like the image below
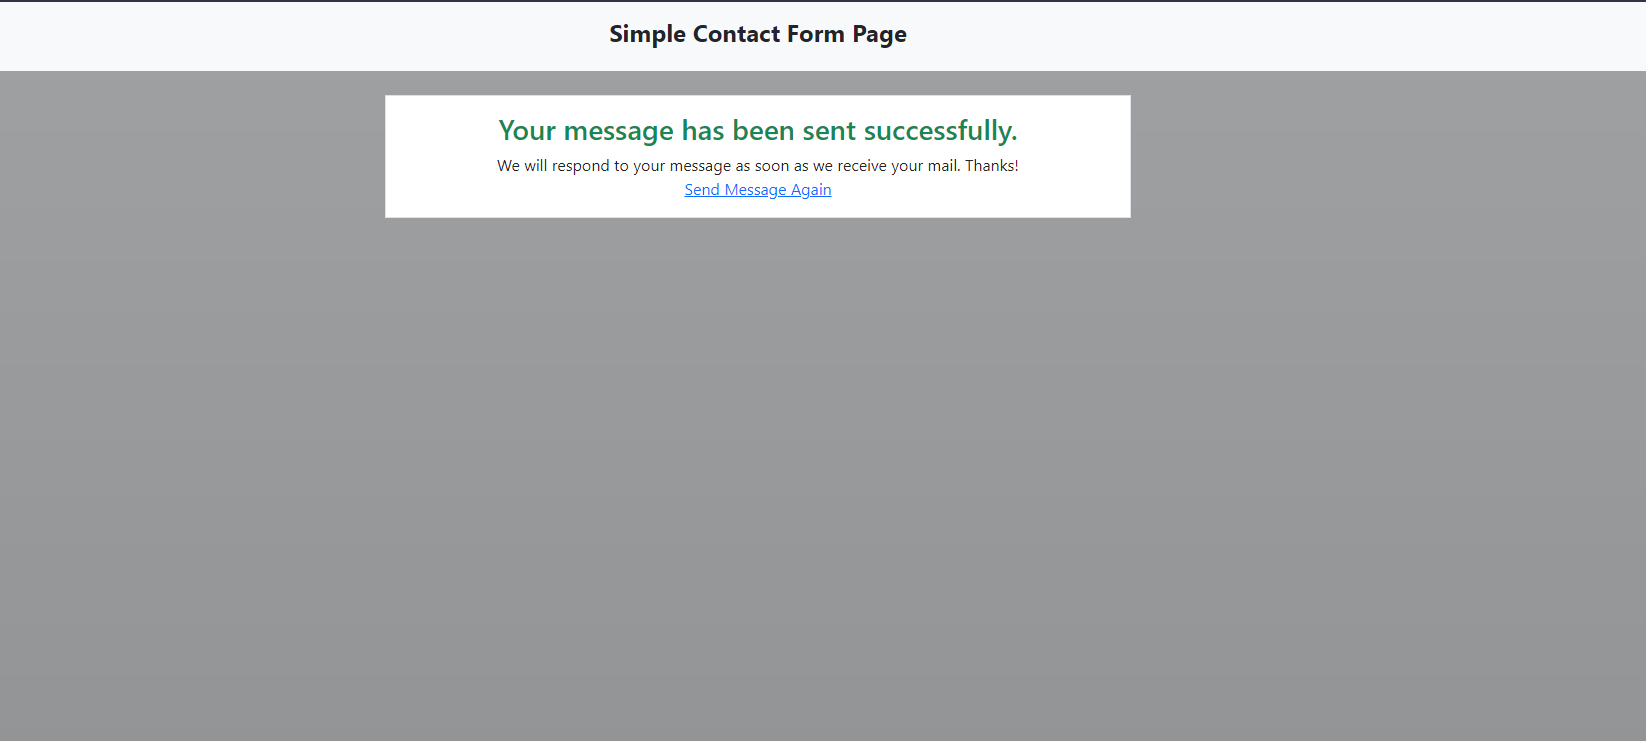
Next, browse the project in your browser. i.e. http://localhost:8000
Before testing the app. Make sure to follow the Google Account Configuration below.
- Go to "Google Account". Note: Login your sender's GMail Account.
- Select "Security" from Left Side Menu.
- Scroll Down the Page to "Less Secure App Access"
- Enable "Allow less secure apps"
DEMO VIDEO
Now you can test the project on your end and see if it works as we planned to. If you have encountered any errors, please review the changes you have with the codes I provided. You can also the working source code I created for this tutorial. The download button is located below this article. Make sure to configure the Email Configuration in the settings.py file.
That's the end of this tutorial. I hope you'll find tutorial useful for your future Python Django Projects. Explore more on this website for more Free Source Codes and Tutorials.