Creating a Dynamic Ordering Data using PHP, MySQL, and JavaScript Tutorial

In this tutorial, you can learn to create Dynamic Ordering Data and DOM Elements using PHP, JavaScript, and MySQL Database. This tutorial aims to provide students and beginners with a reference for learning some useful techniques for building an application using PHP Language, MySQL, and JavaScript. Here, I will be providing a simple web application that demonstrates the main objective of this tutorial. The complete source code zip file will be provided also and is free to download.
What is Dynamic Ordering Data?
Dynamic Ordering Data is a simple web application database table structure that allows the user to choose or set their desired order of data. Basically, we can simply sort the data order by each column on the database but in some instances, we will be forced to implement this kind of structure and add some interactive feature to front-end of a software or application to meet our requirements. For example, an application has a dynamic navigation menu data whereas the developer saves the menu data on the database. Using this kind of database structure, we can sort the order of the menu items for display dynamically.
How to create Dynamic Ordering Data and DOM Elements?
Dynamic Ordering Data and DOM Elements can be achieved using PHP, JavaScript, and MySQL Database. On the database table that we want to dynamically sort the order, we can simply add a column with an integer type of value. The added table column will store the order number of each data. Next, using CSS and JavaScript, we can create a list item element that allows the users to drag and drop the element from the current position to another. Then, using PHP, we can update the new sort order of the data on the database. Check out the sample web application scripts that I created and provided below to understand it more.
Sample Web Application
The scripts below result in a simple web application that contains a simple list of items in which each item is being retrieved from the database. Users can change the order position of the data by grabbing the data element from the current position and dropping it before or after the list item. Then, by hitting or clicking the "Save Order" button, the new sort order of the data will be updated on the database.
Before we start the coding part, please make sure to have virtual server software such as XAMPP, WAMP, or any similar software to allow your local machine to run PHP scripts. Also, make sure to run Apache and MySQL.
Creating the Database
First, on your MySQL Database, create a new database named dummy_db. Copy and Paste the DB Schema and sample data below.
- -- phpMyAdmin SQL Dump
- -- version 5.1.3
- -- https://www.phpmyadmin.net/
- --
- -- Host: 127.0.0.1
- -- Generation Time: Apr 28, 2023 at 09:34 AM
- -- Server version: 10.4.24-MariaDB
- -- PHP Version: 8.1.5
- --
- -- Database: `dummy_db`
- --
- -- --------------------------------------------------------
- --
- -- Table structure for table `sampletbl`
- --
- --
- -- Dumping data for table `sampletbl`
- --
- (1, 'Sample Data Only #1', 0),
- (2, 'Sample Data Only #2', 1),
- (3, 'Sample Data Only #3', 2),
- (4, 'Sample Data Only #4', 3),
- (5, 'Sample Data Only #5', 4);
- --
- -- Indexes for dumped tables
- --
- --
- -- Indexes for table `sampletbl`
- --
- --
- -- AUTO_INCREMENT for dumped tables
- --
- --
- -- AUTO_INCREMENT for table `sampletbl`
- --
Creating the Database Connection
Next, create a new PHP file and save it as db-connect.php. Then paste the following script to this file script. This script connects our web application to the MySQL Database that we created.
getMessage()); exit; }
Creating the Page Interface
Next, let's create the page interface of the web application. On your source code directory, create a new PHP file named index.php and copy/paste the code below.
- <?php
- require_once('db-connect.php')
- ?>
- <!DOCTYPE html>
- <html lang="en">
- <head>
- <meta charset="UTF-8">
- <meta name="viewport" content="width=device-width, initial-scale=1.0">
- <link rel="stylesheet" href="style.css">
- <link rel="preconnect" href="https://fonts.googleapis.com">
- <link rel="preconnect" href="https://fonts.gstatic.com" crossorigin>
- <link rel="stylesheet" href="https://fonts.googleapis.com/css2?family=Material+Symbols+Outlined:opsz,wght,FILL,[email protected],100..700,0..1,-50..200" />
- </head>
- <body>
- <div class="container">
- <hr id="title_hr">
- <form action="update_order.php" method="POST" id="dynamic-order">
- <!-- Sortable list Container -->
- <div class="sortable-list-container">
- <!-- List Wrapper -->
- <ul>
- <?php
- $list_qry = $conn->query("SELECT * FROM `sampletbl` order by `sort_order` asc ");
- while($row = $list_qry->fetch_assoc()):
- ?>
- <!-- List item -->
- <li draggable="true">
- <div class="flex-container">
- <div>
- <span class="material-symbols-outlined">
- drag_indicator
- </span>
- </div>
- <div>
- <input type="hidden" name="sort_order[]" value="<?= $row['id'] ?>">
- <?= $row['content'] ?>
- </div>
- </div>
- </li>
- <!-- List item -->
- <?php endwhile; ?>
- </ul>
- <!-- List Wrapper -->
- </div>
- <!-- Sortable list Container -->
- </form>
- <!-- Form Submit Button -->
- </div>
- </body>
- </html>
Then, create a new file named style.css and use the following script. The script below contains the CSS (stylesheet) code that designs the page layout and other elements of the page.
- @import url('https://fonts.googleapis.com/css2?family=Dongle:wght@300;400;700&family=Roboto+Mono:ital,wght@0,100;0,200;0,300;0,400;0,500;0,600;1,100;1,200;1,300;1,400;1,500;1,600&display=swap" rel="stylesheet');
- *{
- margin: 0;
- padding: 0;
- box-sizing: border-box;
- font-family: 'Dongle', sans-serif;
- font-family: 'Roboto Mono', monospace;
- }
- ::selection{
- color: #fff;
- background: #4db2ec;
- }
- body{
- display: flex;
- align-items: center;
- justify-content: center;
- min-height: 100vh;
- background: #4facfe;
- background-image: linear-gradient(to right, #4facfe 0%, #00f2fe 100%);
- padding: 2em 0;
- }
- #page-title{
- color: #fff;
- text-align: center;
- font-weight: 500;
- text-shadow: 0px 0px 15px #0000003a;
- }
- #title_hr{
- width:60px;
- border: 2px solid #ffffff;
- margin: .35em auto;
- }
- @media (min-width: 780px){
- #page-title{
- width: 780px;
- }
- }
- /* Sortable List */
- .sortable-list-container{
- width: 400px;
- background-color: #fff;
- border: 1px solid #dedede;
- box-shadow:1px 1px 5px #6c6c6c;
- margin: 1em auto ;
- }
- .sortable-list-container ul{
- padding: .5em 1em;
- }
- .sortable-list-container ul li{
- list-style: none ;
- border: 1px solid #cfcfcf;
- box-shadow:1px 1px 5px #a8a8a8;
- margin-bottom: 10px;
- padding: 0.5em 1em;
- cursor: grab;
- background: #fff;
- }
- .sortable-list-container ul li[data-dragging="true"]{
- border-style: dashed;
- box-shadow: unset;
- }
- .sortable-list-container ul li[data-dragging="true"] :where(*){
- opacity: 0;
- }
- /* Flex Container */
- .flex-container{
- display: flex;
- width: 100%;
- flex-wrap: wrap;
- align-items: center;
- }
- /* Save Button */
- button#save-btn {
- display: block;
- width: 150px;
- background: #438efe;
- padding: 0.5em 1em;
- color: #fff;
- font-size: 1rem;
- font-weight: 500;
- margin: 0.35em auto;
- border: none;
- box-shadow: 0px 0px 10px #00000030;
- cursor: pointer;
- }
- button#save-btn:hover{
- background: #2578f5;
- }
Creating the Update API
Lastly, let's create a new PHP file named update_order.php and use the following script. This file script will execute the update process of the new sort order of data into the database table.
- <?php
- // Require or include once the db connection handler script
- require_once('db-connect.php');
- if($_SERVER['REQUEST_METHOD'] == 'POST'){
- // If Post data exists
- // If Sort Order Sample Post data Exists
- // set post data into a variable
- $data_ids = $_POST['sort_order'];
- // loop the data
- foreach($data_ids as $order => $id){
- // update the sort order of the data
- $update = $conn->query("UPDATE `sampletbl` set `sort_order` = '{$order}' where `id` ='{$id}'");
- if(!$update){
- // If query execution fails, return an error message
- echo "<script>alert('An error occured while updating data!'); location.replace('./')</script>";
- }
- }
- echo "<script>alert('Data Sort Order has been updated successfully!'); location.replace('./')</script>";
- }else{
- // No Sort Order Post Data sent
- echo "<script>alert('No Sort Data sent!'); location.replace('./')</script>";
- }
- }else{
- // If no post data send to this request
- echo "<script>alert('No Post Data sent!'); location.replace('./')</script>";
- }
Snapshots
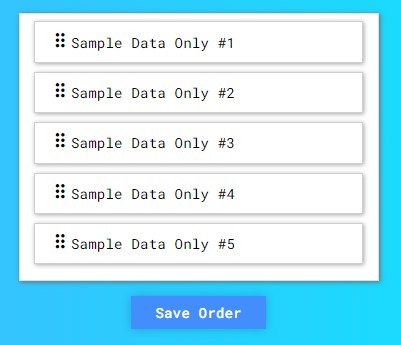
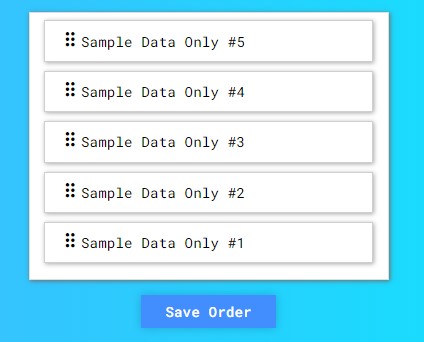
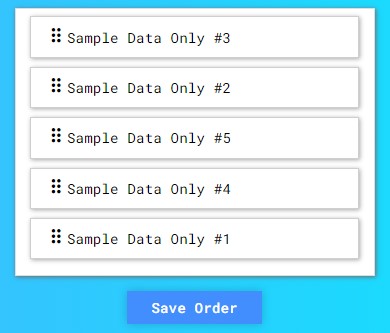
Here are some snapshots of the overall result of the web application script I have provided above:
Default
Sample Updated Sort Order #1
Sample Updated Sort Order #2
DEMO VIDEO
There you go! I have provided the complete source code zip file of the sample web application script I created on this site and it is free to download. The download button can be found below this tutorial's content. Feel free to download and do some experiments with the source code to enhance your programming capabilities.
That's it! I hope this Dynamic Ordering Data and DOM Element using PHP, MySQL, and JavaScript Tutorial will help you with what you are looking for and will be useful for your current and future web application projects.
Explore more on this website for more Tutorials and Free Source Codes.