How to Insert Data into MySQL Database using PHP, MySQLi, AJAX and JQuery
Submitted by nurhodelta_17 on Tuesday, August 29, 2017 - 19:44.
Language
This tutorial will show you how to insert data into mysql database using PHP, MySQLi, AJAX and JQuery. You might wonder why use AJAX and JQuery when you can insert into database using PHP and MySQLi. Yes, but with the use of AJAX and JQuery, you don't need to reload the page in doing an action. This tutorial will not give you a good design but will give you idea on the topic.

Creating our Database
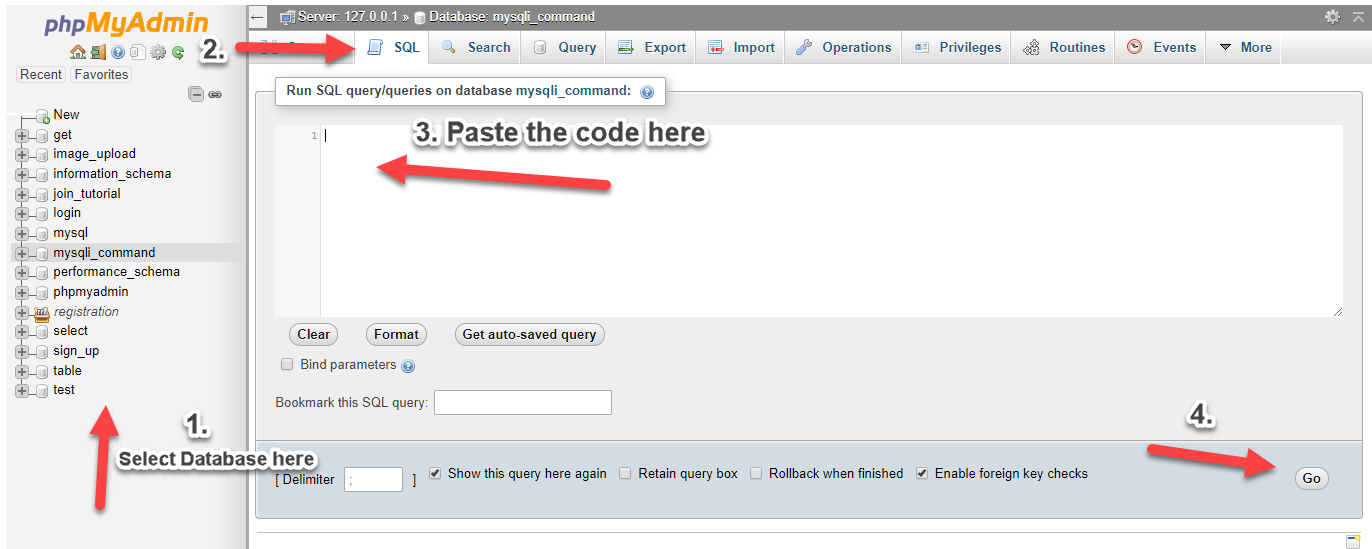
First, we're going to create our database. This will store the data that we are going to insert. 1. Open phpMyAdmin. 2. Click databases, create a database and name it as "ajax_insert. 3. After creating a database, click the SQL and paste the below code. See image below for detailed instruction.- CREATE TABLE `post` (
- `postid` INT(11) NOT NULL AUTO_INCREMENT,
- `post_text` VARCHAR(200) NOT NULL,
- `date_time` datetime NOT NULL,
- PRIMARY KEY(`postid`)
- ) ENGINE=InnoDB DEFAULT CHARSET=latin1;

Creating our Connection
Next step is to create a database connection and save it as "conn.php". This file will serve as our bridge between our form and our database. To create the file, open your HTML code editor and paste the code below after the tag.- <?php
- //MySQLi Procedural
- if (!$conn) {
- }
- ?>
Creating our Form with our Output
Next, we create our add form and a page to output our added data. We name this as "index.php". Also included in this page, the location of our jquery script which will be included in the file of this tutorial.- <!DOCTYPE html>
- <html lang = "en">
- <head>
- <meta charset = "UTF-8" name = "viewport" content = "width=device-width, initial-scale=1"/>
- </head>
- <body>
- <div id = "post_form">
- <form>
- </form>
- <br>
- </div>
- </body>
- <script type = "text/javascript">
- $(document).ready(function(){
- displayResult();
- /* ADDING POST */
- $('#add_post').on('click', function(){
- if($('#post').val() == ""){
- alert('Please enter something first');
- }else{
- $post = $('#post').val();
- $.ajax({
- type: "POST",
- url: "add_post.php",
- data: {
- post: $post,
- },
- success: function(){
- displayResult();
- }
- });
- }
- });
- /***** *****/
- });
- function displayResult(){
- $.ajax({
- url: 'add_post.php',
- type: 'POST',
- async: false,
- data:{
- res: 1
- },
- success: function(response){
- $('#result').html(response);
- }
- });
- }
- </script>
- </html>
Creating our Add Code
Last, we create our add code which will add our inputted data into our database. We name this as "add_post.php".- <?php
- include ('conn.php');
- mysqli_query($conn,"insert into `post` (`post_text`, `date_time`) values ('$post', NOW())") or die(mysqli_error());
- }
- ?>
- <?php
- ?>
- <?php
- ?>
- <div>
- Post: <?php echo $row['post_text']; ?>
- </div>
- <br>
- <?php
- }
- }
- ?>
Note: Due to the size or complexity of this submission, the author has submitted it as a .zip file to shorten your download time. After downloading it, you will need a program like Winzip to decompress it.
Virus note: All files are scanned once-a-day by SourceCodester.com for viruses, but new viruses come out every day, so no prevention program can catch 100% of them.
FOR YOUR OWN SAFETY, PLEASE:
1. Re-scan downloaded files using your personal virus checker before using it.
2. NEVER, EVER run compiled files (.exe's, .ocx's, .dll's etc.)--only run source code.

