How to Select Data Between Two Dates in PHP/MySQL
This tutorial will show you how to select MySQL rows between two inputted dates. This tutorial does not include a good design but will give you knowledge on the said topic. I've also included 2 MySQLi methods which are Object-oriented and Procedural in the comments. So, feel free to switch between them.
Creating our Database
First, we're going to create a database that contains our data.
- Open phpMyAdmin.
- Click databases, create a database and name it as "between".
- After creating a database, click the SQL and paste the below code. See image below for detailed instruction.

Inserting Data Into our Database
Next Step in to insert some data into our database. This will serve as our reference when we select our dates.
- Click the database "between" that we have created earlier.
- Click SQL and paste the code below.
Creating our Connection
Next step is to create a database connection and save it as "conn.php". This file will serve as our bridge between our form and our database. To create the file, open your HTML code editor and paste the code below after the tag.
- <?php
- //MySQLi Procedural
- //$conn = mysqli_connect("localhost","root","","between");
- //if (!$conn) {
- // die("Connection failed: " . mysqli_connect_error());
- //}
- //MySQLi Object-oriented
- $conn = new mysqli("localhost","root","","between");
- if ($conn->connect_error) {
- }
- ?>
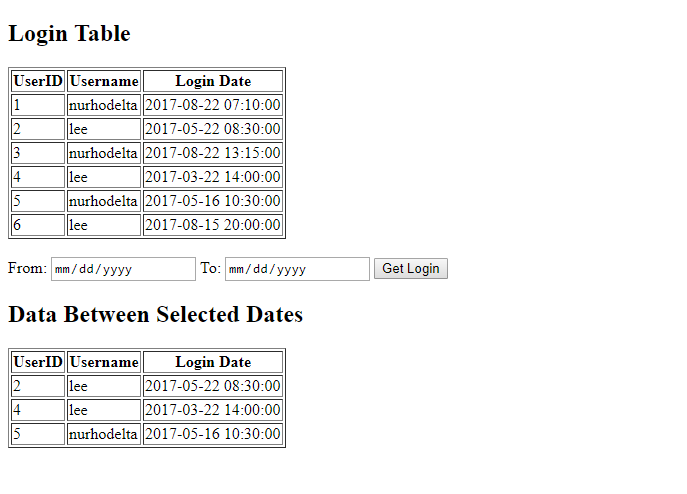
Creating our Form and Table
Lastly, we create our login table, our form, and our result table on one page. To create the page, open your HTML code editor and paste the code below after the tag. We name this page as "index.php".
- <!DOCTYPE html>
- <html>
- <head>
- <title>How to Select MySQL Table between Two Dates in PHP</title>
- </head>
- <body>
- <h2>Login Table</h2>
- <div>
- <table border="1">
- <thead>
- <th>UserID</th>
- <th>Username</th>
- <th>Login Date</th>
- </thead>
- <tbody>
- <?php
- include('conn.php');
- //MySQLi Procedural
- //$query=mysqli_query($conn,"select * from `login`");
- //while($row=mysqli_fetch_array($query)){
- /* ?>
- <tr>
- <td><?php echo $row['logid']; ?></td>
- <td><?php echo $row['username']; ?></td>
- <td><?php echo $row['login_date']; ?></td>
- </tr>
- <?php */
- //}
- //MySQLi Object-oriented
- $query=$conn->query("select * from `login`");
- while($row = $query->fetch_array()) {
- ?>
- <tr>
- <td><?php echo $row['logid']; ?></td>
- <td><?php echo $row['username']; ?></td>
- <td><?php echo $row['login_date']; ?></td>
- </tr>
- <?php
- }
- ?>
- </tbody>
- </table>
- </div><br>
- <div>
- <form method="POST">
- <label>From: </label><input type="date" name="from">
- <label>To: </label><input type="date" name="to">
- <input type="submit" value="Get Data" name="submit">
- </form>
- </div>
- <h2>Data Between Selected Dates</h2>
- <div>
- <table border="1">
- <thead>
- <th>UserID</th>
- <th>Username</th>
- <th>Login Date</th>
- </thead>
- <tbody>
- <?php
- include('conn.php');
- //MySQLi Procedural
- //$oquery=mysqli_query($conn,"select * from `login` where login_date between '$from' and '$to'");
- //while($orow=mysqli_fetch_array($oquery)){
- /* ?>
- <tr>
- <td><?php echo $orow['logid']?></td>
- <td><?php echo $orow['username']?></td>
- <td><?php echo $orow['login_date']?></td>
- </tr>
- <?php */
- //}
- //MySQLi Object-oriented
- $oquery=$conn->query("select * from `login` where login_date between '$from' and '$to'");
- while($orow = $oquery->fetch_array()){
- ?>
- <tr>
- <td><?php echo $orow['logid']?></td>
- <td><?php echo $orow['username']?></td>
- <td><?php echo $orow['login_date']?></td>
- </tr>
- <?php
- }
- }
- ?>
- </tbody>
- </table>
- </div>
- </body>
- </html>
That's it, test your work if it works fine and if ever there's an error occurred please read the step from the beginning again or you can compare your codes to the code I have uploaded. Feel free also to comment below for any question or reactions.
Note: Due to the size or complexity of this submission, the author has submitted it as a .zip file to shorten your download time. After downloading it, you will need a program like Winzip to decompress it.
Virus note: All files are scanned once-a-day by SourceCodester.com for viruses, but new viruses come out every day, so no prevention program can catch 100% of them.
FOR YOUR OWN SAFETY, PLEASE:
1. Re-scan downloaded files using your personal virus checker before using it.
2. NEVER, EVER run compiled files (.exe's, .ocx's, .dll's etc.)--only run source code.