Registration Form Using Bootstrap
Submitted by GeePee on Thursday, April 2, 2015 - 22:16.
In one of our previous tutorial, we discuss on How to Create Secure Registration Page in PHP/MySQL. This time, I will put some extra coding to make our registration form look better by using CSS code. We will be using bootstrap to make our like easier. No need to reinvent the wheel as it is already invented by twitter.
So here we go.
First you need to download the bootstrap framework.
After you download the framework, extract it on your computer and copy the following files under CSS folder:
bootstrap.css
bootstrap-responsive.css
Create a directory called "css" and paste the above files under it.
Next, create a file called registration.html and paste the following code:
The file structure should look like:
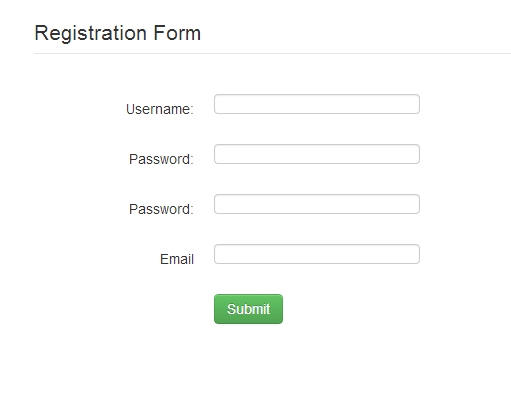
- <!<!DOCTYPE html PUBLIC "-//W3C//DTD XHTML 1.0 Transitional//EN" "http://www.w3.org/TR/xhtml1/DTD/xhtml1-transitional.dtd">
- <html xmlns="http://www.w3.org/1999/xhtml">
- <head>
- <meta http-equiv="Content-Type" content="text/html; charset=utf-8" />
- <title>Register</title>
- </head>
- <body>
- <div class="container">
- <form class="form-horizontal" id="registration" method='post' action='register.php'>
- <fieldset>
- <legend>Registration Form</legend>
- <div class="control-group">
- <label class="control-label">Username:</label>
- <div class="controls">
- <input type="text" id="username" name="user_name">
- </div>
- </div>
- <div class="control-group">
- <label class="control-label">Password:</label>
- <div class="controls">
- <input type="text" id="password" name="password1">
- </div>
- </div>
- <div class="control-group">
- <label class="control-label">Password:</label>
- <div class="controls">
- <input type="text" id="password" name="password2">
- </div>
- </div>
- <div class="control-group">
- <label class="control-label">Email</label>
- <div class="controls">
- <input type="text" id="email" name="email">
- </div>
- </div>
- <div class="control-group">
- <label class="control-label"></label>
- <div class="controls">
- <button type="submit" class="btn btn-success" >Submit</button>
- </div>
- </div>
- </fieldset>
- </form>
- </div>
- </body>
- </html>
login\registration.html
login\css\bootstrap.css
login\css\bootstrap-responsive.css
This assumes that you put this into the "login" folder.
Make sure that you also follow on how to create the PHP script for our registration.
Understanding how this code works.
As you can see, there are several class we used in the code above. They are:
class="container"
class="form-horizontal"
class="control-label"
class="control-group"
class="control-label"
These class are not meant to be modified as it is defined under the bootstrap framework.
Please follow this link to see the other samples:
http://twitter.github.io/bootstrap/base-css.html#forms