Creating a User-Friendly Metronome App: Step-by-Step Guide with HTML, CSS, and JavaScript

This tutorial will guide you through the development of a straightforward web application known as the Metronome Application. The application will be crafted using `HTML`, `CSS`, and `JavaScript`. Geared towards students and novice programmers, this tutorial serves as a practical reference for learning to create a user-friendly metronome application utilizing the mentioned programming languages. I will provide step-by-step instructions and scripts to achieve the desired result.
What is Metronome App?
The Metronome Application functions as a web-based version of a metronome device. This application generates regular, metrical ticks or beats at a consistent interval. Typically employed in music practice, a metronome aids musicians in maintaining a steady tempo or rhythm. The application offers an audible cue, often in the form of clicks, enabling musicians to stay synchronized with their desired tempo during play or practice.
How to Create a Simple Metronome Application?
Before we begin the coding process, ensure you have downloaded and installed the following if they are not yet available on your local machine:
- XAMPP/WAMP or any similar web servers
- Code Editor such as MS Code Editor, Notepad++, and Sublime Text
- Single Click or Tick Audio - for the metronome audible cue
After a successful installation, be sure to run the Apache server.
Let's get started...
Step 1: Creating the Custom CSS
In this tutorial, the provided source code utilizes the Bootstrap Framework for the application interface design. However, certain elements, including the background image, control buttons, and more, have custom styling. Below is the CSS script used for the web app interface. Save the file as `style.css`.
- @import url('https://fonts.googleapis.com/css2?family=Orbitron:wght@400;500;600;700;800;900&display=swap');
- html, body{
- height: 100%;
- width: 100%;
- }
- body{
- background-color:#cfd9df;
- background-image: linear-gradient(to top, #cfd9df 0%, #e2ebf0 100%);
- display: flex;
- flex-flow: column wrap;
- justify-content: center;
- align-items: center;
- }
- * {
- font-family: 'Orbitron', sans-serif;
- }
- div#app-title {
- font-size: 2rem;
- font-weight: 600;
- letter-spacing: 2px;
- color: #5e5e5e;
- }
- div#bpm-container {
- width: 300px;
- height: 300px;
- padding: 5px;
- background: #30c7ec;
- background-image: radial-gradient(circle 248px at center, #16d9e3 0%, #30c7ec 47%, #46aef7 100%);
- border-radius: 100%;
- border: 12px dashed #008096;
- }
- div#bpm-container>span:nth-child(1) {
- font-size: 4rem;
- font-weight: 600;
- color: #006475;
- letter-spacing: 5px;
- }
- div#bpm-container>span:nth-child(2) {
- font-size: 1.2rem;
- font-weight: 600;
- letter-spacing: 2px;
- color: #026070;
- }
- div.beatsText {
- font-size: 1.3rem;
- font-weight: 500;
- }
- button.beatsBTN{
- transition: transform .1s ease;
- }
- button.beatsBTN:active{
- transform: scale(.9);
- }
- #playMetronome{
- border: 6px dashed #006475;
- background: #66a6ff;
- background-image: linear-gradient(120deg, #89f7fe 0%, #66a6ff 100%);
- color: #006475;
- }
- #stopMetronome{
- display: none;
- border: 6px dashed #b14536;
- background: #fe9a8b;
- background-image: linear-gradient(to right, #f78ca0 0%, #f9748f 19%, #fd868c 60%, #fe9a8b 100%);
- color: #6e0d00;
- }
- button.controlBtns {
- height: 50px;
- width: 50px;
- display: flex;
- align-items: center;
- justify-content: center;
- border-radius: 100%;
- }
Step 2: Creating the Application Interface
Moving forward, let's establish the page or web application interface. In your code editor, create a new HTML file and save it as `index.html`. This file will contain the HTML scripts incorporating essential elements for the application, including the Metronome Tempo Display and Slider, Beats per Measure, and Control Buttons (Play/Stop). Consult the following HTML script for this stage:
- <!DOCTYPE html>
- <html lang="en">
- <head>
- <meta charset="UTF-8">
- <meta name="viewport" content="width=device-width, initial-scale=1.0">
- <!-- Fontawesome CSS CDN -->
- <link rel="stylesheet" href="https://cdnjs.cloudflare.com/ajax/libs/font-awesome/6.4.2/css/all.min.css" integrity="sha512-z3gLpd7yknf1YoNbCzqRKc4qyor8gaKU1qmn+CShxbuBusANI9QpRohGBreCFkKxLhei6S9CQXFEbbKuqLg0DA==" crossorigin="anonymous" referrerpolicy="no-referrer" />
- <!-- Bootstrap CSS CDN -->
- <link rel="stylesheet" href="https://cdn.jsdelivr.net/npm/[email protected]/dist/css/bootstrap.min.css">
- <link rel="stylesheet" href="style.css">
- <!-- Fontawesome CSS CDN -->
- <!-- jQuery CSS CDN -->
- <!-- Bootstrap CSS CDN -->
- <script src="https://cdn.jsdelivr.net/npm/[email protected]/dist/js/bootstrap.bundle.min.js"></script>
- </head>
- <body>
- <div class="col-lg-4 col-md-8 col-sm-12 col-12 my-3">
- <div class="card shadow w-100">
- <div class="card-body">
- <div class="container-fluid">
- <div>
- </div>
- <!-- Beats Per Minute Elements -->
- <!-- BPM Text Display -->
- <div class="d-flex justify-content-center w-100">
- <div class="d-flex flex-column justify-content-center align-items-center" id="bpm-container">
- </div>
- </div>
- <!-- End of BPM Text Display -->
- <div class="my-3 w-100 d-flex align-items-center">
- <div class="col-auto flex-shrink-1">
- </div>
- <!-- BPM Slider -->
- <div class="col-auto flex-grow-1">
- <input type="range" class="form-range" min="35" max="250" value="140" id="bpmSlider">
- </div>
- <!-- End of BPM Slider -->
- <div class="col-auto flex-shrink-1 px-2">
- </div>
- </div>
- <!-- End of Beats Per Minute Elements -->
- <!-- Beats per Measure -->
- <div class="my-3">
- <div class="w-100 d-flex align-items-center justify-content-center">
- <div class="col-auto flex-shrink-1">
- </div>
- <div class="col-4">
- </div>
- <div class="col-auto flex-shrink-1">
- </div>
- </div>
- </div>
- <!-- End of Beats per Measure -->
- <!-- Buttons -->
- <div class="my-3">
- <div class="d-flex align-items-center justify-content-center">
- </div>
- </div>
- <!-- End of Buttons -->
- </div>
- </div>
- </div>
- </div>
- </body>
- </html>
Step 3: Creating the JS Script
Finally, let's generate the JavaScript file for the application. This file encompasses multiple functions and event listeners crucial for the functionality of our Metronome application. The script includes playing the metronome, updating the tempo, adjusting the beats per measure, and other relevant functions. Create a JS file and save it as `script.js`.
- /**
- * Setting elements to constants and Decalring Variables
- */
- const playButton = document.getElementById('playMetronome');
- const stopButton = document.getElementById('stopMetronome');
- const bpmSlider = document.getElementById('bpmSlider');
- const bpmEl = document.getElementById('bpm');
- const beatTxt = document.getElementById('beatsText');
- const beatBTN = document.querySelectorAll('button.beatsBTN');
- const audio = new AudioContext()
- let audioBuffer;
- let i =1;
- let beat_count = 4
- let metronome;
- let bpm = 140;
- let isplaying = false;
- // Loading Metronome Audi
- function load_audio(){
- return fetch('./metronome.mp3')
- .then(response => response.arrayBuffer())
- .then(buffer => audio.decodeAudioData(buffer) );
- }
- load_audio().then(buffer => audioBuffer = buffer )
- /**
- * Function for Playing the Metronome Click Sound
- * @param int rate = to change playbackrate or the pitch
- */
- function playClick(rate=1) {
- // creating the audio buffer source
- const source = audio.createBufferSource();
- // Serring audio buffer to source
- source.buffer = audioBuffer;
- // changing the pitch
- source.playbackRate.value = rate;
- // Connect source to audio destination
- source.connect(audio.destination);
- // play the audio from the start
- source.start(0);
- }
- /**
- * Function that Loops the Metronome depending to provided tempo and beats
- */
- function metronome_play(){
- // identifying that metronome is playing
- isplaying = true
- // looping the beat
- metronome = setInterval(function(){
- // setting up the pitch, high pitch the 1 beat per measure
- var PBrate = 1
- if(i == 1)
- PBrate = 2;
- playClick(PBrate)
- i = i + 1;
- if(i > beat_count){
- i = 1;
- }
- }, (60000 / bpm))
- }
- // Function that stops the metronome
- function metronome_stop(){
- clearInterval(metronome)
- i = 1;
- isplaying = false
- }
- // function that updates the beats per measure
- function change_beat(type = "plus"){
- if(type == 'plus'){
- beat_count = beat_count + 1;
- }else{
- beat_count = beat_count - 1;
- }
- if(beat_count < 2)
- beat_count = 2;
- beatTxt.innerText = beat_count
- if(isplaying){
- metronome_stop()
- metronome_play()
- }
- }
- /**
- * Event Listener that triggers the metronome to play
- */
- playButton.addEventListener('click', function(e){
- e.preventDefault()
- if(!isplaying){
- metronome_play()
- }
- // Hide Play Button
- playButton.style.display = 'none'
- // Show Stop Button
- stopButton.style.display = 'flex'
- })
- /**
- * Event Listener that triggers the metronome to stop
- */
- stopButton.addEventListener('click', function(e){
- e.preventDefault()
- metronome_stop()
- // Hide Stop Button
- stopButton.style.display = 'none'
- // Show Play Button
- playButton.style.display = 'flex'
- })
- /**
- * Event Listener that triggers the metronome speed up or down
- */
- bpmSlider.addEventListener('input', function(e){
- e.preventDefault()
- bpmEl.innerText = `${bpmSlider.value}`
- bpm = bpmSlider.value
- if(isplaying){
- metronome_stop()
- metronome_play()
- }
- })
- /**
- * Event Listener that triggers the metronome to change the number of beats per measure
- */
- beatBTN.forEach(el=>{
- el.addEventListener('click', function(e){
- e.preventDefault()
- change_beat(el.dataset.type)
- })
- })
Prior to testing the application, ensure to modify the path of the metronome click or tick audio file you've downloaded in the `load_audio()` function of the JavaScript file.
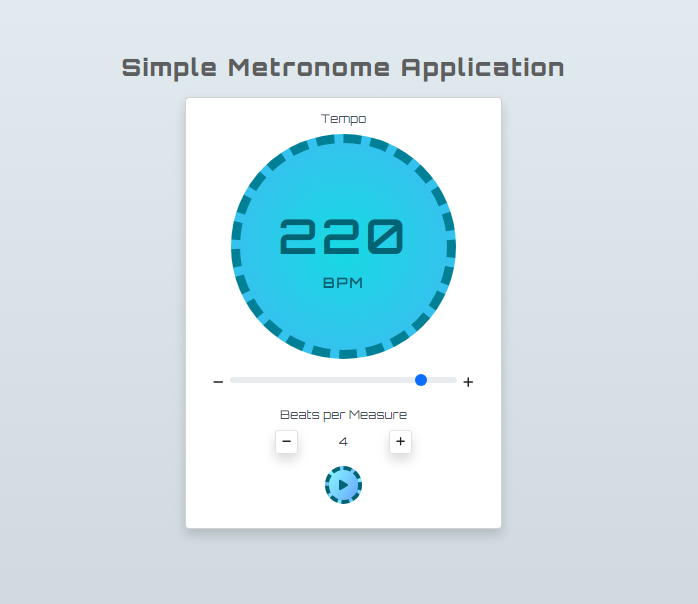
Snapshots
Here are some snapshots of the result script I have provided above:
Page Interface
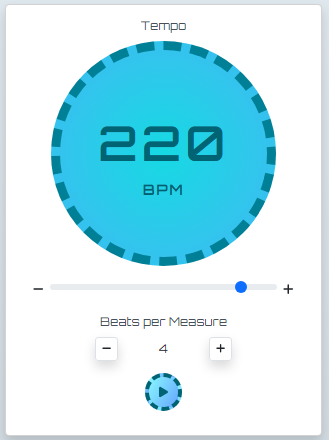
Metronome when not playing
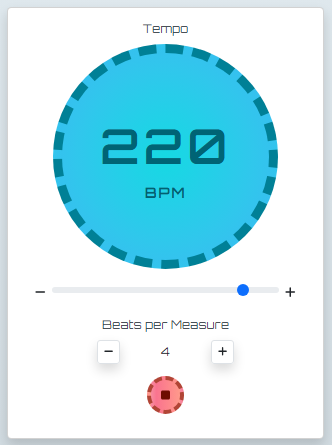
Metronome when playing
I have also provided the compressed complete source code zip file of the Simple Metronome Application that I created on this website. To download it, simply click the Download button below this article tutorial.
That' it! I hope this Metronome Application Tutorial using HTML, CSS, and JavaScript will help you with what you are looking for and you'll find something useful from the script for your future web application projects. Explore more on this website for more Free Source Codes, Tutorials, and Article covering various programming languages.