Creating a Video Custom Controls using HTML, CSS, and JS Tutorial

In this tutorial, you can learn to create Video Custom Controls using HTML, CSS, and Pure JavaScript. The tutorial aims to provide students and beginners with a reference for learning the JS Web Video API to control the video element. Here, I will be providing simple web page scripts that demonstrate the creation of custom control of the video element.
What are Custom Video Custom Controls?
Basically, the HTML Video element has built-in controls for the video by adding a controls attribute to the element. Custom Video Controls are custom controls that the developer implemented to provide the end-users with more interactive and useful controls that are relevant only to the website.
How to Create a Custom Video Custom Controls?
Custom Video Custom Controls can be achieved simply by using HTML, CSS, and JavaScript. We can simply create the controls using some HTML elements such as div tags and design them using some CSS properties on how we prefer the controls should be looking. Then, using the JS Web Video API methods, we can add some event listeners to the controls we created and manage the video such as playing or pausing the video, changing the video's current play time, changing video volume, and more. Check out the source code scripts that I created and provided below to understand it more.
Sample Web Page Scripts
The following scripts result in a simple web page that contains a video element and custom controls. The custom controls contain a duration slider, volume, slider, backward (-10s) button, forward (+10s), play/pause button, current time text, and remain time text.
Page Interface
Here's the HTML file script known as index.html. The file contains the page layout, video, and custom controls elements. Please don't forget to change the video tag element source path with a video path that is available on your end.
- <!DOCTYPE html>
- <html lang="en">
- <head>
- <meta charset="UTF-8">
- <meta name="viewport" content="width=device-width, initial-scale=1.0">
- <link rel="stylesheet" href="style.css">
- <link rel="preconnect" href="https://fonts.googleapis.com">
- <link rel="preconnect" href="https://fonts.gstatic.com" crossorigin>
- <link rel="stylesheet" href="https://fonts.googleapis.com/css2?family=Material+Symbols+Outlined:opsz,wght,FILL,[email protected],100..700,0..1,-50..200" />
- </head>
- <body>
- <div class="container">
- <hr id="title_hr">
- <div id="vid-wrapper">
- <div id="custom-controls">
- <div id="vid-slider">
- <span id="vid-slider-holder">
- <input type="range" step="any" min="0" max="100" id="vid_duration" value="0">
- </span>
- </div>
- <div class="other-ctrls">
- <div class="btns">
- </div>
- <div id="vol-slider-holder">
- <input type="range" step="any" min="0" max="10" value="10" id="vol-slider">
- </div>
- </div>
- </div>
- </div>
- </div>
- </body>
- </html>
Stylesheet (CSS)
Next, here's the CSS file script known as style.css. The file contains the page layout and custom controls elements design or stylesheet codes.
- @import url('https://fonts.googleapis.com/css2?family=Dongle:wght@300;400;700&family=Roboto+Mono:ital,wght@0,100;0,200;0,300;0,400;0,500;0,600;1,100;1,200;1,300;1,400;1,500;1,600&display=swap" rel="stylesheet');
- *{
- margin: 0;
- padding: 0;
- box-sizing: border-box;
- font-family: 'Dongle', sans-serif;
- font-family: 'Roboto Mono', monospace;
- }
- ::selection{
- color: #fff;
- background: #4db2ec;
- }
- body{
- display: flex;
- align-items: center;
- justify-content: center;
- min-height: 100vh;
- background: #4facfe;
- background-image: linear-gradient(to right, #4facfe 0%, #00f2fe 100%);
- padding: 2em 0;
- }
- #page-title{
- color: #fff;
- text-align: center;
- font-weight: 500;
- text-shadow: 0px 0px 15px #0000003a;
- }
- #title_hr{
- width:60px;
- border: 2px solid #ffffff;
- margin: .35em auto;
- }
- @media (min-width: 780px){
- #page-title{
- width: 780px;
- }
- }
- /* Table Wrapper */
- #vid-wrapper{
- width: 700px;
- background-color: #000;
- border: 1px solid #2e2e2e;
- padding: 1em .75em;
- margin: 1em auto;
- border-radius: 5px;
- box-shadow: 1px 1px 10px #00000046;
- }
- /* Video Element */
- #vid-wrapper video{
- width: 100%;
- height: 350px;
- object-fit: scale-down;
- object-position: center center;
- }
- /* Video Duration Slider */
- div#vid-slider {
- color: #fff;
- display: flex;
- width: 100%;
- justify-content: center;
- align-items: center;
- }
- span#current-time,
- span#remaining-time {
- display: block;
- flex-shrink: 1;
- }
- #vid-slider-holder{
- display: block;
- flex-grow: 1;
- padding: 0 .35em;
- }
- #vid-slider-holder input{
- width: 100%;
- }
- /* duration range */
- #vid-slider-holder input {
- -webkit-appearance: none;
- appearance: none;
- width: 100%;
- cursor: pointer;
- outline: none;
- border-radius: 15px;
- height: 6px;
- background: #645a5a;
- }
- #vid-slider-holder input::-webkit-slider-thumb {
- -webkit-appearance: none;
- appearance: none;
- height: 15px;
- width: 15px;
- background-color: #eeeeee;
- border-radius: 50%;
- border: 1px solid #c2c1c1;
- transition: .2s ease-in-out;
- }
- #vid-slider-holder input::-moz-range-thumb {
- height: 15px;
- width: 15px;
- background-color: #eeeeee;
- border-radius: 50%;
- border: none;
- box-shadow: 0px 0px 3px #000;
- transition: .2s ease-in-out;
- }
- #vid-slider-holder input::-webkit-slider-thumb:hover {
- box-shadow: 0 0 0 10px #2aaaff10
- }
- #vid-slider-holder input:focus::-webkit-slider-thumb {
- box-shadow: 0 0 0 13px #2aaaff1a
- }
- #vid-slider-holder input::-moz-range-thumb:hover {
- box-shadow: 0 0 0 10px #2aaaff10
- }
- #vid-slider-holder input:focus::-moz-range-thumb {
- box-shadow: 0 0 0 13px #2aaaff1a
- }
- /* Btns and other controls */
- .other-ctrls {
- display: flex;
- width: 100%;
- color: #fff;
- align-items: center;
- justify-content:space-between;
- }
- .other-ctrls .btns{
- display: flex;
- align-items: center;
- justify-content:center;
- flex-shrink: 1;
- }
- div#minus-10-sec-btn,
- div#pause-play-btn,
- div#plus-10-sec-btn {
- width: 20px;
- height: 20px;
- margin: 0.35em 0.5em;
- cursor: pointer;
- }
- div#minus-10-sec-btn:hover>span,
- div#pause-play-btn:hover>span,
- div#plus-10-sec-btn:hover>span {
- color: #cccccc !important;
- }
- /* Volume Slider */
- #vol-slider-holder{
- width: 150px;
- display: flex;
- align-items: center;
- justify-content: center;
- }
- #vol-slider {
- -webkit-appearance: none;
- appearance: none;
- width: 100%;
- cursor: pointer;
- outline: none;
- border-radius: 15px;
- height: 6px;
- background: #645a5a;
- }
- #vol-slider::-webkit-slider-thumb {
- -webkit-appearance: none;
- appearance: none;
- height: 15px;
- width: 15px;
- background-color: #eeeeee;
- border-radius: 50%;
- border: 1px solid #c2c1c1;
- transition: .2s ease-in-out;
- }
- #vol-slider::-moz-range-thumb {
- height: 15px;
- width: 15px;
- background-color: #eeeeee;
- border-radius: 50%;
- border: none;
- box-shadow: 0px 0px 3px #000;
- transition: .2s ease-in-out;
- }
- #vol-slider::-webkit-slider-thumb:hover {
- box-shadow: 0 0 0 10px #2aaaff10
- }
- #vol-slider:focus::-webkit-slider-thumb {
- box-shadow: 0 0 0 13px #2aaaff1a
- }
- #vol-slider::-moz-range-thumb:hover {
- box-shadow: 0 0 0 10px #2aaaff10
- }
- #vol-slider:focus::-moz-range-thumb {
- box-shadow: 0 0 0 13px #2aaaff1a
- }
JavaScript
Finally, here's the JavaScript file script known as script.js. The file contains the JS codes that make the custom controls functional and control the video element.
- // Select Video Element
- const video = document.querySelector("#vid-wrapper video")
- // Select Duration Slider Element
- const durationSliderEl = document.querySelector("#vid-slider-holder input")
- // Select Volume Slider Element
- const volumeSliderEl = document.querySelector("#vol-slider")
- // Select Backward icon Element
- const backward = document.getElementById('minus-10-sec-btn')
- // Select Forward icon Element
- const forward = document.getElementById('plus-10-sec-btn')
- // Select Play/Pause icon Element
- const playPause = document.getElementById('pause-play-btn')
- // Select Current Time Text Element
- const vidCurrentTime = document.getElementById('current-time')
- // Select Remaining Time Text Element
- const vidRemainTime = document.getElementById('remaining-time')
- // for duration interval
- let durationInterval;
- // Update duration slider fill color
- const durationSlider= () =>{
- // get progress
- const progress = (durationSliderEl.value / durationSliderEl.max) * 100;
- // Update Fill Color depending to progress
- durationSliderEl.style.background = `linear-gradient(to right, #3aa8ff ${progress}%, #645a5a ${progress}%)`;
- }
- // Update volume slider fill color
- const volumeSlider = () => {
- // get progress
- const progress = (volumeSliderEl.value / volumeSliderEl.max) * 100;
- // Update Fill Color depending to progress
- volumeSliderEl.style.background = `linear-gradient(to right, #3aa8ff ${progress}%, #645a5a ${progress}%)`;
- }
- // Update Duration Slider, current time, and remaining time elements
- const updateDuration = () =>{
- // get current time
- var currentTime = video.currentTime
- // get video total duration
- var totalTime = video.duration
- // Compute Remaining Time
- var remain = totalTime - currentTime
- // Compute duration slider value
- var sliderValue = (currentTime / totalTime) * 100;
- // Reset Duration Slider Value
- durationSliderEl.value= sliderValue
- // update duration slider
- durationSlider()
- // compute Current Time (m:s)
- var curtimeMins = Math.floor(currentTime / 60)
- var curtimeSecs = Math.floor(((currentTime / 60) - curtimeMins) * 60)
- // compute Remaining Time (m:s)
- var remainTimeMins = Math.floor(remain / 60)
- var remainTimeSecs = Math.floor(((remain / 60) - remainTimeMins) * 60)
- // make current time minimum 2 digits and add 0 before the digit if only single digits
- curtimeMins = String(curtimeMins).padStart(2, 0);
- curtimeSecs = String(curtimeSecs).padStart(2, 0);
- // make remaining time minimum 2 digits and add 0 before the digit if only single digits
- remainTimeMins = String(remainTimeMins).padStart(2, 0);
- remainTimeSecs = String(remainTimeSecs).padStart(2, 0);
- // Update current Time Element Text
- vidCurrentTime.innerText = `${curtimeMins}:${curtimeSecs}`
- // Update remaining Time Element Text
- vidRemainTime.innerText = `${remainTimeMins}:${remainTimeSecs}`
- }
- window.onload = ()=>{
- volumeSlider()
- updateDuration()
- playPause.addEventListener('click', e=>{
- e.preventDefault()
- if(!!playPause.dataset.playing){
- delete playPause.dataset.playing;
- video.pause()
- playPause.innerHTML = `<span class="material-symbols-outlined">play_arrow</span>`
- }else{
- playPause.dataset.playing= 'true'
- video.play()
- playPause.innerHTML = `<span class="material-symbols-outlined">pause</span>`
- }
- })
- video.addEventListener('play', e => {
- durationInterval = setInterval(()=>{
- updateDuration()
- }, 100)
- })
- video.addEventListener('pause', e => {
- if(durationInterval != undefined){
- clearInterval(durationInterval)
- }
- })
- backward.addEventListener('click', e=>{
- e.preventDefault()
- var currentTime = video.currentTime
- currentTime -= 10;
- currentTime = (currentTime < 0) ? 0 : currentTime
- video.currentTime = currentTime
- updateDuration()
- })
- forward.addEventListener('click', e=>{
- e.preventDefault()
- var currentTime = video.currentTime
- currentTime += 10;
- currentTime = (currentTime > video.duration) ? video.duration : currentTime
- video.currentTime = currentTime
- updateDuration()
- })
- durationSliderEl.addEventListener("input", (event) => {
- durationSlider()
- var duration = video.duration
- var newCurrentTime = (durationSliderEl.value / 100) * duration
- video.currentTime = newCurrentTime
- updateDuration()
- })
- volumeSliderEl.addEventListener("input", (event) => {
- volumeSlider()
- var vol = (volumeSliderEl.value / 10)
- video.volume = vol
- })
- video.addEventListener("ended", e=>{
- delete playPause.dataset.playing;
- video.pause()
- playPause.innerHTML = `<span class="material-symbols-outlined">play_arrow</span>`
- video.currentTime = 0
- })
- }
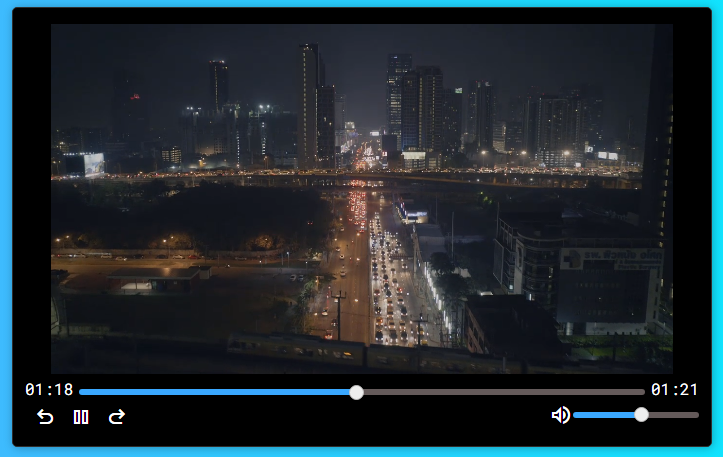
Snapshots
Here are some snapshots of the overall result of the web page scripts I have provided.
Page UI
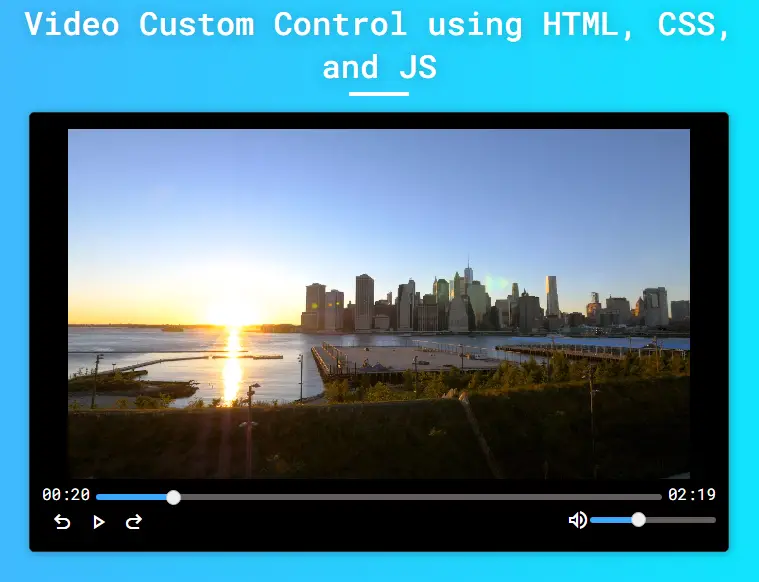
Video and Custom Control Block
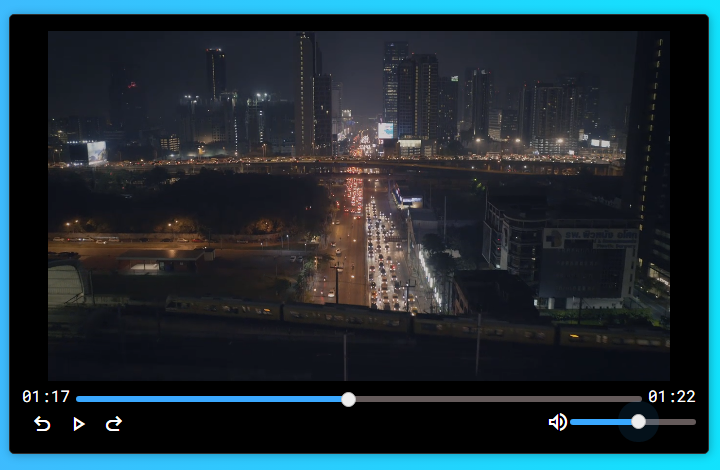
Custom Controls

Video Block when Playing
There you go! I have also provided the complete source code zip file of the web page scripts on this website and it is free to download. The download button is located below this tutorial's content. Feel free to download and modify the source code the way you desire.
DEMO VIDEO
That's it! I hope this Creating a Video Custom Controls using HTML, CSS, and JS Tutorial will help you with what you are looking for and you'll find this useful for your current and future web application projects.
Explore more on this website for more Tutorials and Free Source Codes.