Creating an Iterator for While Loop Forms in PHP/MySQLi
This tutorial will teach you how to create an iterator to use in while loops form to identify that a certain element of a form is associated with another element. In the case of this tutorial, we use an iterator to associate our text with the selected product's id.
Getting Started
In this tutorial, I am using XAMPP as my local web server to run PHP the php scripts. I used CDN's for the Bootstrap and jQuery which means internet connection is needed to run the source codes in this tutorial properly otherwise download the said libraries.
Creating our Database
The first step is to create our database.
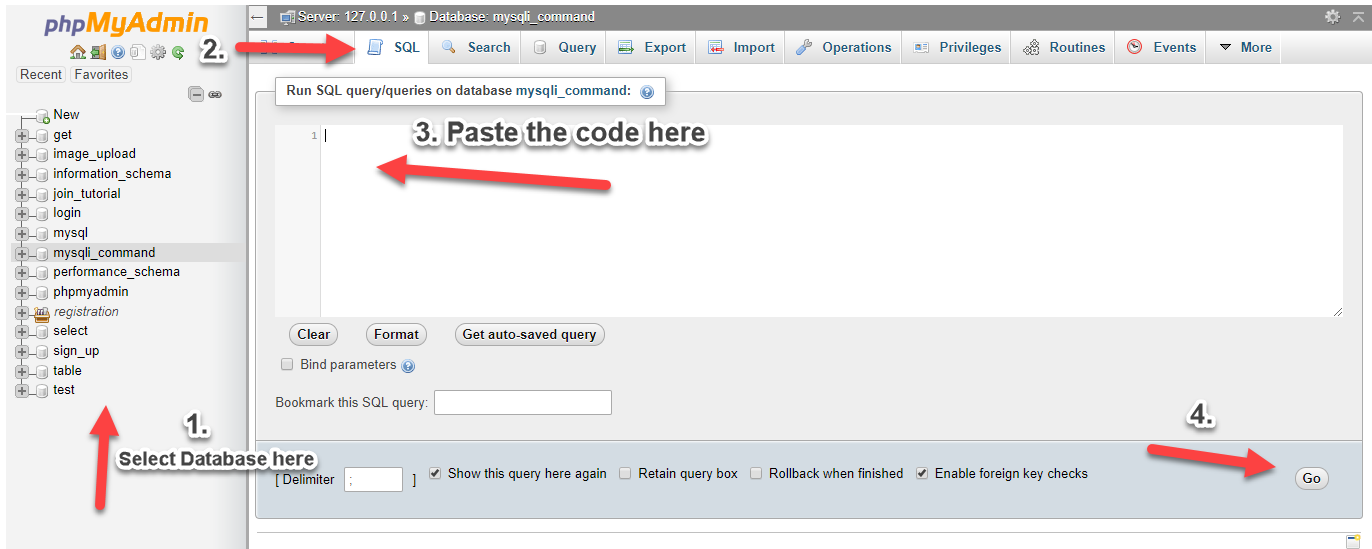
- Open the XAMPP's Control Panel and start
ApacheandMySQL. - Browse the
PHPMyAdminin a browser. i.e. http://localhost/phpmyadmin - Click the databases, create a new database and name it as
test. - After creating a database, click the
SQLandcopy/pastethe below codes. See the image below for detailed instructions.
- (4, 'Laptop', 699.99),
- (5, 'Desktop Pc', 999.99),
- (6, 'Tablet', 299.99);
Creating our Connection
Next, we create our connection to our database. This will serve as the bridge between our forms and database. We name this as conn.php.
- <?php
- if (!$conn) {
- }
- ?>
Creating the Interface
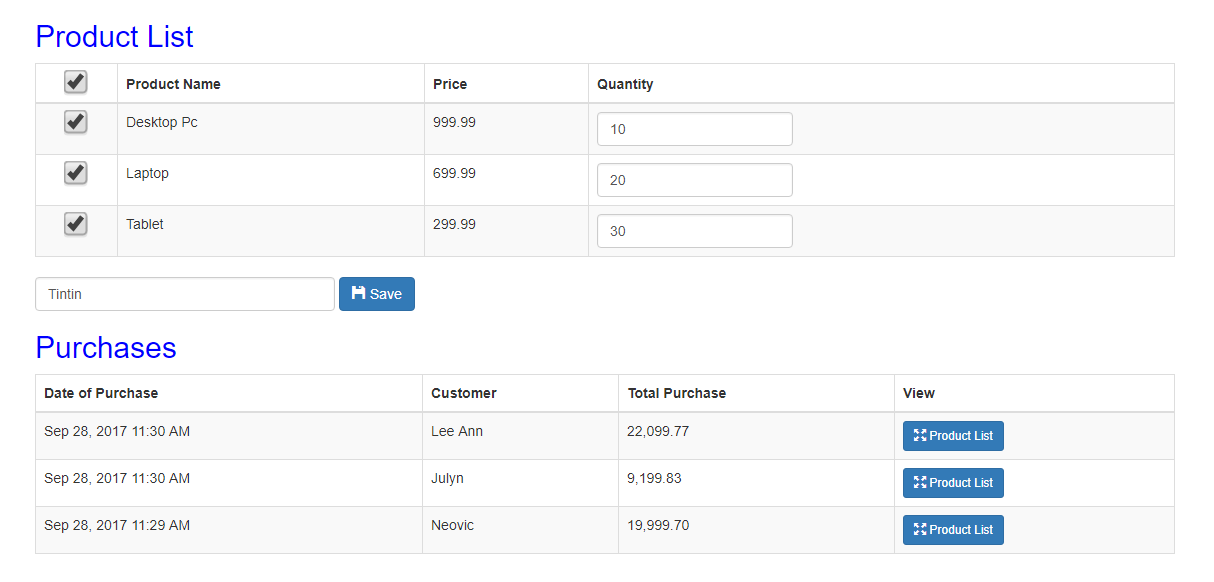
Next, we create a list of our products and our purchase table. We included our iterator in our purchase product form.
index.php
- <!DOCTYPE html>
- <html>
- <head>
- <title>Creating an Iterator for While Loop Forms in PHP/MySQLi</title>
- <script src="https://ajax.googleapis.com/ajax/libs/jquery/3.1.0/jquery.min.js"></script>
- <link rel="stylesheet" href="https://maxcdn.bootstrapcdn.com/bootstrap/3.3.6/css/bootstrap.min.css" />
- <script src="https://maxcdn.bootstrapcdn.com/bootstrap/3.3.7/js/bootstrap.min.js"></script>
- <style>
- input[type="checkbox"] {
- transform:scale(2, 2);
- }
- </style>
- </head>
- <body>
- <div class="container">
- <div class="row">
- <div class="col-lg-12">
- <h2 style="color:blue">Product List</h2>
- </div>
- </div>
- <div class="row">
- <div class="col-lg-12">
- <form method="POST" action="purchase.php" class="form-inline">
- <table width="100%" class="table table-striped table-bordered table-hover">
- <thead>
- <th style="text-align:center"><input type="checkbox" id="checkAll"></th>
- <th>Product Name</th>
- <th>Price</th>
- <th>Quantity</th>
- </thead>
- <tbody>
- <?php
- include('conn.php');
- //dis is our iterator
- $iterate=0;
- ?>
- <tr>
- <td align="center"><input type="checkbox" value="<?php echo $row['productid']; ?>||<?php echo $iterate; ?>" name="prodid[]"></td>
- <td><?php echo $row['product_name']; ?></td>
- <td><input type="number" name="quantity_<?php echo $iterate; ?>" value="0" class="form-control"></td>
- </tr>
- <?php
- $iterate++;
- }
- ?>
- </tbody>
- </table>
- <input type="text" name="cname" class="form-control" placeholder="Customer Name" style="width:300px;" required> <button type="submit" class="btn btn-primary"><span class="glyphicon glyphicon-floppy-disk"></span> Save</button>
- </form>
- </div>
- </div>
- <div class="row">
- <div class="col-lg-12">
- <h2 style="color:blue">Purchases</h2>
- </div>
- </div>
- <div class="row">
- <div class="col-lg-12">
- <table width="100%" class="table table-striped table-bordered table-hover">
- <thead>
- <th class="hidden"></th>
- <th>Date of Purchase</th>
- <th>Customer</th>
- <th>Total Purchase</th>
- <th>View</th>
- </thead>
- <tbody>
- <?php
- include('conn.php');
- ?>
- <tr>
- <td class="hidden"></td>
- <td><?php echo $row1['name']; ?></td>
- <td>
- <a href="#show<?php echo $row1['purchaseid']; ?>" data-toggle="modal" class="btn btn-primary btn-sm"><span class="glyphicon glyphicon-fullscreen"></span> Product List</a>
- <?php include('modal.php'); ?>
- </td>
- </tr>
- <?php
- }
- ?>
- </tbody>
- </table>
- </div>
- </div>
- </div>
- <script>
- $(document).ready(function(){
- $("#checkAll").change(function () {
- $("input:checkbox").prop('checked', $(this).prop("checked"));
- });
- });
- </script>
- </body>
- </html>
Creating the Save Script
This is our purchase code. It will insert the products selected to our purchase table.
purchase.php
- <?php
- include('conn.php');
- $customer=$_POST['cname'];
- $total=0;
- foreach($_POST['prodid'] as $product):
- $productid=$proinfo[0];
- $iterate=$proinfo[1];
- $subt= ($prow['price'] * $_POST['quantity_'.$iterate]);
- $total+=$subt;
- mysqli_query($conn,"INSERT into details (purchaseid, productid, quantity) values ('$purchase', '$productid', '".$_POST['quantity_'.$iterate]."')");
- }
- endforeach;
- }
- else{
- ?>
- <script>
- window.alert('Please select a product');
- window.location.href='index.php';
- </script>
- <?php
- }
- ?>
Lastly, we create our modal in showing the list of products in a purchase.
modal.php
- <!-- Product Purchase -->
- <div class="modal fade" id="show<?php echo $row1['purchaseid']; ?>" tabindex="-1" role="dialog" aria-labelledby="myModalLabel" aria-hidden="true">
- <div class="modal-dialog modal-lg">
- <div class="modal-content">
- <div class="modal-header">
- <button type="button" class="close" data-dismiss="modal" aria-hidden="true">×</button>
- <center><h4 class="modal-title" id="myModalLabel">List of Purchased Products</h4></center>
- </div>
- <div class="modal-body">
- <?php
- ?>
- <div class="container-fluid">
- <div class="row">
- <div class="col-lg-12">
- <span>Sold to: <?php echo $brow['name']; ?></span>
- </div>
- </div>
- <div class="row">
- <div class="col-lg-12">
- <table width="100%" class="table table-striped table-bordered table-hover">
- <thead>
- <tr>
- <th>Product Name</th>
- <th>Price</th>
- <th>Quantity</th>
- <th>Subtotal</th>
- </tr>
- </thead>
- <tbody>
- <?php
- $total=0;
- $s=mysqli_query($conn,"select * from details left join product on product.productid=details.productid where purchaseid='".$row1['purchaseid']."'");
- ?>
- <tr>
- <td><?php echo $srow['product_name']; ?></td>
- <td><?php echo $srow['quantity']; ?></td>
- <td>
- <?php
- $sub=$srow['price']*$srow['quantity'];
- $total+=$sub;
- ?>
- </td>
- </tr>
- <?php
- }
- ?>
- <tr>
- <td colspan="3" align="right"><strong>Grand Total</strong></td>
- </tr>
- </tbody>
- </table>
- </div>
- </div>
- </div>
- </div>
- <div class="modal-footer">
- <button type="button" class="btn btn-default" data-dismiss="modal"><span class="glyphicon glyphicon-remove"></span> Cancel</button>
- </div>
- </div>
- </div>
- </div>
- <!-- /.modal -->
Demo
And that ends this tutorial. I hope this will help you with what you are looking for and for your future PHP Projects. If you have questions or comments, feel free to express it below or message me.
Happy Coding :)Note: Due to the size or complexity of this submission, the author has submitted it as a .zip file to shorten your download time. After downloading it, you will need a program like Winzip to decompress it.
Virus note: All files are scanned once-a-day by SourceCodester.com for viruses, but new viruses come out every day, so no prevention program can catch 100% of them.
FOR YOUR OWN SAFETY, PLEASE:
1. Re-scan downloaded files using your personal virus checker before using it.
2. NEVER, EVER run compiled files (.exe's, .ocx's, .dll's etc.)--only run source code.