How to protect Your Business with A Geofenced Severe Weather Alert

As weather events continue to become more extreme, less predictable, and more widespread, it is absolutely critical to get advance warning in order to take action, protecting lives but also assets. With Los Angeles county being hit by a tornado recently, it is fair to say that being prepared for anything is no longer just for the risk averse. For a business, this is no different, and severe weather alerts can be the difference in team member safety, not to mention all the property, equipment, products, and other items that can be destroyed through severe weather.
For those businesses and organizations that rely on field sites, this is especially critical, though getting the right warnings in advance can just as easily benefit a company headquarters in the middle of a city. It’s true that there are already weather apps available, and even tutorials on how to DIY a simple weather application. However, when dealing with specific severe weather alerts, you need to get the right information: too little information about your location can cause you to be unprepared; too much information can desensitize you and cause you to miss an important alert. To solve this problem, you can fully customize exactly what you need: a location (field site, your home, a warehouse, etc.) that is geofenced and can be as big or as small as needed; the right type of alerts depending on your concern (floods, wind, winter storm, fire, etc.); and how these alerts should reach you.
To solve this problem, we will review step by step how to use a weather API data that can create a live alert system that provides you with the exact information you need. The process is extremely simple, and the benefits it can provide you and your business could be significant. With weather forecasting methods improving through the use of AI, along with better data collection from satellites and ground/air based sensors, setting up a severe weather alert is especially good because you can get the best predictions possible, and the alerts will automatically improve as the underlying system continues to evolve.
Setting Up Severe Weather Alerts Around A Geofence
This tutorial walks through the process of using Node.js to set up a geofence, select the specific alerts you would like, customize how those alerts are configured, and how the information will be sent to you. As a bonus, we will briefly look at a realistic field site situation where we are using edge devices.
Setup
To begin the process you must activate Node.js and set up the alert endpoint.

Acquire/Enter API Key
After the setup, you must input your API key, which for this example can be obtained by signing up to the platform and then accessing the provided key.

Select The Type of Alert Insight
For this step, you need to determine what “insight” you would like for your alert. If a single area of concern is enough, you can enter it here, or you can create multiple alerts (repeat this tutorial) for various insights. The list of insights includes Air, Fires, Wind, Winter, Thunderstorms, Floods, Temperature, Tropical, Marine, Fog, and Tornado. More info on the insights and how they are delivered can be found here.

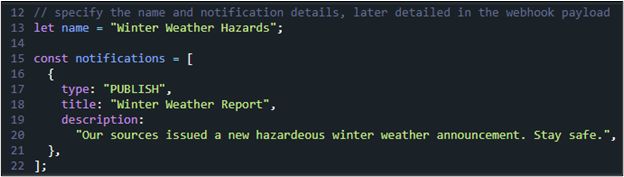
Customize The Details of The Alert
Once the alert is sent out from the National Weather Service, you can capture and publish it. This step allows you to clarify what the alert is and provide a description of what it means (in addition to the actual alert details). This can help provide directions or advice for a particular weather event. For example, in the case of a tornado the alert could remind the people located at the site where they need to go for safety.
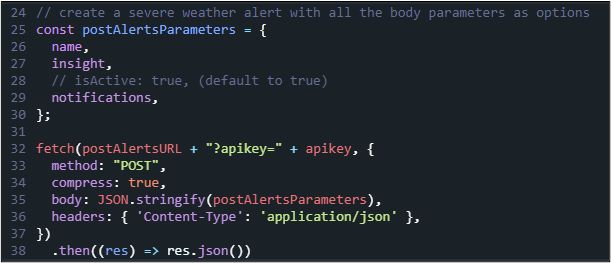
Create The Alert
This step is straightforward and ensures the alert is active.
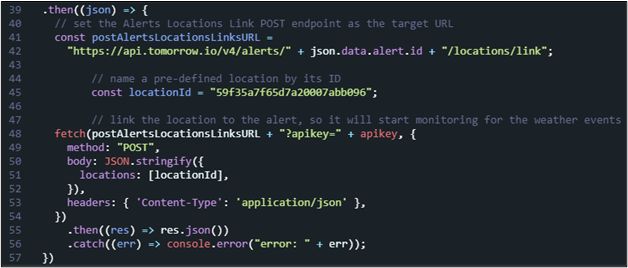
Tie The Alert to A Location
For this step, you create the actual geofence around your target. This can be done using any location type (more info on types here), including “Point,” “Polygon,” or “Polyline.”
Select The Alert Channel (Configure The Webhook URL)
For this step, there are many different ways to set up the webhook URL depending on where you want to send it and how you want it to work with the rest of your code. Here is a full tutorial on alert listeners, but it is important to have a clear idea of how you want the process to work. Where will you likely be when you get an alert? What type of cell or other services are available? Do you want the alert to go to a single person, multiple people, or a specific location? Should the alerts be sent as a simple SMS, an email, or be sent to a group through Slack? These questions should be answered and vetted by the team before you create the appropriate webhook.
BONUS OPTION: Send The Alert to An Edge Device GUI
Following the above steps will create the weather alert for your specified geofence location. However, in some cases it might be advantageous (especially if you are providing alerts for a field site or other remote location) to take the alert one step further. If someone is working with an edge device, it is not difficult to create a custom GUI that can provide an instant alert on screen, interrupting their work process and ensuring they receive the critical alert as quickly as possible. While this process is another tutorial itself (here), it is useful to see a practical use case for it here. Combining weather alerts with a GUI weather widget (in this case, for a Raspberry Pi) can create additional value for your company’s safety.
Final Thoughts
While following routine weather doesn’t have to include critical and disruptive alerts, it’s important to be able to create these types of intrusive alerts to provide exactly the right info you need to protect yourself, your team, and your assets. This tutorial walked through each step of the process, and showed that it is both possible and simple to use weather API data and Node.js to customize the alert, the geofence, and the delivery.