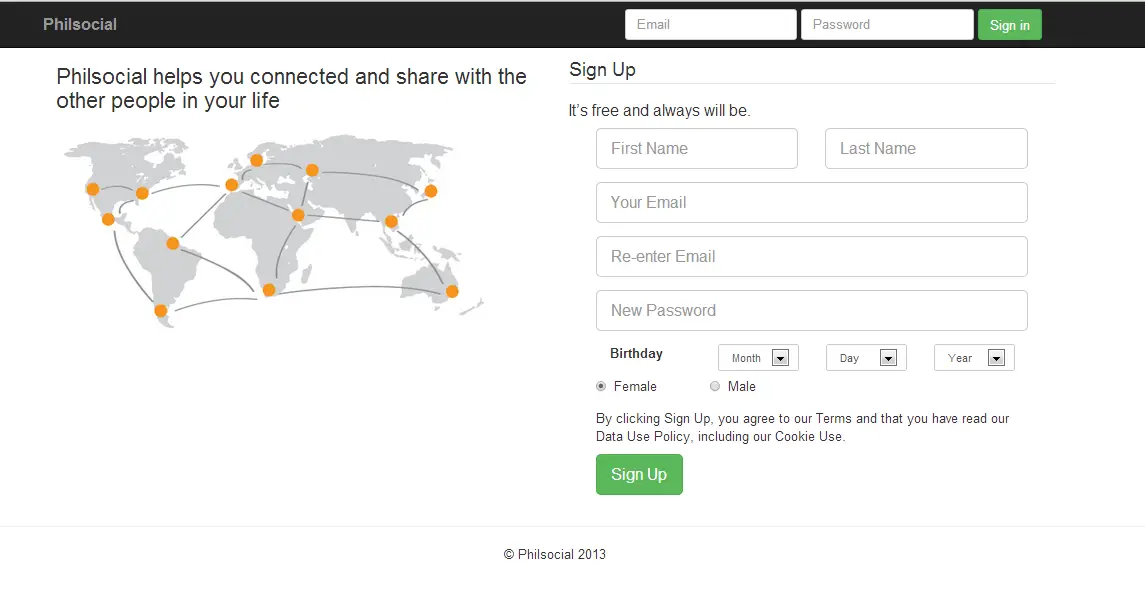
Creating a Registration Page Part I

In this tutorial, I will show you how create our Registration Page using Bootstrap framework. The Registration form together with the Login form will welcome you when you access the site. And it will require the new member to register on the site, so that they can login and to have access to the site. First, create a PHP file named “index.php”, save it inside “philsocial” folder. And this PHP file is composed of different parts. For the first part, add the following code: This part of the code, will handle the declaration of your HTML document before the tag. And it is an instruction to the web browser about the version of the written HTML page. Next is, we specify the language code, then we defines what character coding is used in the page and so on. And for the head portion of the page wherein we set our desired company title, and specify the Customize template to be used.
  1. <html lang="en">
  2. <head>
  3. <meta charset="utf-8">
  4. <meta content="width=device-width, initial-scale=1.0" name="viewport">
  5. <meta content="" name="description">
  6. <meta content="" name="author">
  7. <link href="#" rel="shortcut icon">
  8.  
  9. <title>Philsocial</title><!-- Bootstrap core CSS -->
  10. <link href="css/bootstrap.css" rel="stylesheet"><!-- Custom styles for this template -->
  11. <link href="jumbotron.css" rel="stylesheet">
  12.  
  13. </head>
Next in the second part, add the following code: This code will serve later as our menu bar and as of the moment we only display here the company name. And this part also we set our login form. And we will go back here later when we are dealing with login logout system.
  1. <body>
  2. <div class="navbar navbar-inverse navbar-fixed-top">
  3. <div class="container">
  4. <div class="navbar-header">
  5. <button class="navbar-toggle" data-target=".navbar-collapse" data-toggle="collapse" type=
  6. "button"><span class="icon-bar"></span> <span class="icon-bar"></span> <span class=
  7. "icon-bar"></span></button> <a class="navbar-brand" href="#" style=
  8. "font-weight: bold">Philsocial</a>
  9. </div>
  10.  
  11. <div class="navbar-collapse collapse">
  12. <form action="home.php" class="navbar-form navbar-right" method="post">
  13. <div class="form-group">
  14. <input class="form-control" placeholder="Email" type="text">
  15. </div>
  16.  
  17. <div class="form-group">
  18. <input class="form-control" placeholder="Password" type="password">
  19. </div>
  20. <div class="form-group">
  21. <button class="btn btn-success" name="login" type="submit">Sign in</button>
  22. </div>
  23. </form>
  24. </div><!--/.navbar-collapse -->
  25. </div>
  26. </div><!-- Main jumbotron for a primary marketing message or call to action -->
Then for the third part will focus on the Registration Form add the following code:
  1. <div class="container">
  2. <div class="rows">
  3. <div class="col-xs-6">
  4. <h3>Philsocial helps you connected and share with the other people in your
  5. life</h3><img src="img/background.png" width="500px"></div>
  6.  
  7. <div class="col-xs-6">
  8. <form action="#" class="form-horizontal" id="register" method=
  9. "post" name="register" ">
  10. <fieldset>
  11. <legend>Sign Up</legend>
  12.  
  13. <h4>It’s free and always will be.</h4>
  14.  
  15. <div class="rows">
  16. <div class="col-xs-12">
  17. <div class="form-group">
  18. <div class="rows">
  19. <div class="col-md-12">
  20. <div class="col-lg-6">
  21. <input class="form-control input-lg" id="fName" name="fName" placeholder=
  22. "First Name" type="text">
  23. </div>
  24.  
  25. <div class="col-lg-6">
  26. <input class="form-control input-lg" id="lName" name="lName" placeholder=
  27. "Last Name" type="text">
  28. </div>
  29. </div>
  30. </div>
  31. </div>
  32.  
  33. <div class="form-group">
  34. <div class="rows">
  35. <div class="col-md-12">
  36. <div class="col-lg-12">
  37. <input class="form-control input-lg" id="email" name="email"
  38. placeholder="Your Email" type="text">
  39. </div>
  40. </div>
  41. </div>
  42. </div>
  43.  
  44. <div class="form-group">
  45. <div class="rows">
  46. <div class="col-md-12">
  47. <div class="col-lg-12">
  48. <input class="form-control input-lg" id="reemail" name="reemail"
  49. placeholder="Re-enter Email" type="text">
  50. </div>
  51. </div>
  52. </div>
  53. </div>
  54.  
  55. <div class="form-group">
  56. <div class="rows">
  57. <div class="col-md-12">
  58. <div class="col-lg-12">
  59. <input class="form-control input-lg" id="password" name="password"
  60. placeholder="New Password" type="password">
  61. </div>
  62. </div>
  63. </div>
  64. </div>
  65.  
  66. <div class="form-inline">
  67. <div class="rows">
  68. <div class="col-md-12">
  69. <div class="col-md-3">
  70. <label>Birthday</label>
  71. </div>
  72.  
  73. <div class="col-lg-3">
  74. <select class="form-control input-sm" name="month">
  75.  
  76. <option>Month</option>
  77. <?php
  78. $m = array("Jan","Feb","Mar","Apr","May","Jun","Jul","Aug","Sep","Oct","Nov","Dec");
  79. foreach ($m as $month) {
  80. echo '<option value='.$month.'>'.$month.'</option>';
  81. }
  82. ?>
  83. </select>
  84. </div>
  85.  
  86. <div class="col-lg-3">
  87. <select class="form-control input-sm" name="day" title="Day">
  88.  
  89. <option>Day</option>
  90. <?php
  91. $d = range(31, 1);
  92. foreach ($d as $day) {
  93. echo '<option value='.$day.'>'.$day.'</option>';
  94. }
  95.  
  96. ?>
  97. </select>
  98. </div>
  99.  
  100. <div class="col-lg-3">
  101.  
  102. <option>Year</option>
  103. <?php
  104. $years = range(2010, 1900);
  105. foreach ($years as $yr) {
  106. echo '<option value='.$yr.'>'.$yr.'</option>';
  107. }
  108.  
  109. ?>
  110. </select>
  111. </div>
  112. </div>
  113. </div>
  114. </div>
  115.  
  116. <div class="form-group">
  117. <div class="rows">
  118. <div class="col-md-12" style="text-align: left">
  119.  
  120. <div class="col-lg-3">
  121. <div class="radio">
  122. <label><input checked id="optionsRadios1" name="optionsRadios" type=
  123. "radio" value="Female">Female</label>
  124. </div>
  125. </div>
  126. <div class="col-lg-3">
  127.  
  128. <div class="radio">
  129. <label><input id="optionsRadios2" name="optionsRadios" type="radio"
  130. value="Male"> Male</label>
  131. </div>
  132. </div>
  133. </div>
  134. </div>
  135. </div>
  136. <div class="form-inline">
  137. <div class="rows">
  138. <div class="col-md-12">
  139. <p> By clicking Sign Up, you agree to our Terms and that you have
  140. read our Data Use Policy, including our Cookie Use.</p>
  141. </div>
  142. </div>
  143. </div>
  144. <div class="form-group">
  145. <div class="rows">
  146. <div class="col-md-8">
  147. <div class="col-lg-12">
  148. <button class="btn btn-success btn-lg" type="submit">Sign Up</button>
  149. </div>
  150. </div>
  151. </div>
  152. </div>
  153. </div>
  154. </div>
  155. </fieldset>
  156. </form>
  157. </div>
  158. </div><!--rows-->
  159. </div><!--container-->
And for the last part, the footer and some javascripts link for loading the pages faster. Then add the following code:
  1. <hr>
  2. <footer>
  3. <p style="text-align: center">© Philsocial 2013</p>
  4. </footer><!-- /container -->
  5. <!-- Bootstrap core JavaScript
  6. ================================================== -->
  7. <!-- Placed at the end of the document so the pages load faster -->
  8. <script src="assets/js/jquery.js"></script>
  9. <script src="js/bootstrap.min.js"></script>
  10. </body>
  11. </html>
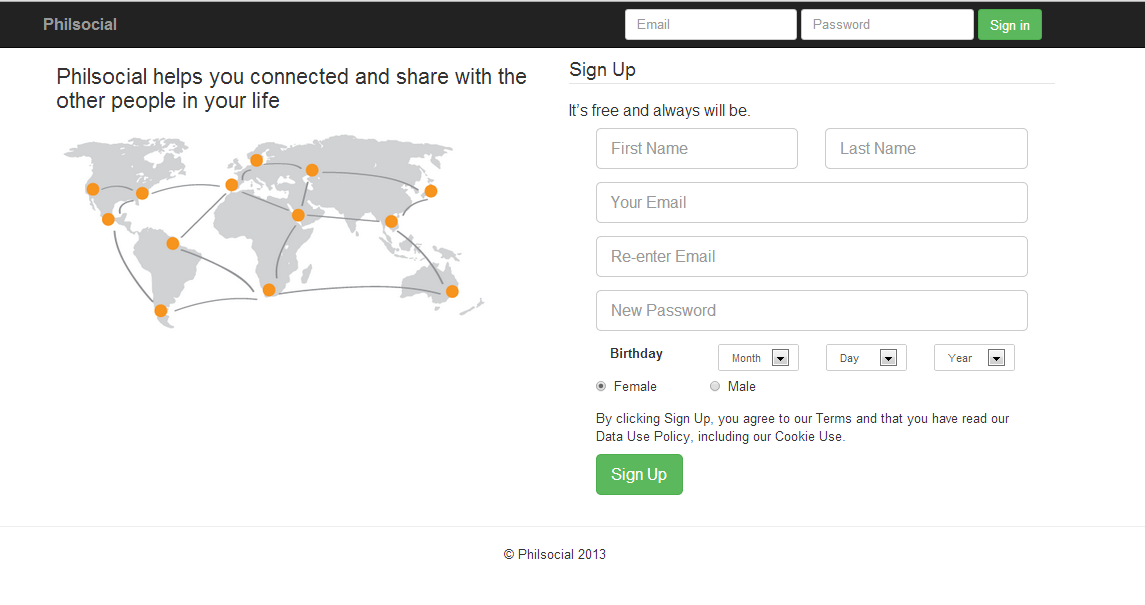
After completing, it looks like as shown below: registration_page And here’s the different classes used in this tutorial:
  1. class="navbar navbar-inverse navbar-fixed-top"
  2. class="container"
  3. class="navbar-header"
  4. class="navbar-toggle"
  5. class="navbar-collapse collapse"
  6. class="navbar-form navbar-right"
  7. class="form-group"
  8. class="form-control"
  9. class="rows"
  10. class="col-xs-6"
  11. class="form-horizontal"
  12. class="form-control input-lg"
  13. class="form-inline"
  14. class="form-control input-sm"
  15. class="radio"
If you want to see more of my works, new Source Code or Application and Tutorials Just click here.

Add new comment