Part IV: Completing the modules for Generating Autonumber using PHP/MySQL
Submitted by GeePee on Sunday, April 12, 2015 - 23:37.
This tutorial is a continuation of our previous topic called “Part III: Generating Autonumber using PHP/MySQL”. At this time, we’re going to continue our lesson focusing on updating and deleting of autonumber.
Let's create a new file and name it as “eautonum.php” and add the following code:
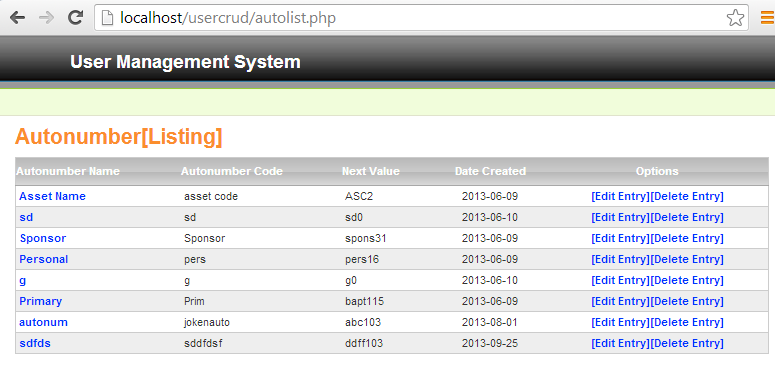
This will perform if the “Edit Entry” on the autolist.php is clicked then it will get the “id” of specified autonumber and pass it into the URL during the POST method. Then when the “eatunum.php” is loaded, it will display the specific autonumber selected by the user into the textboxes provided.
After this, we need to create another php file named “pAutonum.php”. And add the following code:
This code will process the POST data submitted from “eautnum.php” to finally update the selected autonumber. Then if successfully updated the it will be redirected to “autolist.php” and then you see the newly updated autonumber.
And lastly we will create create a another file named “delAutonum.php” and add the following code:
This code will simply delete the selected autonumber by the user.
And we’re done here folks, you can try now your application.
- <?php
- /**
- * Description: Edit Autonumber.
- * Author: Joken E. Villanueva
- * Date Created: May 24,2013
- * Date Modified:June 6, 2013
- */
- require_once("includes/initialize.php");
- include_layout_template_admin('admin_header.php');
- ?>
- <div id="menubar">
- </script>
- <?php
- include("menus.php");
- ?>
- </div>
- <div id="module-name">Autonumber[Edit Entry]
- </div>
- <?php
- $id = $_GET['id'];
- $mydb->setQuery("Select * from autonumber where auto_id=" . $id);
- $res = $mydb->loadSingleResult();
- /* $auto = new autonumbers();
- $cur = $auto->listOfautonumber();
- $rec = $user->singleUser($id); */
- ?>
- <div id="content">
- <form method="post" action="pAutonum.php">
- <table class="app_listing">
- <tr>
- <th > <div class="app_title" align="left"> Autonumber Details</div></th>
- </tr>
- <tr class="form">
- <td class="form">
- <table class="app_form">
- <tr>
- <td class="label" width="120">Autonumber Code :: </td>
- <td class="input">
- <input type="text" name="autocode" id="autocode" class="txtbox" value="<?php
- echo $res->autocode;
- ?>"/>
- </td>
- </tr>
- <tr>
- <td class="label">Autonumber Name :: </td>
- <td class="input">
- <input type="text" name="autoname" id="autoname" class="txtbox" value="<?php
- echo $res->autoname;
- ?>"/>
- </td>
- </tr>
- <tr>
- <td class="label">Append Character :: </td>
- <td class="input">
- <input type="text" name="appenchar" id="appenchar" class="txtbox" value="<?php
- echo $res->appenchar;
- ?>"/>
- </td>
- </tr>
- <tr>
- <td class="label">Autonumber Start :: </td>
- <td class="input">
- <input type="text" name="autostart" id="autostart" class="txtbox" value="<?php
- echo $res->autostart;
- ?>" />
- </td>
- </tr>
- <tr>
- <td class="label">Autonumber End :: </td>
- <td class="input">
- <input type="text" name="autoend" id="autoend" class="txtbox" value="<?php
- echo $res->autoend;
- ?>"/>
- </td>
- </tr>
- <tr>
- <td class="label">Increment Value :: </td>
- <td class="input">
- <input type="text" name="incval" id="incval" class="txtbox" value="<?php
- echo $res->incval;
- ?>"/>
- <input type="hidden" name="datecreated" id="datecreated" class="txtbox" value="<?php
- ?>"/>
- <input type="hidden" name="id" id="id" class="txtbox" value="<?php
- echo $id;
- ?>"/>
- </td>
- </tr>
- <tr>
- <td></td>
- <td>
- <input type="submit" name="submit" value="Save" class="app_button">
- </td>
- </tr>
- </table>
- </tr>
- </table>
- </form>
- <?php
- require_once("includes/initialize.php");
- include_layout_template_public('header.php');
- ?>
- <div id="menubar">
- </div>
- <div id="module-name">Edit User
- </div>
- <?php
- $id = $_POST['id'];
- $autocode = $_POST['autocode'];
- $autoname = $_POST['autoname'];
- $appenchar = $_POST['appenchar'];
- $autostart = $_POST['autostart'];
- $autoend = $_POST['autoend'];
- $incval = $_POST['incval'];
- $datecreated = $_POST['datecreated'];
- $auto = new autonumbers();
- $auto->auto_id = $id;
- $auto->autocode = $autocode;
- $auto->autoname = $autoname;
- $auto->appenchar = $appenchar;
- $auto->autostart = $autostart;
- $auto->autoend = $autoend;
- $auto->incval = $incval;
- $auto->datecreated = $datecreated;
- $auto->update($id);
- ?>
- <script type="text/javascript">
- alert("Autonumber successfully updated!");
- window.location = "autolist.php";
- </script>
- <?php
- /**
- * Description: Delete Autonumber.
- * Author: Joken E. Villanueva
- * Date Created: May 24,2013
- * Date Modified:June 6, 2013
- */
- require_once("includes/initialize.php");
- include_layout_template_public('header.php');
- ?>
- <div id="menubar">
- </div>
- <div id="module-name">Autonumber[Delete Entry]
- </div>
- <div id="content">
- <?php
- $id = $_GET['id'];
- $rec = new autonumbers();
- $rec->delete($id);
- ?>
- <script type="text/javascript">
- alert("Autonumber has successfully deleted!");
- window.location = "autolist.php";
- </script>