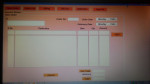
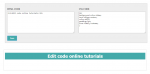
Part II: Updating and Deleting of MySQL data using an OOP approach in PHP

Submitted by GeePee on
This tutorial is a continuation of our previous tutorial called Part I Creating and Reading of MySQL Data using an OOP approach in PHP. Be sure to read it before continuing this tutorial. All we need is add three PHP files called edit_user.php, process_edit_user.php and deleteuser.php. Create a file called edit_user.php. and add the following code: The main purpose of this code is used to display the selected data from “index.php”.

Part I: Creating and Reading of MySQL Data Using OOP Approach in PHP

Submitted by GeePee on
This tutorial I will show you on how to perform Object Oriented Programming using PHP and how easy to manage our source code and deal with objects and update the code easily. Before we move on to writing object-oriented code in PHP, it is important to understand the basic concept of classes, objects, properties, and methods. A Class is like a blueprint of a car. It defines how car created from the blueprint will look and behave, but it still an abstract concept. An Object is like a real car created from the blueprint.

PHP Operational Trail

Submitted by GeePee on
In this lesson we will tackle about the operation of the server to process PHP code. I will show the diagram first then I’l explain after. operational_trail This has actually happened when you ask for the URL (Uniform Resource Locator) in your browser before you get back your HTML return back to you. So we have our browser and the web server and its called apache.

Clipboard

Submitted by ainaerik on
Clipboard in java. Try this project and you will enjoy learning using this programming language. The following are the steps to run this program: 1- Extract clipboard.zip 2- Open Eclipse IDE 3- click file menu and Import 4- general/existing projects into workspace/next 5- check, select root directory and click browse 6- locate the project folder then click ok/finish If you find my code useful

Splashscreen

Submitted by ainaerik on
Splashscreen in java. This is usually used as a start up of any system. It looks like a introduction of a system or maybe showing that the system is loading and is starting. The following are the steps to run this program: 1- Extract SplashScreen.zip 2- Open Eclipse IDE 3- click file menu and Import 4- general/existing projects into workspace/next 5- check, select root directory and click browse 6

Notepad

Submitted by ainaerik on
Notepad in java. Just like the other features of notepad, the user can save and edit text files. The following are the steps to run this program: 1- Extract Notepad.zip 2- Open Eclipse IDE 3- click file menu and Import 4- general/existing projects into workspace/next 5- check, select root directory and click browse 6- locate the project folder then click ok/finish If you find my code useful, send

Reverse a string

Submitted by ainaerik on
This tutorial will teach you how to reverse a string in java . The following are the steps to run this program: 1- Extract reverseString.zip 2- Open Eclipse IDE 3- click file menu and Import 4- general/existing projects into workspace/next 5- check, select root directory and click browse 6- locate the project folder then click ok/finish If you find my code useful, send me an email at: ainaerik@

Hashing and Salting

Submitted by ainaerik on
This tutorial will teach you how to secure password with md5 and sha1 in java . The following are the steps to run this program: 1- Extract Hashing.zip 2- Open Eclipse IDE 3- click file menu and Import 4- general/existing projects into workspace/next 5- check, select root directory and click browse 6- locate the project folder then click ok/finish If you find my code useful, send me an email at

Displaying Digital and Analog Clock in VB.NET

Submitted by donbermoy on
Today, I will teach you how to create and display the digital and analog time. Now, let's start this tutorial! 1. Let's start with creating a Windows Form Application for this tutorial by following the following steps in Microsoft Visual Studio: Go to File, click New Project, and choose Windows Application. 2. Next, add two radioButtons named rbDigital and rbanalog. Insert also a timer named Timer1, add a label named Label2, and a webbrowser named WebBrowser1.