Introduction
This tutorial is about creating simple calculator which performs only four operations.
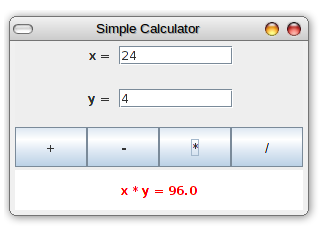
For creating a simple Calculator we require two JTextFields where the user can enter two numbers, four JButton for four operations namely addition, subtraction,multiplication and division, a JLabel for displaying the result.
Implementation
Step 1:
Creating a class which extends JFrame because we are going to create an Application.
After this we have to define the constructor of the class as follows.
Super() is used to give title to the frame. SetBackground() method is used to change the background color of the frame.
super("Simple Calculator");
setBackground
(Color.
GRAY);
xInput and yInput are the text fields where user can enter two numbers. Initial value in the text field is 0 and size is 10.
Next we create separate labels for displaying “x=” and “y=” and add these labels to separate panels as follows.
xPanel.
add( new JLabel(" x = ")); xPanel.add(xInput);
Similarly we have to create yPanel and add labels and text fields to it.
Step 3: Creating buttons for different Operators
We will create a button panel in which we will add four buttons for four operators: +, -, *,/. These four buttons are added to the panel using Grid Layout with one row and four columns so that all the buttons are of same size.
Once a user clicks on these button suitable action is performed, for those events we require adding ActionListener to those buttons.
JPanel buttonPanel
= new Jpanel
(); //panel for the four buttons buttonPanel.
setLayout(new GridLayout(1,
4)); // panel has 1 row and four columns.JButton plus
= new Jbutton
("+"); // Button with “+” text on it plus.addActionListener(this); // ActionListener is present in the same class.
buttonPanel.add(plus);
Similarly other buttons can be created and added to the buttonPanel.
Step 4: Adding all the panels to the frame
Next we create label for displaying the result and add the label and previously created panels to the frame.
answer
= new JLabel("x + y = 0", Jlabel.
CENTER); // text on label will align in the center of the label.answer.
setForeground(Color.
red); //sets foreground coloranswer.
setBackground(Color.
white); //sets background coloranswer.setOpaque(true); // make sure background color is visible
Finally set up the layout for the frame, using a GridLayout having 4 rows, 1 column , 3 pixel vertical gaps between rows , also 3 pixel horizontal gap between the columns. Then add all the components that have been created.
add(xPanel);
add(yPanel);
add(buttonPanel);
add(answer);
This method is called when a user clicks on any of the four buttons. When the user clicks on the button, text from two text fields is stored into variables and depending on which button is clicked, the result is calculated and displayed on the answer label.
double x, y; // The numbers from the input boxes.
/*The try...catch
statement will check for errors in the String. If
the string is not a legal number, the error message
"Illegal data for x." is put into the answer and
the actionPerformed() method ends. */
try {
String xStr
= xInput.
getText(); // get the content of the field as String x
= Double.
parseDouble(xStr
); // convert String data type to double }
// The string xStr is not a legal number.
answer.setText("Illegal data for x.");
xInput.requestFocus();
return;
}
Similarly text from other field is obtained and stored into y variable.
Next, perform the operation based on the action command from the button. Note that division by zero produces an error message.
String op
= evt.
getActionCommand(); //let you know which button was clicked. if (op.equals("+")) //calculates the result and display on answer label.
answer.setText( "x + y = " + (x+y) );
else if (op.equals("-"))
answer.setText( "x - y = " + (x-y) );
else if (op.equals("*"))
answer.setText( "x * y = " + (x*y) );
else if (op.equals("/")) {
if (y == 0) //displays the results only if divider is not zero
answer.setText("Can't divide by zero!");
else
answer.setText( "x / y = " + (x/y) );
}
public static void main
(String[] args
) { SimpleCalc calc = new SimpleCalc(); //creates the object
calc.setLocation(100,100);
calc.setSize(300,200);
calc.setResizable(false);
calc.
setDefaultCloseOperation( JFrame.
EXIT_ON_CLOSE ); //close the application when close button of the frame is clicked. calc.setVisible(true);
}