PHP - Send Data To SQLite Using AngularJS

In this tutorial we will create a Send Data To SQLite Using AngularJS. PHP is a server-side scripting language designed primarily for web development. SQLite provides an interface for accessing the database. It includes class interfaces to the SQL commands. And also it allows you to create SQL functions and aggregate using PHP. So Let's do the coding...

Getting started:

First you have to download & install XAMPP or any local server that run PHP scripts. Here's the link for XAMPP server https://www.apachefriends.org/index.html. And this is the link for the jquery that i used in this tutorial https://jquery.com/. Lastly, this is the link for the bootstrap that i used for the layout design https://getbootstrap.com/. Additionally, you will need to download the AngularJS here's the link https://angularjs.org/. Installing SQLite Browser We will now then install the SQLite data viewer, here's the link for the DB Browser for SQLite http://sqlitebrowser.org/.

Setting Up SQLite

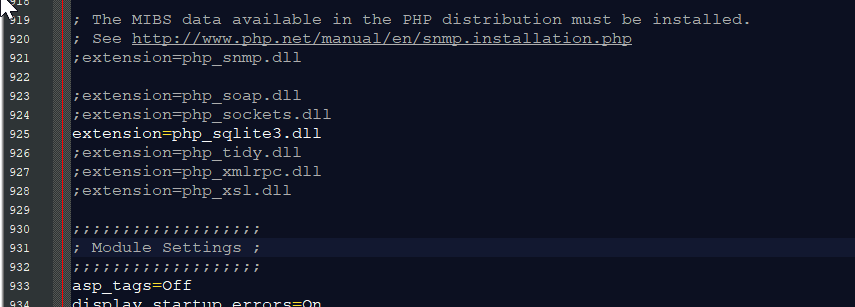
First, we are going to enable SQLite 3 in our PHP. 1. Open localhost server folder XAMPP, etc and locate php.ini. 2. Open php.ini and enable sqlite3 by removing the semicolon in the line. tut1 3. Save changes and Restart Server.

Creating the database connection

Open your any kind of text editor(notepad++, etc..). Then just copy/paste the code below then name it conn.php.
  1. <?php
  2.  
  3. $conn = new SQLite3('db/db_member.db');
  4.  
  5. $query = "CREATE TABLE IF NOT EXISTS member (mem_id INTEGER PRIMARY KEY AUTOINCREMENT NOT NULL, firstname VARCHAR, lastname VARCHAR, gender VARCHAR, age VARCHAR)";
  6.  
  7. $conn->exec($query);
  8.  
  9. ?>

Creating The Interface

This is where we will create a simple form for our application. To create the forms simply copy and write it into you text editor, then save it as index.php.
  1. <!DOCTYPE html>
  2. <html lang="en" ng-app="myModule">
  3. <head>
  4. <meta charset="UTF-8" name="viewport" content="width=device-width, initial-scale=1"/>
  5. <link rel="stylesheet" type="text/css" href="css/bootstrap.css"/>
  6. </head>
  7. <body ng-controller="myController">
  8. <nav class="navbar navbar-default">
  9. <div class="container-fluid">
  10. <a class="navbar-brand" href="https://sourcecodester.com">Sourcecodester</a>
  11. </div>
  12. </nav>
  13. <div class="col-md-3"></div>
  14. <div class="col-md-6 well">
  15. <h3 class="text-primary">PHP - Send Data To SQLite Using Angular</h3>
  16. <hr style="border-top:1px dotted;"/>
  17. <button class="btn btn-success" data-toggle="modal" data-target="#form_modal"><span class="glyphicon glyphicon-plus"></span> Add member</button>
  18. <br /><br />
  19. <table class="table table-bordered">
  20. <thead class="alert-info">
  21. <tr>
  22. <th>Firstname</th>
  23. <th>Lastname</th>
  24. <th>Gender</th>
  25. <th>Age</th>
  26. </tr>
  27. </thead>
  28. <tbody style="background-color:#fff;">
  29. <tr ng-repeat="member in members | orderBy: 'lastname'">
  30. <td>{{member.firstname}}</td>
  31. <td>{{member.lastname}}</td>
  32. <td>{{member.gender}}</td>
  33. <td>{{member.age}}</td>
  34. </tr>
  35. </tbody>
  36. </table>
  37. </div>
  38. <div class="modal fade" id="form_modal" aria-hidden="true">
  39. <div class="modal-dialog">
  40. <div class="modal-content">
  41. <form>
  42. <div class="modal-header">
  43. <h3 class="modal-title">Add Member</h3>
  44. </div>
  45. <div class="modal-body">
  46. <div class="col-md-2"></div>
  47. <div class="col-md-8">
  48. <div class="form-group">
  49. <label>Firstname</label>
  50. <input type="text" ng-model = "firstname" class="form-control"/>
  51. </div>
  52. <div class="form-group">
  53. <label>Lastname</label>
  54. <input type="text" ng-model = "lastname" class="form-control"/>
  55. </div>
  56. <div class="form-group">
  57. <label>Gender</label>
  58. <select class="form-control" ng-model = "gender">
  59. <option value="">--Please select an option--</option>
  60. <option value="Male">Male</option>
  61. <option value="Female">Female</option>
  62. </select>
  63. </div>
  64. <div class="form-group">
  65. <label>Age</label>
  66. <input type="number" min="0" max="200" ng-model = "age" class="form-control"/>
  67. </div>
  68. </div>
  69. </div>
  70. <div style="clear:both;"></div>
  71. <div class="modal-footer">
  72. <button class="btn btn-primary" type="button" ng-click = "saveData()" ><span class="glyphicon glyphicon-save"></span> Save</button>
  73. <button class="btn btn-danger" id="close" type="button" data-dismiss="modal"><span class="glyphicon glyphicon-remove"></span> Close</button>
  74. </div>
  75. </div>
  76. </form>
  77. </div>
  78. </div>
  79. </div>
  80. <script src="js/angular.js"></script>
  81. <script src="js/jquery-3.2.1.min.js"></script>
  82. <script src="js/bootstrap.js"></script>
  83. <script src="js/script.js"></script>
  84. </body>
  85. </html>

Creating the PHP Query

This code contains the php query of the application. This code will store the data inputs to the database and display the data in the page after storing. To do this just copy and write these block of codes inside the text editor and save it as shown below. save.php
  1. <?php
  2. require_once 'conn.php';
  3.  
  4. $data = json_decode(file_get_contents("php://input"));
  5.  
  6. $firstname = $data->firstname;
  7. $lastname = $data->lastname;
  8. $age = $data->age;
  9. $gender = $data->gender;
  10.  
  11. $conn->exec("INSERT INTO `member` (firstname, lastname, age, gender) VALUES('$firstname', '$lastname', '$age', '$gender')");
  12. ?>
data.php
  1. <?php
  2. require_once 'conn.php';
  3. $data = array();
  4. $query = $conn->query('SELECT * FROM `member`');
  5. while($fetch = $query->fetchArray()){
  6. $data[] = $fetch;
  7. }
  8.  
  9. echo json_encode($data);
  10. ?>

Creating the Main Function

This code contains the main function of the application. This code will sent a POST request to the SQLite database using the angular directives. To do this just copy and write these block of codes as shown below inside the text editor and save it as script.js inside the js folder.
  1. var app = angular.module("myModule", [])
  2. .controller("myController", function($scope, $http, $timeout){
  3. $http.get('data.php').then(function(response){
  4. $scope.members = response.data;
  5. });
  6.  
  7. $scope.saveData = function(){
  8. if($scope.firstname == null || $scope.lastname == null || $scope.gender == null || $scope.age == null){
  9. alert("Please complete the required field");
  10. }else{
  11. $http.post("save.php", {firstname: $scope.firstname, lastname: $scope.lastname, age: $scope.age, gender: $scope.gender})
  12. .then(function(){
  13. $scope.firstname = "";
  14. $scope.lastname = "";
  15. $scope.age = "";
  16. $scope.gender = "";
  17. $scope.getData();
  18. $(document).ready(function(){
  19. $("#form_modal #close").click();
  20. });
  21.  
  22. });
  23. }
  24.  
  25. }
  26.  
  27. $scope.getData = function(){
  28. $http.get('data.php').then(function(response){
  29. $scope.members = response.data;
  30. });
  31. }
  32. });
There you have it we successfully created a Send Data To SQLite Using AngularJS. I hope that this simple tutorial help you to what you are looking for. For more updates and tutorials just kindly visit this site. Enjoy Coding!!

Add new comment