How to create a Sign up Page Using Twitter Bootstrap
Submitted by GeePee on Monday, April 20, 2015 - 23:59.

In this tutorial, I'm going to show you how to create a Sign up page using the twitter bootstrap framework. Using bootstrap framework, it has a ready made piece of code and you can save time because it easy to use, fast and better.
If you don’t have this framework yet, you can download it here.
After downloading, create a new folder and name it as “signup”. Then save this to our local server. Then extract the downloaded file and copy the three folders namely css, fonts and js.
Here’s the folder structure:
signup/
├── css/
│ ├── bootstrap.css
│ ├── bootstrap.min.css
│ ├── bootstrap-theme.css
│ ├── bootstrap-theme.min.css
├── js/
│ ├── bootstrap.js
│ ├── bootstrap.min.js
└── fonts/
├── glyphicons-halflings-regular.eot
├── glyphicons-halflings-regular.svg
├── glyphicons-halflings-regular.ttf
└── glyphicons-halflings-regular.woff
This time, let’s create a new PHP file and save it as “signup.php”. And add the following code.
Next, inside the Month Selectbox. Add the following code:
This code added, we create an array containing a range of months. Then on the next line, we use foreach loop to iterate and get all the values from the array and we also use it to populate the selectbox.
And for Days. Add the following code:
For days, we only use the range of the array from 1 to 31.
Next, for year. Add the following code:
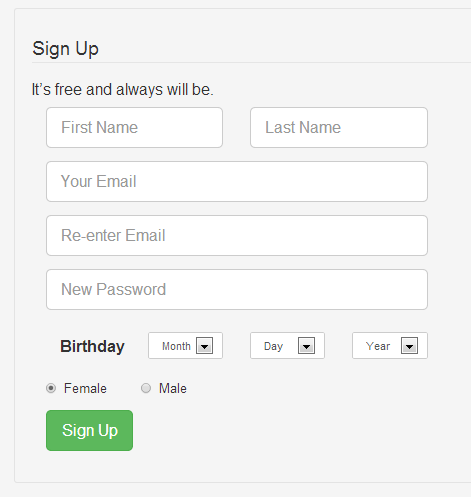
Then the output should look like as shown below.
 Next, we’re going to create a new PHP file to view the process data from sign up page after submitting the form and we will save it as “process_signup.php”. Then add the following code:
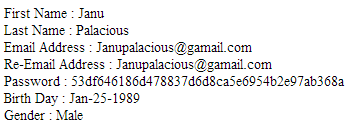
The output of the code above will look like as shown below.
Next, we’re going to create a new PHP file to view the process data from sign up page after submitting the form and we will save it as “process_signup.php”. Then add the following code:
The output of the code above will look like as shown below.
 In this tutorial, we the different class and these are:
If you want to see more of my works, new Source Code or Application and Tutorials Just click here.
In this tutorial, we the different class and these are:
If you want to see more of my works, new Source Code or Application and Tutorials Just click here.
- <!DOCTYPE html>
- <html lang="en">
- <head>
- <meta charset="utf-8">
- <meta content="width=device-width, initial-scale=1.0" name="viewport">
- <meta content="" name="description">
- <meta content="" name="author">
- <title>Sign Up page</title><!-- Bootstrap core CSS -->
- </head>
- <body>
- <div class="container">
- <div class="well">
- <form action="register.php" class="form-horizontal well" method="post">
- <fieldset>
- <legend>Sign Up</legend>
- <h4>It’s free and always will be.</h4>
- <div class="row">
- <div class="col-xs-8">
- <div class="form-group">
- <div class="rows">
- <div class="col-md-8">
- <div class="col-lg-6">
- <input class="form-control input-lg" id="fName" name=
- "fName" placeholder="First Name" type="text">
- </div>
- <div class="col-lg-6">
- <input class="form-control input-lg" id="lName" name=
- "lName" placeholder="Last Name" type="text">
- </div>
- </div>
- </div>
- </div>
- <div class="form-group">
- <div class="rows">
- <div class="col-md-8">
- <div class="col-lg-12">
- <input class="form-control input-lg" id="email" name=
- "email" placeholder="Your Email" type="text">
- </div>
- </div>
- </div>
- </div>
- <div class="form-group">
- <div class="rows">
- <div class="col-md-8">
- <div class="col-lg-12">
- <input class="form-control input-lg" id="reemail" name=
- "reemail" placeholder="Re-enter Email" type="text">
- </div>
- </div>
- </div>
- </div>
- <div class="form-group">
- <div class="rows">
- <div class="col-md-8">
- <div class="col-lg-12">
- <input class="form-control input-lg" id="password"
- name="password" placeholder="New Password" type=
- "password">
- </div>
- </div>
- </div>
- </div>
- <div class="form-group">
- <div class="rows">
- <div class="col-md-8">
- <h4></h4>
- <div class="col-md-3">
- <h4><label class=
- "col-lg-4 control-label">Birthday</label> </h4>
- <div class="col-lg-3">
- <h4><select class="form-control input-sm" name=
- "month">
- <option>
- Month
- </option>
- <!--php code for populating the selectbox for Month -->
- </select> </h4>
- <div class="col-lg-3">
- <h4><select class="form-control input-sm" name=
- "day">
- <option>
- Day
- </option>
- <!--php code for populating the selectbox for Day -->
- </select> </h4>
- <div class="col-lg-3">
- <h4><select class="form-control input-sm"
- name="year">
- <option>
- Year
- </option>
- <!--php code for populating the selectbox for Year -->
- </select> </h4>
- </div>
- </div>
- </div>
- </div>
- </div>
- </div>
- </div>
- <div class="form-group">
- <div class="rows">
- <div class="col-md-4">
- <div class="col-lg-6">
- <div class="radio">
- <label><input checked id="optionsRadios1" name=
- "optionsRadios" type="radio" value=
- "Female">Female</label>
- </div>
- </div>
- <div class="col-lg-6">
- <div class="radio">
- <label><input id="optionsRadios2" name=
- "optionsRadios" type="radio" value="Male">
- Male</label>
- </div>
- </div>
- </div>
- </div>
- </div>
- <div class="form-group">
- <div class="rows">
- <div class="col-md-8">
- <div class="col-lg-12">
- <button class="btn btn-success btn-lg" type=
- "submit">Sign Up</button>
- </div>
- </div>
- </div>
- </div>
- </div>
- </div>
- </fieldset>
- </form>
- </div>
- </div><!-- /container -->
- </body>
- </html>
- foreach ($m as $month) {
- echo '<option value='.$month.'>'.$month.'</option>';
- }
- foreach ($d as $day) {
- echo '<option value='.$day.'>'.$day.'</option>';
- }
- foreach ($years as $yr) {
- echo '<option value='.$yr.'>'.$yr.'</option>';
- }
Next, we’re going to create a new PHP file to view the process data from sign up page after submitting the form and we will save it as “process_signup.php”. Then add the following code:
- echo 'First Name : '.$fName = $_POST['fName'].'<br/>';
- echo 'Last Name : '.$lName = $_POST['lName'].'<br/>';
- echo 'Email Address : '.$email = $_POST['email'].'<br/>';
- echo 'Re-Email Address : '.$reemail = $_POST['reemail'].'<br/>';
- echo 'Birth Day : '.$month = $_POST['month'].'-'. $day = $_POST['day'].'-'. $year = $_POST['year'].'<br/>';
- echo 'Gender : '.$optionsRederadios = $_POST['optionsRadios'];
In this tutorial, we the different class and these are:
- class="form-horizontal well"
- class="rows"
- class="col-xs-8"
- class="form-group"
- class="col-md-8"
- class="col-lg-6"
- class="form-control input-lg"
- class="form-control input-sm"
- class="col-lg-4 control-label"
- class="radio"