How to create a Simple Registration Form Using Modal
Submitted by GeePee on Wednesday, March 18, 2015 - 23:38.
In this tutorial I'm going to show you how to create a simple registration form using Modal. Instead of creating new web page for a registration form, we will use modal so that we could save memory and space in our web directory. To start with application we need to download first a twitter bootstrap framework for this we’ll be using it for this application. After downloading, extract it and copy these three folders such as : css, fonts and js and then we will create a new folder inside the document root called ”Register” then we will paste the copied folder inside this folder.
Here’s the folder structure:
Register/
├── css/
│ ├── bootstrap.css
│ ├── bootstrap.min.css
│ ├── bootstrap-theme.css
│ ├── bootstrap-theme.min.css
├── js/
│ ├── bootstrap.js
│ ├── bootstrap.min.js
└── fonts/
├── glyphicons-halflings-regular.eot
├── glyphicons-halflings-regular.svg
├── glyphicons-halflings-regular.ttf
└── glyphicons-halflings-regular.woff
At this time, we’re going to create a new PHP file called “login.php”. And add the following code:
This code below will display a simple login form, but our main focus is to display a modal for Registration. And this Modal for Registration Form will trigger when the user click the “Not Registered?” link.
When you execute the code in the browser, it will look like as shown below:
 Then we’re going to add the following code in the space provided for Modal, and here’s the following code:
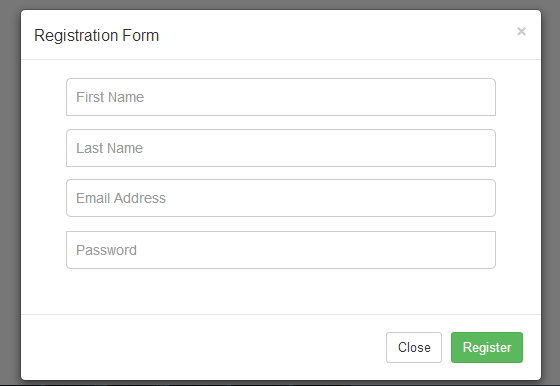
When the code above is executed, it will look like as shown below:
Then we’re going to add the following code in the space provided for Modal, and here’s the following code:
When the code above is executed, it will look like as shown below:
 And here’s the following classes used for this application:
- <!DOCTYPE html>
- <html lang="en">
- <head>
- <meta charset="utf-8">
- <meta content="width=device-width, initial-scale=1.0" name="viewport">
- <meta content="" name="description">
- <meta content="" name="author">
- <title>Signin Template for Bootstrap</title><!-- Bootstrap core CSS -->
- <!-- HTML5 shim and Respond.js IE8 support of HTML5 elements and media queries -->
- <!--[if lt IE 9]>
- <script src="../../assets/js/html5shiv.js"></script>
- <script src="../../assets/js/respond.min.js"></script>
- <![endif]-->
- </head>
- <body>
- <div class="container">
- <form class="form-signin">
- <h2 class="form-signin-heading">Please sign in</h2><input autofocus="" class=
- "form-control" placeholder="Email address" type="text"> <input class="form-control"
- placeholder="Password" type="password"> <label><a data-target="#EditBasicInfo"
- data-toggle="modal" href="" title="Click here to register.">Not Registered?</a></label>
- <button class="btn btn-lg btn-primary btn-block" type="submit">Sign in</button>
- <!-----This area is where we are going to add the code for Modal---->
- </div>
- </div>
- <!-- /container -->
- <!-- Bootstrap core JavaScript
- ================================================== -->
- <script src="assets/js/jquery.js"></script>
- <script src="js/bootstrap.min.js"></script>
- </body>
- </html>
Then we’re going to add the following code in the space provided for Modal, and here’s the following code:
- <!-- Modal -->
- <div class="rows">
- <div class="col-xs-12">
- <div class="modal fade" id="EditBasicInfo" tabindex="-1">
- <div class="modal-dialog">
- <div class="modal-content">
- <div class="modal-header">
- <button class="close" data-dismiss="modal" type="button">×</button>
- <h4 class="modal-title" id="myModalLabel">Registration Form</h4>
- </div>
- <div class="modal-body">
- <div class="form-group">
- <div class="rows">
- <div class="col-md-12">
- <div class="col-lg-12">
- <input class="form-control input-lg" name="fname" placeholder="First Name" type="text">
- </div>
- </div>
- </div>
- </div>
- <div class="form-group">
- <div class="rows">
- <div class="col-md-12">
- <div class="col-lg-12">
- <input class="form-control input-lg" name="fname" placeholder="Last Name" type="text">
- </div>
- </div>
- </div>
- </div>
- <div class="form-group">
- <div class="rows">
- <div class="col-md-12">
- <div class="col-lg-12">
- <input class="form-control input-lg" name="email" placeholder="Email Address" type="email">
- </div>
- </div>
- </div>
- </div>
- <div class="form-group">
- <div class="rows">
- <div class="col-md-12">
- <div class="col-lg-12">
- <input class="form-control input-lg" name="password" placeholder="Password" type="password">
- </div>
- </div>
- </div>
- </div>
- </div>
- <div class="modal-footer">
- <button class="btn btn-default" data-dismiss="modal" type="button">Close</button>
- <button class="btn btn-success" data-dismiss="modal" type="button">Register</button>
- </div><!-- </form>-->
- </div><!-- /.modal-content -->
- </div><!-- /.modal-dialog -->
- </form>
- </div><!-- /.modal -->
And here’s the following classes used for this application:
- class="container"
- class="form-signin"
- class="form-signin-heading"
- class="form-control"
- class="btn btn-lg btn-primary btn-block"
- class="rows"
- class="col-xs-12"
- class="modal fade"
- class="modal-dialog"
- class="modal-content"
- class="modal-header"
- class="close"
- class="modal-title"
- class="modal-body"
- class="form-group"
- class="form-control input-lg"
- class="modal-footer"
- class="btn btn-default"
- class="btn btn-success"