Creating Image Gallery with HTML and CSS
Submitted by mehfuza on Tuesday, September 3, 2013 - 08:33.
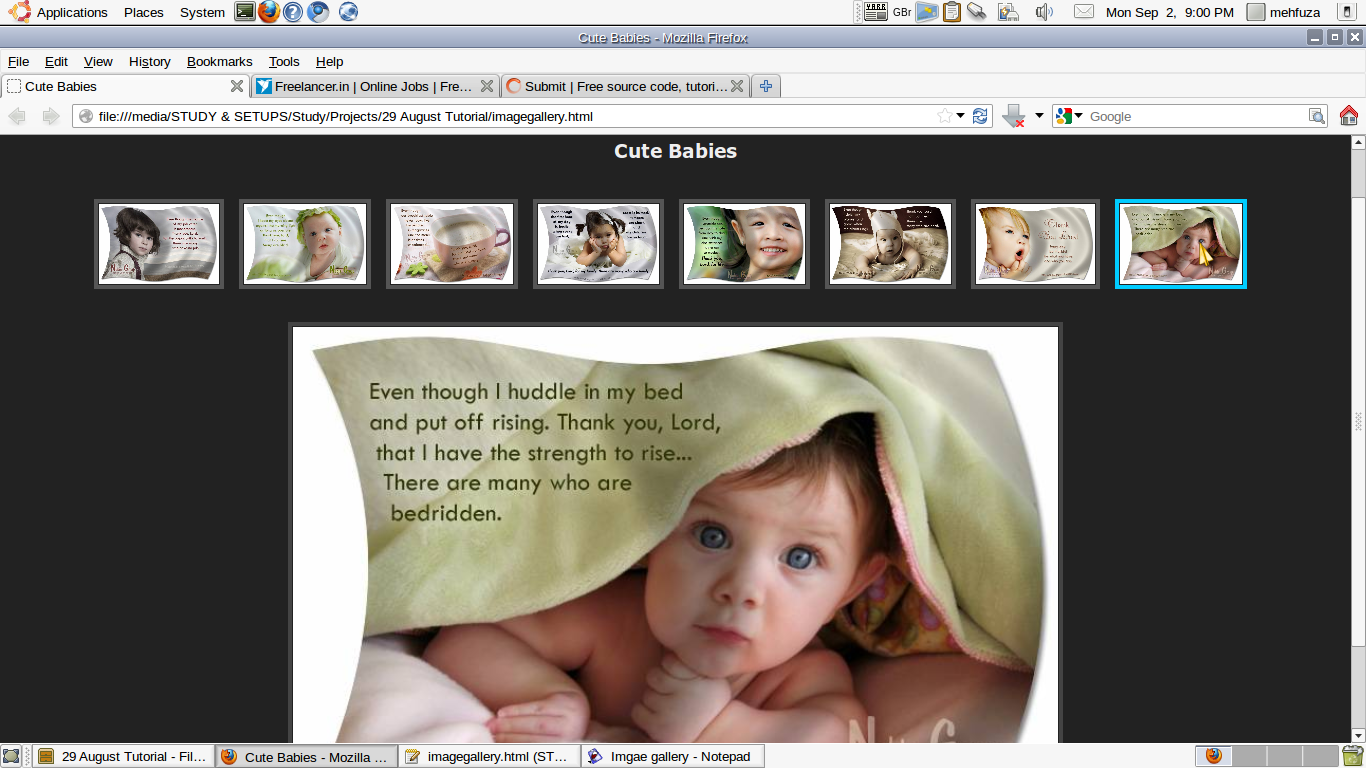
Images gallery for web pages can be created with plain HTML, JavaScript, and CSS. Easiest one is with HTML but that's not good if we want to add new images. Image Gallery with HTML and CSS is quite easy and we can add new images to the gallery with ease. It looks beautiful too by using CSS. This program creates the thumbnails and displays the enlarged image when a mouse is moved over a thumbnail.
Following are the steps to create the Image Gallery.
Step 2: Style for displaying Title.
Step 3: Style for displaying thumbnail.
This style is used for creating the thumbnails i.e displaying images in small size. Margin property of CSS is used to specify the amount of space to be left between a border and the image or any content around it. It is specified with four values as top, right, left, bottom(top margin, right margin etc) or if the the margin should be equal on all the four sides then it can be specified with single value. Same rule is used for specifying padding which is nothing but space between border and the content around which the border is drawn.
Next is the CSS style when a mouse is moved over the thumbnail. The color is changed and cursor appearance is changed to pointer.
Step 5: Style for the enlarged image
For the enlarged image height is changed to 500 px and border is drawn around the image. This class name used here is preview.
Part 1: Styling with Cascading Style Sheet.
This code can be written inside or in external css file. Step 1: Style for the document body.- body {
- background: #222; //changes background color of the body
- margin-top: 20px; // top margin of the document expressed in pixel.
- }
- h3 { //title is displayed using <h3> tag
- color: #eee; //color of the title
- font-family: Verdana; //font family for the Title
- }
- .thumbnails img { //thumbnails is the name of style class for <img> tag.
- height: 80px;
- border: 4px solid #555; //border around the thumbnail is 4 pixel wide and color used is the one with 555 color code.
- padding: 1px; // amount of space left between the image edge and it's border
- margin: 0 10px 10px 0; // amount of space left between a border and the image or any content around it.
- }
- .thumbnails img:hover {
- border: 4px solid #00ccff;
- cursor:pointer;
- }
Part 2: Adding and Displaying the Images:
One main division is created inside the document and other two divisions are created inside the main division for thumbnails and images. This division is aligned in the center of the web document. Step 1: Adding Title For displaying title tag and onmouseover attribute to specify that images should be enlarged when mouse is moved over the thumbnail. Id is applied to each image thumbnail.
When mouse is moved over the thumbnail, value of src attribute of the image(
![]()
Comments
Photo gallery
Hi guys, I need your advice: how to create a gallery with an image title and description? It has to have a list of pictures on the top, and when mouse is moving around (onMouseOver)the pointed picture has to have a biggest size, a title, and description at the middle of the screen. The main part is done - pictures are changing, but stuck with title and description. :(