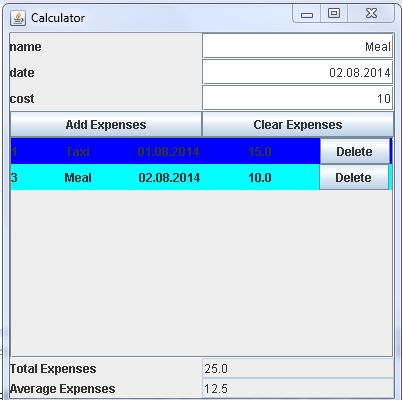
Expenses calculator
Submitted by pavel7_7_7 on Friday, September 5, 2014 - 08:19.
Java swing library is a library that is used for creation of java application with Graphical User Interface (GUI).
The whole project will consist of two classes:
The first class will be the application class that will hold the GUI of the application:
The second class will be a class, that will represent an expense panel with the information:
An expense record is represented by the following data:
These fields will be represented in this panel by the Labels:
Also, there is an option to delete an expense record by pressing a button:
An array of colors is used to fill every expense panel with different color:
The constructor of this class initializes fields and sets data to the labels and adds labels to the panel:
The array of colors is initialized with ten different colors:
The interaction with the main class ti send the cost of the expense is done by a public method:
The background of the panel is set in
The last thing that should be implemented is the delete option:
Now we can implement the application class the will contain the data of all expenses.
The list of all GUI elements that will display the data and the information to add expenses is represented by private fields:
The constructor of this class initializes all the variables. The first step is to set size of the frame, its title and option that the from should me closed if the exit sign is pressed:
The initialization of the elements it's done by adding text to all the labels and placing them to the different panels. The data of an expense is entered in text fields and it's added by pressing
As you can see, there two buttons that have ActionListeners.
Let's take a look on the handling of pressing
Adding an expense operation is performed in user defined method:
An expense is creating b getting data from the input text fields. After this, it's added to the screen and to the array of all expenses.
The clearExpenses method simply removes all the data from the array and expense panel:
The updateStats method get the total cost of all expenses, calculates average expense and displays these values in the text fields:
To start any java application we need to have a main method. In this case, the main method simply creates and start an object of the Expense calculator application:
- JLabel nameLabel,
- dataLabel,
- costLabel,
- numberLabel;
- //delete
- JButton delete;
- //array of colors for background
- initColors();//initializing colors for expenses
- //save data
- name = _name;
- data = _data;
- cost = _cost;
- number = _number;
- //creating labels
- delete.addActionListener(this);//action listener for delete
- //horizontal box layout for panel
- add(numberLabel);
- //adding glue
- add(nameLabel);
- //adding glue
- add(dataLabel);
- //adding glue
- add(costLabel);
- //adding glue
- add(delete);
- }
- /**
- * init the array of colors
- */
- private void initColors() {
- //initialize colors
- }
- public float getCost(){
- return cost;
- }
public void paintComponent(Graphics g)
- //setting the color of expense according to it's number
- this.setBackground(colors[number%10]);
- super.paintComponent(g);
- }
- @Override
- if(e.getSource() == delete){
- //delete from panel3
- parent.remove(this);
- //getting the Expenses class to update stats and modify vector
- Expenses e1 = (Expenses) parent.getParent().getParent().getParent().getParent().getParent().getParent().getParent();
- if(number!=0)
- e1.allExpenses.remove(number - 1);
- else
- e1.allExpenses.remove(0);
- for(int i = 0; i != e1.allExpenses.size();++i){
- e1.allExpenses.get(i).number = i;//setting new numbers
- }
- e1.updateStats();//update statistics
- e1.validate();//validate data
- e1.repaint();//repaint
- }
- //private fields
- JScrollPane sp;
- ArrayList<ExpensesPanel> allExpenses; //vector to hold expenses
- //size,title, exit
- setSize(400,400);
- setTitle("Calculator");
- setDefaultCloseOperation(EXIT_ON_CLOSE);
Add Expensebutton:
- //panel 1
- getContentPane().add(panel1);
- //panel 2
- panel1.add(panel2);
- // creating labels
- //creating the text fields
- //aligning the textfields to the right
- //adding labels & textfield to panel2
- //first row
- panel2.add(name_label); panel2.add(name_tf);
- //second row
- panel2.add(date_label); panel2.add(date_tf);
- //third row
- panel2.add(cost_label); panel2.add(cost_tf);
- //create button(add and clear)
- panel2.add(button1add);
- panel2.add(button2clear);
- //panel 3,vertical layout,scrollpane
- //JTextArea ta = new JTextArea();
- //panel3.add(sp);
- panel1.add(sp);
- //panel 4, labels total exp and ave exp, with uneditable txtfield
- panel1.add(panel4);
- //disable textfields
- average_tf.setEditable(false);
- total_tf.setEditable(false);
- // add new label to panel4 and txtfield
- panel4.add(total_exp); panel4.add(total_tf);
- panel4.add(average_exp); panel4.add(average_tf);
- //set max size of panel4
- //add action listeners to buttons
- button1add.addActionListener(this);
- button2clear.addActionListener(this);
- //vector for expenses
- allExpenses = new ArrayList<ExpensesPanel>();
Add Expensebutton and
clear Expensesbutton:
- @Override
- // TODO Auto-generated method stub
- //add expense
- if(e.getSource()==button1add){
- addExpense();
- updateStats();
- }
- //clear list
- if(e.getSource()==button2clear){
- clearExpense();
- updateStats();
- }
- }
- private void addExpense() {
- //creating an Expense
- ExpensesPanel newExpense = new ExpensesPanel(name_tf.getText(),date_tf.getText(),Float.parseFloat(cost_tf.getText()),allExpenses.size()+1);
- allExpenses.add(newExpense);//add expense to vector
- panel3.add(newExpense);//adding new expense to pannel3
- //update the stats
- updateStats();
- panel3.validate();//repaint panel 3
- panel3.repaint();
- }
- private void clearExpense() {
- // TODO Auto-generated method stub
- for(int i = 0; i != allExpenses.size(); ++i){
- panel3.remove(allExpenses.get(i));//remove data from vector
- }
- //repaint panel without data
- allExpenses.clear();//clear
- panel3.validate();//validate data
- panel3.repaint();//repaint panel
- }
- void updateStats(){
- float total = 0;//total sum is initially 0
- for(int i = 0; i != allExpenses.size(); ++i){
- total += allExpenses.get(i).getCost();//ading to total cost of all expenses
- }
- }
- // TODO Auto-generated method stub
- Expenses my = new Expenses();//creates frame
- my.setVisible(true);//setting this frame visible
- }