Creating an Excel Application in C#
Submitted by donbermoy on Wednesday, July 23, 2014 - 00:40.
This is a tutorial wherein we will going to create a program that creates an excel application using C#.
This tutorial uses Microsoft.Office.Interop.Excel in our Windows Form Application.
1. Let's start with creating a Windows Form Application in C# for this tutorial by following the following steps in Microsoft Visual Studio: Go to File, click New, and choose Windows Form Application.
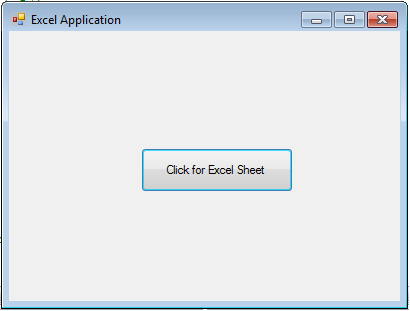
2. Insert a Button control named Button1 in the form. Design must be like this:
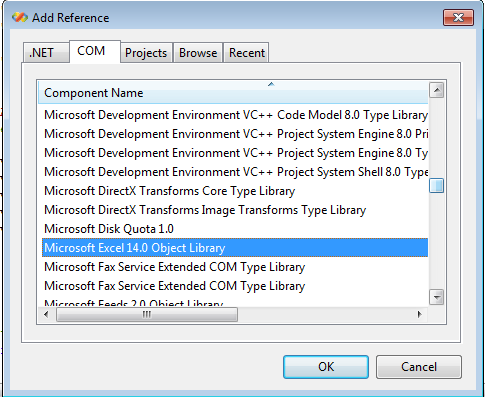
 3. Add a reference to Microsoft Excel Object Library to your project. To do this follow the image below. Note: this is really an important library to add an excel file.
On the COM tab, locate Microsoft Excel Object Library and then click Select Microsoft Excel 14.0 Object Library. Then Click OK. Follow this image below.
On the COM tab, locate Microsoft Excel Object Library and then click Select Microsoft Excel 14.0 Object Library. Then Click OK. Follow this image below.
3. Add a reference to Microsoft Excel Object Library to your project. To do this follow the image below. Note: this is really an important library to add an excel file.
On the COM tab, locate Microsoft Excel Object Library and then click Select Microsoft Excel 14.0 Object Library. Then Click OK. Follow this image below.
On the COM tab, locate Microsoft Excel Object Library and then click Select Microsoft Excel 14.0 Object Library. Then Click OK. Follow this image below.
 4. Put the following code in your code view:
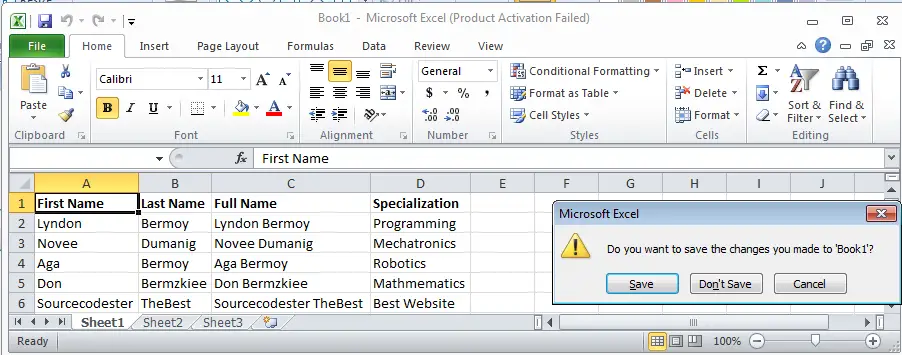
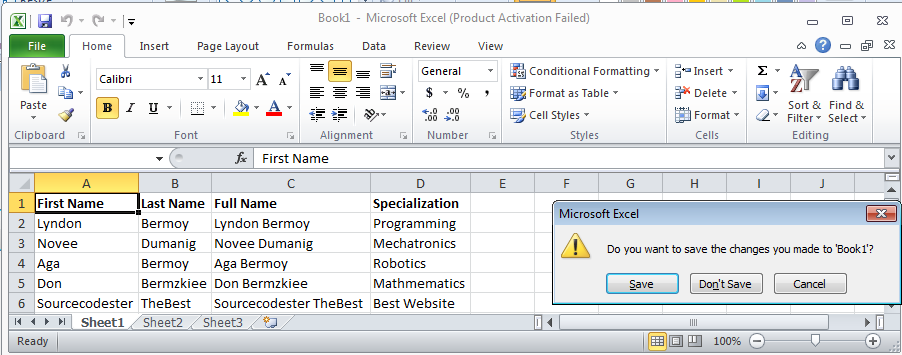
Output:
4. Put the following code in your code view:
Output:
 For more inquiries and need programmer for your thesis systems in any kind of programming languages, just contact my number below.
Best Regards,
Engr. Lyndon Bermoy
IT Instructor/System Developer/Android Developer/Freelance Programmer
If you have some queries, feel free to contact the number or e-mail below.
Mobile: 09488225971
Landline: 826-9296
E-mail:[email protected]
Add and Follow me on Facebook: https://www.facebook.com/donzzsky
Visit and like my page on Facebook at: https://www.facebook.com/BermzISware
For more inquiries and need programmer for your thesis systems in any kind of programming languages, just contact my number below.
Best Regards,
Engr. Lyndon Bermoy
IT Instructor/System Developer/Android Developer/Freelance Programmer
If you have some queries, feel free to contact the number or e-mail below.
Mobile: 09488225971
Landline: 826-9296
E-mail:[email protected]
Add and Follow me on Facebook: https://www.facebook.com/donzzsky
Visit and like my page on Facebook at: https://www.facebook.com/BermzISware
3. Add a reference to Microsoft Excel Object Library to your project. To do this follow the image below. Note: this is really an important library to add an excel file.
On the COM tab, locate Microsoft Excel Object Library and then click Select Microsoft Excel 14.0 Object Library. Then Click OK. Follow this image below.
On the COM tab, locate Microsoft Excel Object Library and then click Select Microsoft Excel 14.0 Object Library. Then Click OK. Follow this image below.
4. Put the following code in your code view:
- using Microsoft.Office.Interop.Excel;
- using System.Windows.Forms;
- public class Form1
- {
- private void Button1_Click(object sender, EventArgs e)
- {
- Application appXL = default(Application);
- Workbook wbXl = default(Workbook);
- Worksheet shXL = default(Worksheet);
- Range raXL = default(Range);
- // Start Excel and get Application object.
- appXL = CreateObject("Excel.Application");
- appXL.Visible = true;
- // Add a new workbook.
- wbXl = appXL.Workbooks.Add;
- shXL = wbXl.ActiveSheet;
- // Add table headers going cell by cell.
- shXL.Cells(1, 1).Value = "First Name";
- shXL.Cells(1, 2).Value = "Last Name";
- shXL.Cells(1, 3).Value = "Full Name";
- shXL.Cells(1, 4).Value = "Specialization";
- // Format A1:D1 as bold, vertical alignment = center.
- object with_1 = shXL.Range("A1", "D1");
- with_1.Font.Bold = true;
- with_1.VerticalAlignment = XlVAlign.xlVAlignCenter;
- // Create an array to set multiple values at once.
- students[0, 0] = "Lyndon";
- students[0, 1] = "Bermoy";
- students[1, 0] = "Novee";
- students[1, 1] = "Dumanig";
- students[2, 0] = "Aga";
- students[2, 1] = "Bermoy";
- students[3, 0] = "Don";
- students[3, 1] = "Bermzkiee";
- students[4, 0] = "Sourcecodester";
- students[4, 1] = "TheBest";
- // Fill A2:B6 with an array of values (First and Last Names).
- shXL.Range("A2", "B6").Value = students;
- // Fill C2:C6 with a relative formula (=A2 & " " & B2).
- raXL = shXL.Range("C2", "C6");
- raXL.Formula = "=A2 & \" \" & B2";
- // Fill D2:D6 values.
- shXL.Cells(2, 4).Value = "Programming";
- shXL.Cells(3, 4).Value = "Mechatronics";
- shXL.Cells(4, 4).Value = "Robotics";
- shXL.Cells(5, 4).Value = "Mathmematics";
- shXL.Cells(6, 4).Value = "Best Website";
- // AutoFit columns A:D.
- raXL = shXL.Range("A1", "D1");
- raXL.EntireColumn.AutoFit();
- // Make sure Excel is visible and give the user control
- // of Excel's lifetime.
- appXL.Visible = true;
- appXL.UserControl = true;
- // Release object references.
- raXL = null;
- shXL = null;
- wbXl = null;
- appXL.Quit();
- appXL = null;
- return;
- Err_Handler:
- MsgBox(Err.Description, vbCritical, "Error: " + Err.Number);
- }
- }
For more inquiries and need programmer for your thesis systems in any kind of programming languages, just contact my number below.
Best Regards,
Engr. Lyndon Bermoy
IT Instructor/System Developer/Android Developer/Freelance Programmer
If you have some queries, feel free to contact the number or e-mail below.
Mobile: 09488225971
Landline: 826-9296
E-mail:[email protected]
Add and Follow me on Facebook: https://www.facebook.com/donzzsky
Visit and like my page on Facebook at: https://www.facebook.com/BermzISware