Simple Change View Using AngularJS
Submitted by razormist on Tuesday, February 14, 2017 - 17:54.
Language
In this tutorial, we will create a Simple Change View Using AngularJS. AngularJs is a structural framework for dynamic web application for a better programming tools. Its extend the culture of HTML syntax to make the application clearly and interactive. So let's start coding...
Creating The Mark Up Form
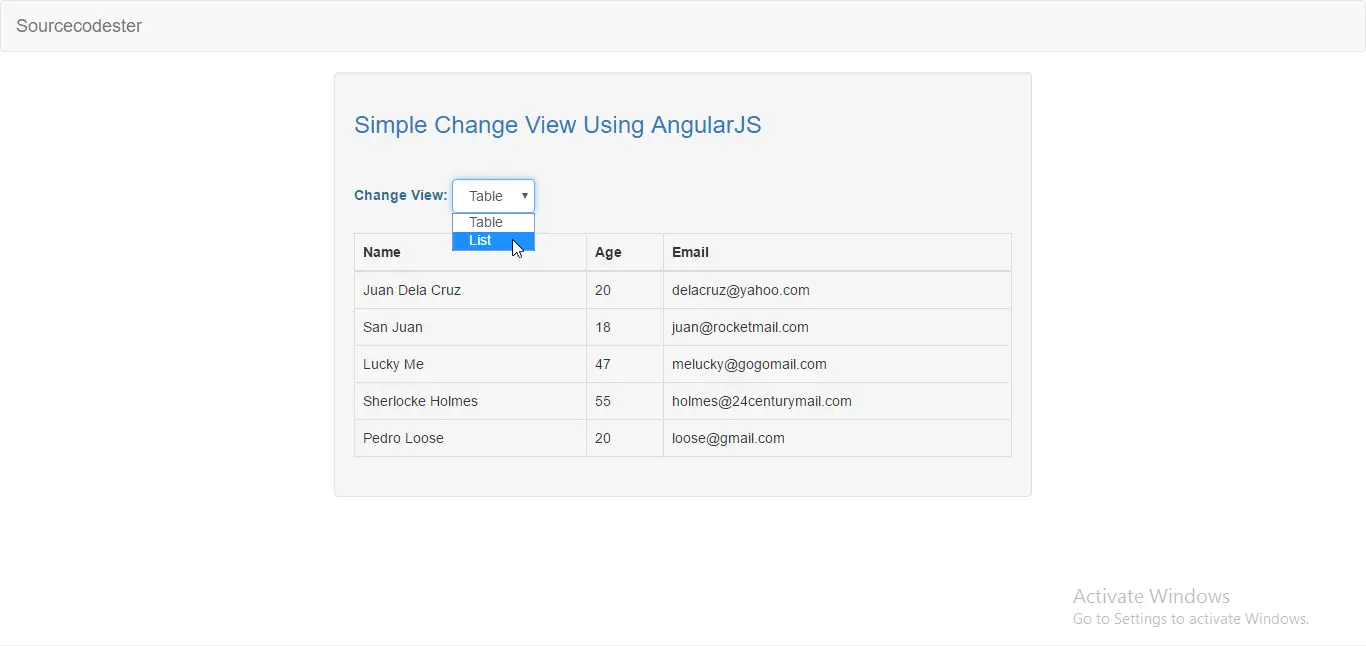
This is where the value is displayed. To create a form open any kind of text editor(notepad++, etc..). Then copy/paste the code below and name it "index.html".
The code above will display the data from the angularjs directives. The ng-include directive includes HTML from an external file.
Note: ng-include won't work for cross-domain requests on all browsers and for file. The ng-include doesn't worked well in chrome, but in firefox it totally working fine.
Table Data
This is the data in a table view. Copy/paste the code below then name it "member_table.html".
The code above will display the data when the directives is called.
There you have it we created a simple change view using AngularJS. I hope that this tutorial help you. For more updates and tutorials just kindly visit this site. Enjoy Coding!!
- <!DOCTYPE html>
- <html lang = "en">
- <head>
- <meta charset = "UTF-8" name = "viewport" content = "width=device-width, initial-scale=1" />
- <link rel = "stylesheet" type = "text/css" href = "css/bootstrap.css"/>
- </head>
- <body ng-app = "myModule">
- <nav class = "navbar navbar-default">
- <div class = "container-fluid">
- </div>
- </nav>
- <div class = "row">
- <div class = "col-md-6 well" ng-controller = "myController">
- <hr style - "border-top:1px dotted #000;"/>
- <div class = "form-inline">
- <select class = "form-control" ng-model = "memberView">
- </select>
- </div>
- <br />
- </div>
- </div>
- </body>
- </html>
List Data
This is the data of the list view. To create this copy/paste the code below then name it "member_list.html".
AngularJs Directives
This is where the data is stored in an array, and return the value to the form when the directives is called. Copy/paste the code below then name it "app.js".
- var app = angular.module("myModule", [])
- .controller("myController", function($scope){
- var members = [
- ];
- $scope.members = members;
- $scope.memberView = "member_table.html";
- });
Note: Due to the size or complexity of this submission, the author has submitted it as a .zip file to shorten your download time. After downloading it, you will need a program like Winzip to decompress it.
Virus note: All files are scanned once-a-day by SourceCodester.com for viruses, but new viruses come out every day, so no prevention program can catch 100% of them.
FOR YOUR OWN SAFETY, PLEASE:
1. Re-scan downloaded files using your personal virus checker before using it.
2. NEVER, EVER run compiled files (.exe's, .ocx's, .dll's etc.)--only run source code.